10 Pendant Light DIY Ideas to Add Drama to Any Room

Are you tired of boring, generic lighting that fails to make a statement? The right pendant light can instantly transform any room from ordinary to extraordinary. Creating your own custom pendant lights gives you complete control over style, size, and ambiance.
These 10 pendant light DIY ideas to add drama to any room will inspire your next creative project. Whether you prefer industrial chic or bohemian vibes, there’s something here for every taste and skill level. Let’s dive in…
1. Geometric Wooden Frame

- Wooden dowels or craft sticks
- Wood glue and clamps
- Pendant light cord kit
- LED bulb
- Wood stain or paint
The geometric wooden frame pendant creates stunning visual interest through clean lines and modern angles. You can construct various shapes including cubes, hexagons, or abstract polyhedrons. This style works beautifully over dining tables or in entryways.
Start by cutting your wooden dowels to equal lengths for symmetrical designs. Connect them using wood glue at precise angles. Allow adequate drying time before handling.
Apply your chosen stain or paint finish once assembled. Thread your pendant cord through the center and secure the bulb socket.
2. Woven Basket Beauty

- Wicker or rattan basket
- Pendant light kit
- Wire cutters
- Spray paint (optional)
Transform an ordinary wicker basket into a stunning bohemian pendant light. This project takes under thirty minutes and delivers incredible results. The woven texture casts beautiful shadow patterns on surrounding walls.
Cut a small hole in the basket bottom for your pendant cord to pass through. Secure the socket inside using the kit hardware. Choose baskets with interesting weave patterns for maximum visual impact.
Consider spray painting your basket in bold metallic tones for a modern twist. Gold, copper, or matte black create sophisticated effects. If you enjoy fun crafts to make at home, this project is perfect for beginners.
3. Industrial Pipe Statement

- Black iron pipes and fittings
- Edison bulb sockets
- Electrical wire
- Ceiling canopy kit
- Pipe wrench
The industrial pipe pendant brings urban loft aesthetics into any space. Black iron pipes create bold masculine energy while remaining surprisingly versatile. This style pairs wonderfully with exposed brick or concrete elements.
Assemble your pipe configuration before wiring for easier handling. Thread electrical wire through the pipe interior. Connect multiple bulb sockets for cluster pendant designs.
Use proper vintage Edison bulbs to complete the industrial aesthetic. These exposed filament bulbs provide warm ambient lighting. Ensure all electrical connections meet safety codes.
4. Colorful Glass Jar Cluster

- Mason jars in various sizes
- Glass stain or spray tint
- Pendant cord kits (multiple)
- Wooden mounting board
- LED candelabra bulbs
Create a breathtaking glass jar cluster that floods your room with colored light. Tinting jars in different hues produces magical rainbow effects. This design becomes an instant conversation piece.
Apply translucent glass stain to clean, dry jars in your chosen palette. Blues and greens create calming effects while reds and oranges energize. Allow complete curing before assembly.
Drill holes through jar lids for pendant cords to pass through. Vary hanging heights for dynamic visual interest. Mount all cords to a single ceiling board for unified installation.
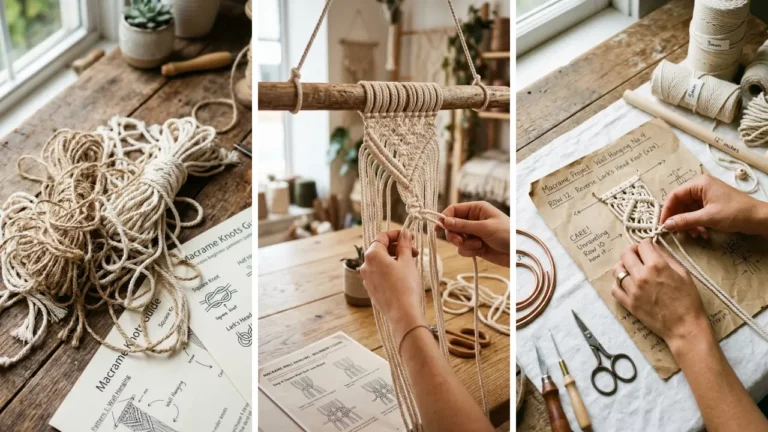
5. Elegant Macrame Hanger

- Macrame cord (cotton or jute)
- Metal or wooden ring
- Glass globe shade
- Pendant light kit
- Scissors
The macrame pendant hanger adds instant bohemian warmth to bedrooms and living spaces. Knotting techniques range from simple to intricate based on your skill level. Natural fiber textures soften modern interiors beautifully.
Start by attaching multiple cord lengths to your ring using lark’s head knots. Work basic square knots or spiral patterns downward. Create a cradle at the bottom to hold your glass shade securely.
Choose natural cotton cord for soft draping or jute for rustic texture. This project makes excellent DIY handmade gifts for housewarming celebrations. Personalize with dyed cord or added beads.
6. Concrete Modern Minimalist

- Quick-set concrete mix
- Plastic bottle mold
- Pendant socket
- Cooking spray
- Sandpaper
A concrete pendant shade delivers stunning minimalist impact with industrial edge. The raw material texture creates sophisticated visual weight. This project requires patience but produces professional results.
Cut a plastic bottle to create your mold shape. Apply cooking spray liberally inside for easy release. Position your socket holder in the center before pouring.
Pour concrete mix slowly to prevent air bubbles. Allow full curing time specified on your product. Sand edges smooth and seal if desired for finished appearance.
7. Feathered Fantasy Globe

- Paper lantern or wire frame
- Craft feathers (goose or ostrich)
- Hot glue gun
- Pendant cord kit
- LED bulb
The feathered globe pendant creates dreamy, ethereal ambiance in bedrooms or nurseries. Soft feathers diffuse light while adding whimsical texture. This glamorous design rivals expensive designer versions.
Begin gluing feathers at the bottom of your globe, overlapping each row slightly. Work upward in horizontal bands for even coverage. Use consistent feather sizes for professional appearance.
White goose feathers create angelic softness while colored ostrich feathers add drama. Ensure your LED bulb remains cool to prevent damage. This light makes a stunning bedroom focal point.
8. Recycled Wine Bottle

- Empty wine bottles
- Glass bottle cutter
- Sandpaper or grinding stone
- Pendant cord kit
- Safety glasses
Transform empty wine bottles into stunning pendant lights with character. Different bottle colors create varied lighting moods and effects. This eco-friendly project recycles materials beautifully.
Score around your bottle using a glass cutter tool at desired height. Apply alternating hot and cold water to create a clean break. Sand all edges thoroughly to eliminate sharpness.
Thread your pendant cord through the bottle neck opening. Create clusters using different colored bottles for dramatic effect. If you love home craft projects quick and satisfying, this one delivers.
9. Beaded Chandelier Cascade

- Wire wreath frame or embroidery hoops
- Crystal or wooden beads
- Jewelry wire
- Pendant light kit
- Wire cutters and pliers
A beaded chandelier cascade adds glamorous sparkle to any room instantly. Dangling beads catch and reflect light beautifully. This design works wonderfully in dining rooms or entryways.
String beads onto jewelry wire in varying lengths for cascading effect. Attach wire strands around your frame at regular intervals. Layer multiple tiers for fuller, more dramatic appearance.
Choose crystal beads for elegant sparkle or wooden beads for bohemian warmth. Mix bead sizes and shapes for added visual interest. This stunning fixture elevates your entire room design.
10. Rope-Wrapped Nautical

- Sisal or manila rope
- Balloon or beach ball form
- White glue diluted with water
- Pendant light kit
- Petroleum jelly
The rope-wrapped nautical pendant brings coastal charm to kitchens and sunrooms. Natural rope texture adds warmth while maintaining clean lines. This style complements farmhouse and beach house aesthetics perfectly.
Coat your balloon form with petroleum jelly for easy removal. Dip rope in diluted glue and wrap around the form carefully. Create open spacing or tight wraps based on your lighting preference.
Allow complete drying before deflating your balloon. Install your pendant kit through the top opening. Consider pairing this style with DIY wall art ideas for living room for cohesive coastal decor.
These 10 pendant light DIY ideas to add drama to any room prove that stunning lighting doesn’t require expensive purchases. Each project allows you to customize colors, sizes, and styles to match your unique space. Grab your supplies and start creating today!
Share your favorite pendant light ideas in the comments below. Which project will you tackle first? Rate this post and inspire fellow DIY enthusiasts!