How to Pour a Two-Color Layered Candle for a Stunning Effect
Have you ever admired those gorgeous two-toned candles in boutique shops and wondered if you could make them yourself? The good news is, learning how to pour a two-color layered candle for a stunning effect is much easier than you might think. With the right techniques and a bit of patience, you can create professional-looking layered candles that rival anything you’d find in expensive home decor stores.
Whether you’re looking to craft personalized gifts or simply want to add a unique touch to your home ambiance, two-color layered candles offer endless creative possibilities. In this comprehensive guide, you’ll discover everything from essential supplies to pro tips that ensure crisp, clean layers every single time. By the end, you’ll have the confidence to experiment with different color combinations and create candles that truly wow.
Ready to transform simple wax into stunning works of art? Let’s dive into the fascinating world of layered candle making.
Essential Supplies for Pouring a Two-Color Layered Candle

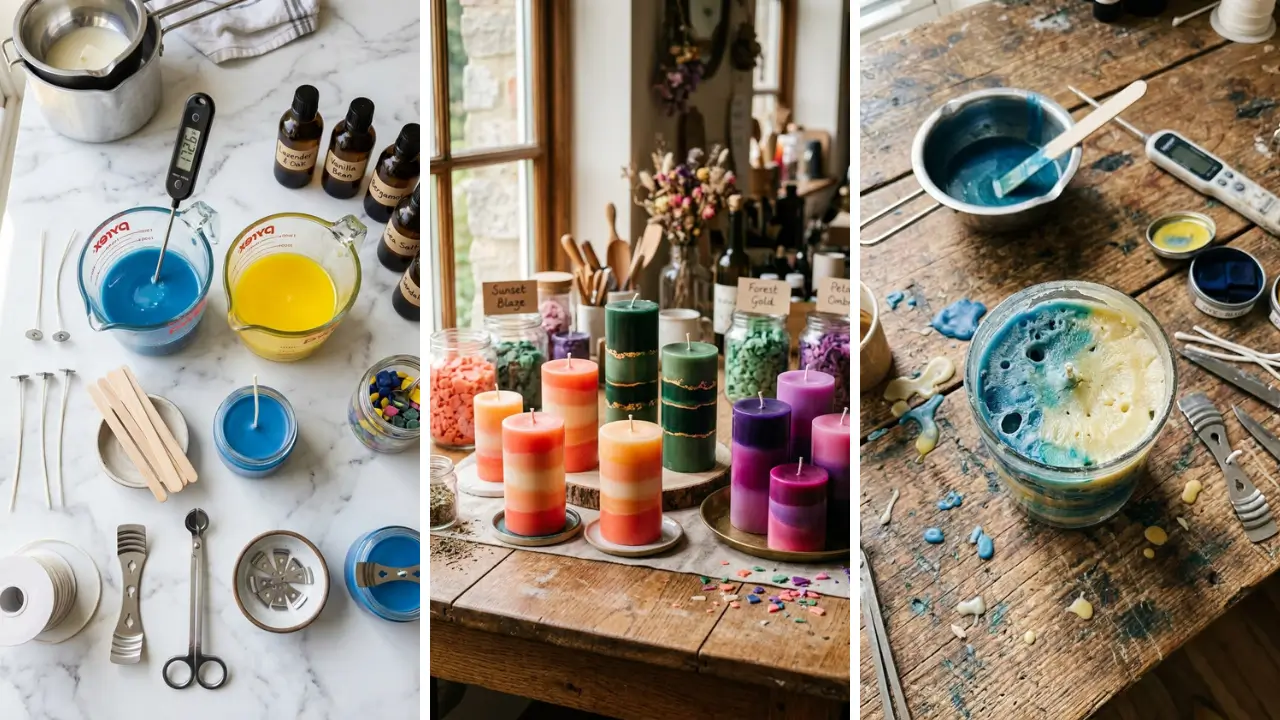
Before you begin your candle-making journey, gathering the right materials is crucial for success. Having everything prepared and within reach makes the process smoother and helps prevent mistakes that could ruin your layers. Here’s what you’ll need to get started:
- Candle wax – Soy wax, paraffin, or a blend works well for layered candles
- Two candle dyes – Choose contrasting or complementary colors
- Heat-resistant containers – Glass jars or metal tins
- Pre-tabbed wicks – Sized appropriately for your container
- Double boiler or melting pot – For safely melting wax
- Thermometer – Temperature control is key for clean layers
- Fragrance oils – Optional but recommended
- Wick centering device – Keeps your wick perfectly straight
If you’re just getting started with crafting, you might find some of these supplies at your local craft store. Many beginners discover that exploring dollar store crafts ideas can help stretch their budget while still achieving beautiful results.
Understanding Temperature: The Secret to Perfect Layers

Temperature control is arguably the most critical factor when learning how to pour a two-color layered candle for a stunning effect. Pour too hot, and your layers will blend together. Pour too cool, and you’ll get uneven surfaces and poor adhesion between layers.
Optimal Pouring Temperatures
For soy wax, aim to pour your first layer between 135-145°F (57-63°C). This temperature allows the wax to settle smoothly without creating sinkholes. For paraffin wax, slightly higher temperatures around 160-170°F work better.
The waiting period between layers is equally important. Your first layer should be cool to the touch but still slightly warm—typically around 90-100°F. This creates the perfect surface for your second layer to bond without mixing.
Why Temperature Matters

Think of it like building a house. If your foundation isn’t solid, everything above it becomes unstable. The same principle applies to layered candles.
A properly cooled first layer provides a stable base that keeps your colors distinct and beautiful. Investing in a good thermometer isn’t optional—it’s essential. Guessing temperatures leads to inconsistent results and frustrated crafters.
Step-by-Step Guide to Pouring Your Two-Color Layered Candle

Now that you understand the basics, let’s walk through the complete process. Following these steps carefully will help you master how to pour a two-color layered candle for a stunning effect on your very first try.
Step 1: Prepare Your Container
Start by securing your wick to the bottom center of your container. Use a wick sticker or a small dab of hot glue. Place your wick centering device on top to keep everything aligned throughout the pouring process.
Pro tip: Warm your container slightly before pouring. This helps prevent adhesion issues and creates a smoother finish on the sides of your candle.
Step 2: Melt Your First Color
Using your double boiler, melt enough wax for your first layer. Once completely melted, add your dye and stir thoroughly. If using fragrance, add it now and stir for at least two minutes to ensure even distribution.
Remember to check your temperature before pouring. Patience here pays off tremendously in the final result.
Step 3: Pour the First Layer
Pour slowly and steadily down the side of your container, not directly onto the wick. This technique minimizes air bubbles and creates a more polished look. Fill to your desired height—typically halfway for a balanced two-color design.
Allow this layer to cool completely. Depending on your environment, this takes anywhere from 2-4 hours. Resist the temptation to speed this up by refrigerating, as rapid cooling can cause cracking.
Step 4: Prepare Your Second Color
While your first layer sets, prepare your second color. Melt the wax, add your contrasting dye, and any fragrance you desire. Having this ready ensures you can pour at the optimal moment.
Step 5: Pour the Second Layer
Test the first layer’s surface—it should be firm but slightly tacky. This slight warmth helps the layers bond together. Pour your second color at the recommended temperature, again going slowly down the side.
Many crafters find that candle making becomes one of their favorite fun crafts to make at home because of how meditative and rewarding the process feels.
Step 6: Finishing Touches
Allow your candle to cure for at least 24 hours before trimming the wick to 1/4 inch. For optimal scent throw, let the candle cure for 1-2 weeks before burning.
Creative Color Combinations for Stunning Layered Candles

Choosing the right color combinations can elevate your layered candles from nice to absolutely breathtaking. The key is understanding color theory and how different shades interact visually.
Classic Combinations That Always Work
Complementary colors create dramatic contrast. Think blue and orange, purple and yellow, or red and green. These combinations catch the eye and make each layer pop distinctly.
Analogous colors offer a more subtle, sophisticated look. Try combining shades that sit next to each other on the color wheel—like coral and pink, or teal and blue. This creates a gradient effect that feels elegant and cohesive.
Seasonal Inspirations
Match your candles to seasons or holidays for extra impact:
- Spring: Lavender and mint green
- Summer: Coral and turquoise
- Fall: Burnt orange and cream
- Winter: Deep red and gold, or navy and silver
These seasonal candles make excellent DIY handmade gifts that friends and family will treasure.
Troubleshooting Common Layered Candle Problems

Even experienced candle makers encounter issues occasionally. Knowing how to prevent and fix common problems saves time, materials, and frustration.
Layers Blending Together
If your colors are mixing at the boundary, you’re likely pouring the second layer while the first is still too warm. Wait longer between pours, and ensure your second layer wax isn’t too hot.
Visible Lines or Gaps Between Layers
This happens when the first layer cools too much before adding the second. The layers don’t bond properly, creating visible separation. To prevent this, pour your second layer while the first is still slightly warm to the touch.
Uneven Layer Heights
Measure your wax before melting to ensure consistent layer sizes. Keeping your container on a level surface during pouring and cooling is equally important.
Air Bubbles in the Wax
Stirring too vigorously or pouring too quickly introduces air. Pour slowly and tap your container gently after each pour to release trapped bubbles.
Advanced Techniques for More Dramatic Effects

Once you’ve mastered the basic two-color layered candle, you can explore more creative approaches that take your creations to the next level.
Angled Layers
Create diagonal layers by propping your container at an angle during pouring and cooling. This technique produces a striking geometric effect that looks incredibly professional.
Multiple Thin Layers
Instead of two thick layers, try creating several thinner layers for a rainbow or ombre effect. This requires more patience but produces absolutely stunning results.
Textured Top Layer
Pour your top layer at a slightly lower temperature to create a rustic, textured surface. This technique adds visual interest and a handcrafted charm that people love. These advanced projects are perfect for those who enjoy home craft projects quick enough to complete in an afternoon yet impressive enough to display proudly.
Safety Tips for Candle Making

Working with hot wax requires proper safety precautions. Taking these seriously protects you and ensures an enjoyable crafting experience. Never leave melting wax unattended.
Wax can overheat quickly and become a fire hazard. Always stay nearby and monitor temperatures closely. Keep a fire extinguisher accessible in your workspace.
Water should never be used on a wax fire as it can cause the burning wax to splatter dangerously. Wear protective clothing and work on heat-resistant surfaces. Spilled hot wax can cause serious burns, so keep bare skin covered when pouring.
Ensure proper ventilation when working with dyes and fragrances. While most candle-making supplies are safe, extended exposure to concentrated scents can cause headaches.
How to Pour a Two-Color Layered Candle: Final Thoughts
Mastering how to pour a two-color layered candle for a stunning effect opens up a world of creative possibilities. With practice, you’ll develop an intuitive understanding of temperatures, timing, and color combinations that make your candles truly unique. Remember that perfection comes with practice.
Your first few attempts might not be flawless, and that’s completely okay. Each candle teaches you something new, and even “imperfect” candles still burn beautifully and fill your space with wonderful fragrance. The skills you develop through candle making transfer to many other handmade gift craft ideas, making this hobby even more valuable.
From here, you might explore adding embeds, creating intricate patterns, or even starting a small business selling your creations. Most importantly, enjoy the process. There’s something deeply satisfying about creating something beautiful with your own hands—something that brings light, warmth, and wonderful scent into your home or the homes of those you gift them to.
Ready to start your candle-making adventure? Gather your supplies this weekend and pour your first two-color layered candle. Share your creations in the comments below, or tag us on social media—we’d love to see what beautiful combinations you come up with!
Frequently Asked Questions
Q: How long should I wait between pouring layers for a two-color layered candle? A: Wait until the first layer is cool to the touch but still slightly warm, typically 2-4 hours depending on room temperature and layer thickness. The surface should feel firm but tacky.
This ensures proper bonding while keeping colors distinct. Q: Can I use different types of wax for each layer when learning how to pour a two-color layered candle for a stunning effect? A: It’s best to use the same type of wax for both layers to ensure proper adhesion and consistent burn quality.
Mixing wax types can cause separation, uneven burning, and other problems that affect your candle’s performance. Q: Why do my candle layers keep mixing together? A: The most common cause is pouring the second layer while the first is still too warm, or pouring at too high a temperature.
Allow more cooling time between layers and check that your wax temperature is within the recommended range before pouring. Q: What’s the best wax for making two-color layered candles? A: Soy wax and paraffin both work excellently for layered candles.
Soy wax is eco-friendly and holds color well, while paraffin provides better scent throw and more vibrant colors. Many crafters prefer a soy-paraffin blend for the best of both worlds. Q: How can I make the layers in my two-color layered candle more defined?
A: Ensure your first layer is fully set before adding the second, and pour the second layer at the correct temperature. Using higher contrast colors also makes the distinction between layers more visually striking. Consider choosing complementary colors for maximum impact.