18 Handmade Wall Decor Ideas to Fill Every Blank Wall
Do you have blank walls staring back at you, begging for personality? Empty walls can make even the most beautiful room feel incomplete and lifeless. The solution is simpler than you think—handmade wall decor that reflects your unique style.
These 18 handmade wall decor ideas to fill every blank wall will transform your space without breaking the bank. From rustic wooden pieces to elegant fabric art, there’s something for every taste and skill level. Let’s dive in…
1. Rustic Wooden Ladder Display

- Wooden ladder (vintage or new)
- Sandpaper and wood stain
- Wall mounting brackets
- Decorative items (photos, plants)
A wooden ladder mounted horizontally creates instant rustic charm. Sand down rough edges and apply your chosen wood stain for a polished look. This versatile piece works perfectly in living rooms, bedrooms, or even bathrooms.
Hang small potted plants, vintage frames, or fairy lights from the rungs. The horizontal mounting technique maximizes visual impact while saving floor space. Your guests will think you hired a professional decorator.
2. Elegant Macrame Hanging
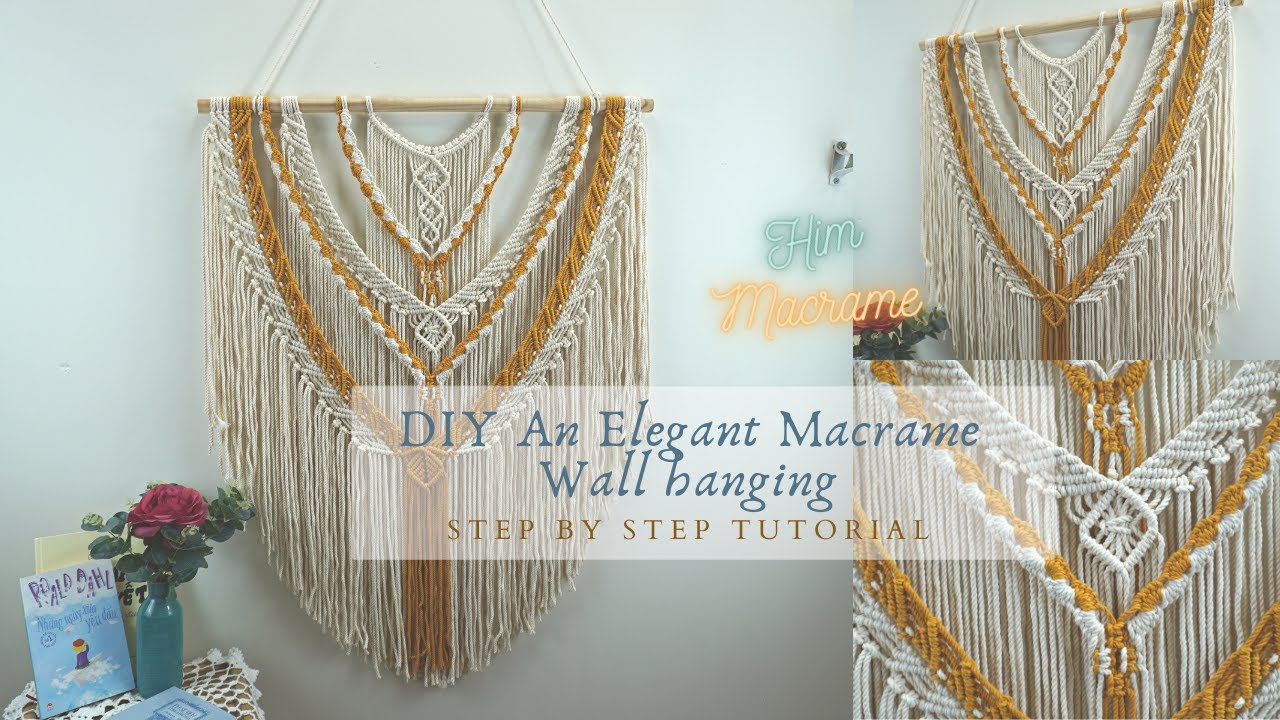
- Macrame cord (4mm thickness)
- Wooden dowel or driftwood
- Scissors
- Measuring tape
The macrame art form has made a stunning comeback in modern interior design. Start with basic knots like the square knot and spiral pattern. These fundamental techniques create beautiful textures that add warmth to any room.
Choose natural cotton cord for an organic bohemian aesthetic. Driftwood adds extra character compared to standard dowels. If you enjoy fun crafts to make at home, macrame is an excellent starting point for beginners.
3. Geometric Paper Sculpture

- Cardstock paper (various colors)
- Craft knife and cutting mat
- Ruler and pencil
- Strong adhesive
Create stunning 3D geometric shapes using simple cardstock paper. Triangles, hexagons, and diamonds look incredibly sophisticated when arranged in patterns. This project costs almost nothing but delivers high-end results.
Score fold lines with a bone folder for crisp, professional edges. The paper folding technique creates depth and shadows that change throughout the day. Arrange multiple pieces in a clustered gallery-style formation for maximum impact.
4. Vintage Window Frame Art

- Old window frame
- Paint or wood stain
- Picture wire and hooks
- Photos or decorative paper
Transform a vintage window frame into a captivating focal point. Remove any remaining glass carefully and clean thoroughly. Distressed paint finishes add authentic farmhouse character to your creation.
Insert family photos, botanical prints, or decorative scrapbook paper behind each pane. The multi-panel design creates natural visual organization. Hang using heavy-duty picture wire for secure wall mounting that lasts.
5. Woven Yarn Tapestry

- Wooden weaving loom or cardboard
- Various yarn textures and colors
- Tapestry needle
- Wooden hanging rod
Weaving creates textured wall art that adds incredible warmth to any space. Even beginners can master basic over-under weaving patterns quickly. Mix chunky and thin yarns for visual interest and tactile appeal.
The tabletop weaving loom technique requires minimal investment and space. Experiment with different color gradients to match your existing decor. Finish with fringe at the bottom for that trendy bohemian look.
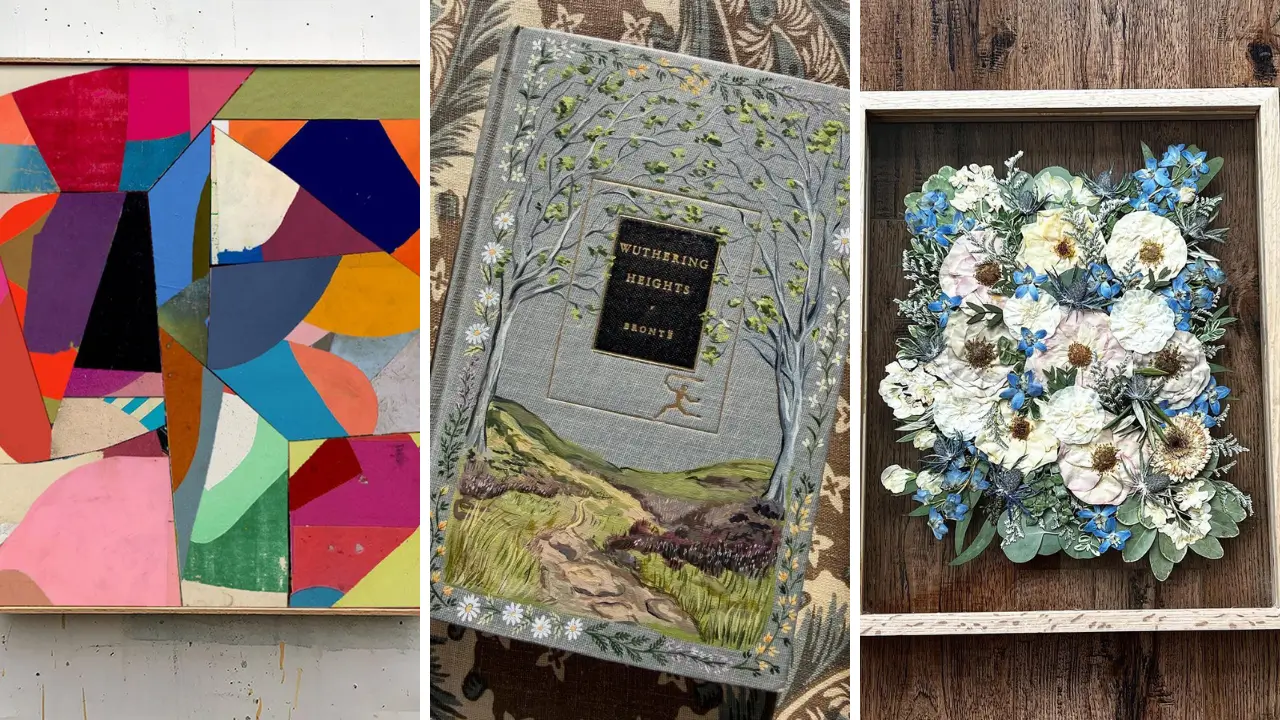
6. Pressed Flower Frames

- Fresh flowers and leaves
- Heavy books or flower press
- Glass floating frames
- Tweezers
Preserve nature’s beauty with pressed botanical art that lasts for years. Collect flowers from your garden or local florist for variety. Press specimens between parchment paper inside heavy books for two weeks.
Floating frames showcase the delicate dried flowers beautifully against any wall color. Arrange your pressed pieces in pleasing compositions before sealing. These make wonderful DIY handmade gifts for friends and family who love nature.
7. Abstract Canvas Painting

- Stretched canvas
- Acrylic paints
- Various brushes and palette knife
- Painter’s tape
You don’t need art school training to create stunning abstract paintings. Start with a color palette that complements your room. Layer colors boldly using brushes, palette knives, or even your fingers.
The pour painting technique creates mesmerizing marble effects with minimal skill required. Use painter’s tape for clean geometric color blocking designs. Abstract art is forgiving—there are no mistakes, only creative opportunities.
8. Fabric Wall Panels
- Fabric in chosen patterns
- Wooden stretcher bars or foam board
- Staple gun
- Scissors and iron
Transform beautiful fabric into custom wall panels that rival expensive artwork. Choose patterns that complement your existing furniture and color scheme. Iron fabric thoroughly to remove all wrinkles before mounting.
Stretch fabric tightly over wooden stretcher bars and staple securely on the back. Create a cohesive look with coordinating fabric sets in varying sizes. This project works perfectly for those seeking home craft projects quick enough to complete in an afternoon.
9. Copper Pipe Sculpture

- Copper pipes (various sizes)
- Pipe cutter or hacksaw
- Copper fittings and elbows
- Wall mounting hardware
Industrial meets artistic with a copper pipe wall sculpture. Cut pipes into varying lengths and connect using standard plumbing fittings. The natural copper patina develops beautiful character over time.
Create geometric shapes or abstract designs based on your space. The modular pipe system allows endless configuration possibilities. Polish for shine or leave natural for that aged industrial aesthetic that’s incredibly popular.
10. Embroidery Hoop Gallery

- Embroidery hoops (various sizes)
- Fabric scraps or embroidered pieces
- Embroidery floss and needles
- Small nails for hanging
Create an eye-catching embroidery hoop gallery wall with minimal effort. Stretch decorative fabric tightly in hoops and trim excess from behind. Mix plain fabrics with hand-embroidered designs for variety.
The circular frame format adds softness to angular rooms. Arrange hoops in organic clusters rather than rigid rows. Simple hand-stitched designs like botanicals or quotes personalize each piece beautifully.
11. Driftwood Mirror Frame

- Round or rectangular mirror
- Collected driftwood pieces
- Hot glue gun
- Picture hanging hardware
Beach vibes come home with a driftwood mirror frame you create yourself. Collect interesting wood pieces during beach walks or purchase from craft stores. Sort pieces by size and color for easier arrangement.
Apply hot glue to attach driftwood radiating outward from the mirror edge. Overlap pieces for natural fullness and depth. The organic irregular shape creates stunning visual interest in coastal or bohemian spaces.
12. String Art Masterpiece

- Wooden board
- Small nails
- Embroidery thread or string
- Hammer and pattern template
Transform simple materials into intricate string art designs. Print your chosen pattern and tape it to stained wood. Hammer nails along the outline at consistent intervals for best results.
Remove the paper template and begin wrapping string between nails in various patterns. Layer different thread colors for depth and dimension. States, animals, or geometric shapes all work wonderfully for this technique.
13. Upcycled Book Page Art

- Old book pages
- Picture frames
- Black ink pens
- Mod Podge or spray adhesive
Give old books new life as stunning book page wall art. Draw silhouettes, quotes, or simple illustrations directly on vintage pages. The aged paper texture adds instant character and warmth.
Create cohesive collections using pages from the same book series. Frame in matching frames for gallery-style impact. This sustainable project is perfect if you love dollar store crafts ideas that look expensive.
14. Clay Wall Hanging

- Air-dry clay
- Rolling pin and clay tools
- Acrylic paint
- Leather cord or twine
Sculpt beautiful air-dry clay wall hangings without a kiln or special equipment. Roll clay to quarter-inch thickness and cut desired shapes. Create texture with stamps, fabric, or found objects.
Poke hanging holes before the clay drying process begins. Paint with acrylics or leave natural for minimalist appeal. Connect multiple clay elements with leather cord for mobile-style installations.
15. Photo Collage Display

- Printed photos (various sizes)
- Washi tape or photo clips
- String lights (optional)
- Cork board or wire grid
Create a dynamic photo collage that tells your personal story. Mix candid shots with travel photos and meaningful moments. Print in both color and black-and-white for visual variety.
Use decorative washi tape to attach photos directly to walls without damage. Wire grids offer flexibility to change displays easily. Add string lights weaving through for magical evening ambiance.
16. Basket Wall Arrangement

- Woven baskets (various sizes)
- Wall hooks or nails
- Level tool
- Pencil for marking
Layer woven baskets on your wall for instant bohemian texture. Collect baskets in varying sizes, shapes, and weave patterns. Thrift stores offer incredible selections at budget-friendly prices.
Arrange baskets in an organic overlapping cluster rather than rigid lines. Mix natural tones with painted accents for personalization. The dimensional texture adds incredible warmth to plain painted walls.
17. Metal Wall Flowers

- Aluminum cans or sheet metal
- Metal shears
- Spray paint
- Hot glue and hanging hardware
Recycle aluminum cans into stunning metal flower sculptures. Cut cans into petal shapes and layer for realistic blooms. Sand edges smooth to prevent cuts during handling.
Spray paint in vibrant metallic colors or soft pastels for different aesthetics. Layer petals using hot glue for dimensional flower forms. These upcycled metal creations add unexpected elegance while being environmentally conscious.
18. Minimalist Line Art

- White cardstock or canvas
- Fine-tip black marker
- Ruler (optional)
- Simple frame
Embrace simplicity with continuous line art drawings that make bold statements. Draw faces, figures, or abstract shapes without lifting your pen. This technique creates elegant pieces perfect for modern interiors.
Practice on scrap paper before committing to your final artwork piece. Frame in slim black or natural wood frames for contemporary appeal. The minimalist aesthetic proves that sometimes less truly is more.
If you’re looking for more handmade gift craft ideas, line art makes thoughtful personalized presents.
These 18 handmade wall decor ideas to fill every blank wall offer endless possibilities for personalizing your space. Whether you prefer rustic charm, modern minimalism, or bohemian texture, there’s a perfect project waiting for you. Grab your supplies and start creating today—your blank walls will thank you!
Share your favorite ideas in the comments below and rate this post!