12 Pressed Flower Craft Ideas for Stunning Wall Art and Decor
Have you ever wondered what to do with those beautiful flowers from your garden before they wilt away? Pressed flowers offer a timeless way to preserve nature’s beauty while creating gorgeous home decor pieces. From delicate framed arrangements to stunning resin coasters, these botanical crafts bring organic elegance into any space.
Today, you’ll discover 12 pressed flower craft ideas for stunning wall art and decor that transform simple dried petals into masterpieces. Whether you’re a beginner or seasoned crafter, these projects suit every skill level. Let’s dive in…
1. Floating Glass Frame Display

- Double-sided glass frame
- Pressed flowers and leaves
- Tweezers
- Craft glue dots
This floating glass frame technique creates an ethereal, suspended look for your pressed botanicals. The transparent design allows light to pass through your flowers, highlighting their delicate veins and natural colors. Arrange your dried flowers between the two glass panels using tweezers for precision placement.
Secure larger pieces with tiny glue dots to prevent shifting during display. Hang multiple frames in a gallery wall formation for maximum visual impact. This project makes excellent DIY handmade gifts for nature-loving friends and family members.
2. Botanical Resin Coasters

- Epoxy resin kit
- Silicone coaster molds
- Pressed flowers
- Mixing cups and sticks
- Heat gun or lighter
Transform your pressed flower collection into functional art pieces with stunning resin coasters. The crystal-clear epoxy preserves flowers permanently while creating a waterproof, heat-resistant surface. Pour a thin layer of mixed resin into your mold first.
Place pressed flowers face-down, then cover with more resin to encapsulate them completely. Use a heat gun to remove air bubbles before the resin cures. Allow 24-48 hours for complete hardening before demolding your beautiful creations.
3. Vintage Herbarium Wall Art

- Aged or kraft paper
- Pressed botanical specimens
- Archival tape
- Fine-tip pen
- Wooden frame
Create museum-worthy herbarium displays that showcase your botanical specimens with scientific elegance. This classic preservation method has been used by naturalists for centuries. Mount each pressed flower on quality paper using small strips of archival tape.
Add handwritten labels beneath each specimen with the plant’s common and Latin names. Age your paper with tea staining for an authentic vintage appearance. Frame behind glass for protection while maintaining that old-world botanical charm.
4. Pressed Flower Candle Holders

- Clear glass votives or jars
- Pressed flowers and ferns
- Decoupage medium
- Foam brush
- Tea light candles
These botanical candle holders cast beautiful shadows when lit, creating romantic ambiance in any room. The flickering light illuminates the delicate flower details magnificently. Apply decoupage medium to the outside of your glass container.
Press dried flowers onto the wet surface, then seal with another layer of decoupage glue. Work in small sections to prevent the medium from drying too quickly. Allow complete drying before inserting candles and enjoying your handcrafted luminaries.
If you enjoy these fun crafts to make at home, you’ll love experimenting with different flower combinations.
5. Wax Paper Suncatchers

- Wax paper sheets
- Pressed flowers and leaves
- Iron and pressing cloth
- Embroidery hoops
- Ribbon for hanging
These translucent flower suncatchers capture and diffuse natural light beautifully. Hang them in windows to enjoy nature’s artwork with every sunrise. Arrange pressed botanicals between two sheets of wax paper.
Cover with a pressing cloth and use a warm iron to fuse the sheets together around your flowers. Trim the sealed wax paper to fit inside embroidery hoops for a polished look. Attach ribbon and hang where sunlight can illuminate your botanical creations.
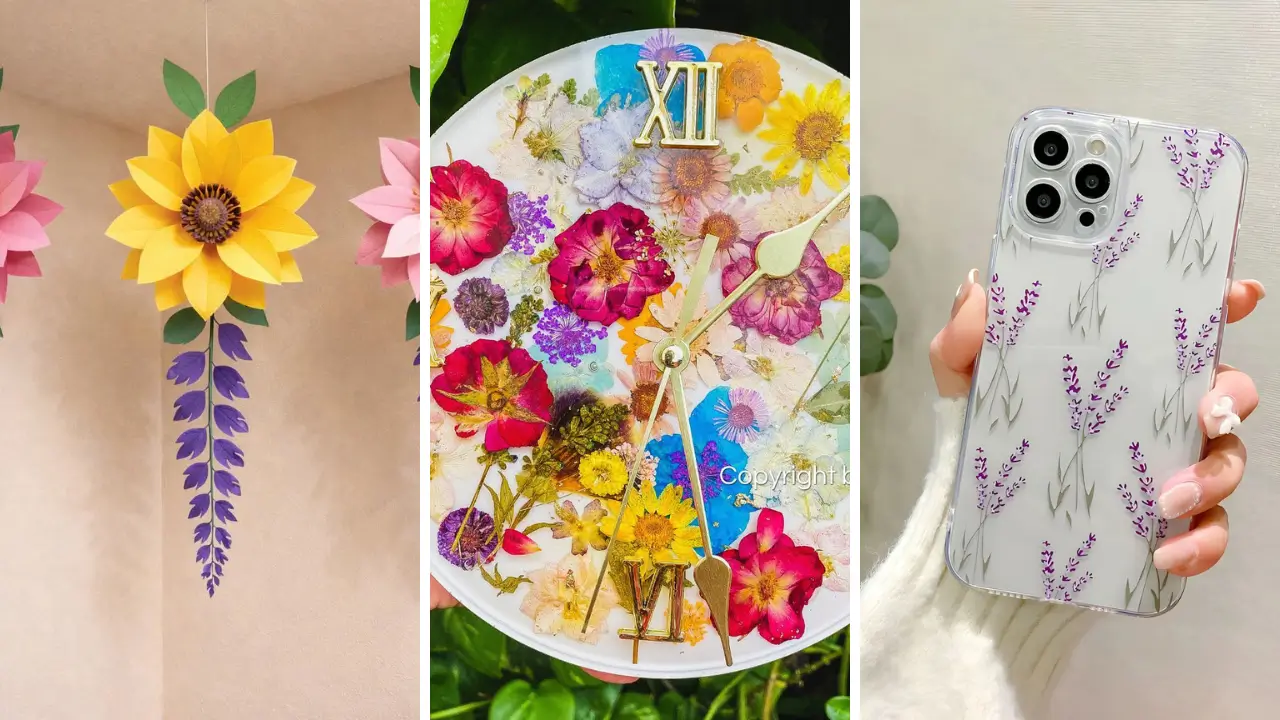
6. Botanical Phone Case Design

- Clear phone case
- Small pressed flowers
- UV resin
- UV lamp or sunlight
- Toothpick for arranging
Carry nature’s beauty everywhere with a custom botanical phone case. This personalized accessory showcases your pressed flower artistry daily. Arrange tiny pressed flowers on your clear case back.
Apply UV resin over the arrangement, spreading evenly with a toothpick. Cure under a UV lamp for 2-3 minutes or in direct sunlight for 15-20 minutes. The hardened resin protects your delicate flowers from daily wear and tear.
7. Pressed Flower Bookmarks

- Cardstock strips
- Pressed flowers
- Self-adhesive laminating sheets
- Hole punch
- Ribbon or tassel
These laminated flower bookmarks make thoughtful gifts for book lovers in your life. Each one becomes a unique, functional piece of preserved nature. Arrange pressed flowers on cardstock strips cut to bookmark size.
Carefully encase in self-adhesive laminating sheets, smoothing out any air bubbles. Trim edges neatly and punch a hole at the top for decorative ribbon. These beautiful bookmarks are perfect handmade gift craft ideas for teachers, librarians, or avid readers.
8. Floral Wall Clock Creation

- Clear acrylic clock blank
- Clock mechanism kit
- Pressed flowers
- Epoxy resin
- Number stickers or paint
Transform a simple clock into a stunning floral timepiece that becomes instant wall art. This functional decor piece brings botanical beauty to everyday moments. Arrange pressed flowers on your acrylic blank, leaving center clear for the mechanism.
Pour clear epoxy resin over the arrangement and allow to cure completely. Install the clock mechanism through the center hole and attach hands. Add hour markers if desired for a finished, professional appearance.
9. Botanical Letter Art

- Wooden or cardboard letters
- Pressed flowers and greenery
- Craft glue
- Clear sealant spray
- Tweezers
Personalize your space with botanical monogram letters covered in pressed flower artistry. Spell names, words, or initials for customized wall displays. Apply craft glue to small sections of your letter surface.
Use tweezers to place pressed flowers and foliage, overlapping slightly for full coverage. Work systematically around the entire letter until completely covered. Seal with clear spray to protect your floral arrangement from dust and humidity.
10. Pressed Flower Jewelry Dish

- Air-dry clay
- Small pressed flowers
- Rolling pin
- Round mold or bowl
- Mod Podge sealant
Create delicate trinket dishes that display pressed flowers beneath a protective coating. These catch-all dishes organize jewelry while showcasing natural beauty. Roll air-dry clay flat and press into a bowl shape.
Before drying, gently press small flowers into the clay surface for a embedded effect. Allow complete drying for 24-48 hours before sealing with Mod Podge. These charming dishes add botanical elegance to dressers and vanities.
Looking for more home craft projects quick to complete? This one finishes in no time.
11. Framed Pressed Flower Collage

- Large picture frame
- Acid-free matting paper
- Various pressed flowers
- Archival glue
- Tweezers and scissors
Design a gallery-worthy collage featuring multiple pressed specimens in artistic arrangement. This statement piece becomes the focal point of any room. Plan your layout on the matting paper before gluing anything down.
Create visual balance by varying flower sizes, colors, and shapes throughout your composition. Secure each piece with tiny dots of archival glue to prevent yellowing over time. Frame behind glass and display away from direct sunlight to preserve colors.
12. Nature Print Canvas Art

- Stretched canvas
- Acrylic paint
- Pressed flowers and ferns
- Spray adhesive
- Clear acrylic sealant
Combine painting with pressed flower application for mixed-media wall art. This technique creates dimensional botanical artwork with stunning visual depth. Paint your canvas background in complementary colors and allow to dry completely.
Apply spray adhesive to the back of pressed botanicals and arrange on your painted surface. Seal the entire canvas with clear acrylic spray for protection and longevity. This project also works beautifully when upcycling old frames or canvases.
If you enjoy repurposing items, check out these thrift store furniture makeover ideas for more creative inspiration.
These 12 pressed flower craft ideas for stunning wall art and decor prove that preserving nature’s beauty is both simple and rewarding. From functional coasters to elegant wall displays, pressed botanicals elevate any space with organic charm. Grab your flowers, pressing supplies, and start creating your own botanical masterpieces today!
Share your favorite pressed flower projects in the comments below! We’d love to see which ideas inspire your next creation. Rate this post and bookmark for future crafting sessions.