How to Make a Paper Wreath for Every Season (Easy Method)
Have you ever walked past a beautifully decorated front door and thought, “I wish I could make something like that”? The good news is — you absolutely can. Learning how to make a paper wreath for every season (easy method) is one of the most satisfying crafting projects you can pick up, whether you’re a complete beginner or a seasoned DIY enthusiast.
Paper wreaths are affordable, customizable, and surprisingly impressive. In this guide, you’ll discover exactly how to create stunning wreaths for spring, summer, fall, and winter using simple materials you probably already have at home. Let’s get into it.
Why Paper Wreaths Are the Perfect Year-Round Craft

Paper wreaths have exploded in popularity for one simple reason: they’re incredibly versatile. Unlike fresh or artificial floral wreaths, paper versions let you control every single detail — color, texture, size, and theme. They’re also budget-friendly.
Most paper wreath projects cost under $10 to make, especially if you shop smart. If you love finding affordable materials, you’ll appreciate how well dollar store crafts ideas translate into high-end-looking wreaths that guests will assume cost much more. Beyond cost, paper wreaths are a fantastic gateway into the broader world of DIY handmade gifts.
Once you master the basics, you’ll find yourself making wreaths as presents for birthdays, housewarmings, and holidays — and people will absolutely love them.
Materials You’ll Need to Make a Paper Wreath for Every Season

Before you dive into the step-by-step process, let’s make sure you have everything on hand. The beauty of this project is that the core supplies stay the same — only the colors and embellishments change per season. Basic supplies you’ll need:
- Cardstock or scrapbook paper (various colors)
- Scissors or a paper trimmer
- Hot glue gun and glue sticks
- A paper plate or cardboard ring (as your wreath base)
- Ruler and pencil
- Ribbon or twine for hanging
- Optional: stamps, markers, or washi tape for decoration
You don’t need expensive tools or specialty materials. In fact, this is one of those fun crafts to make at home that genuinely requires zero prior experience. If you can fold paper and use a glue gun, you’re already qualified.
Easy Step-by-Step Method: How to Make a Paper Wreath Base

The foundation of every great paper wreath is a solid base. Here’s how to create one quickly and easily.
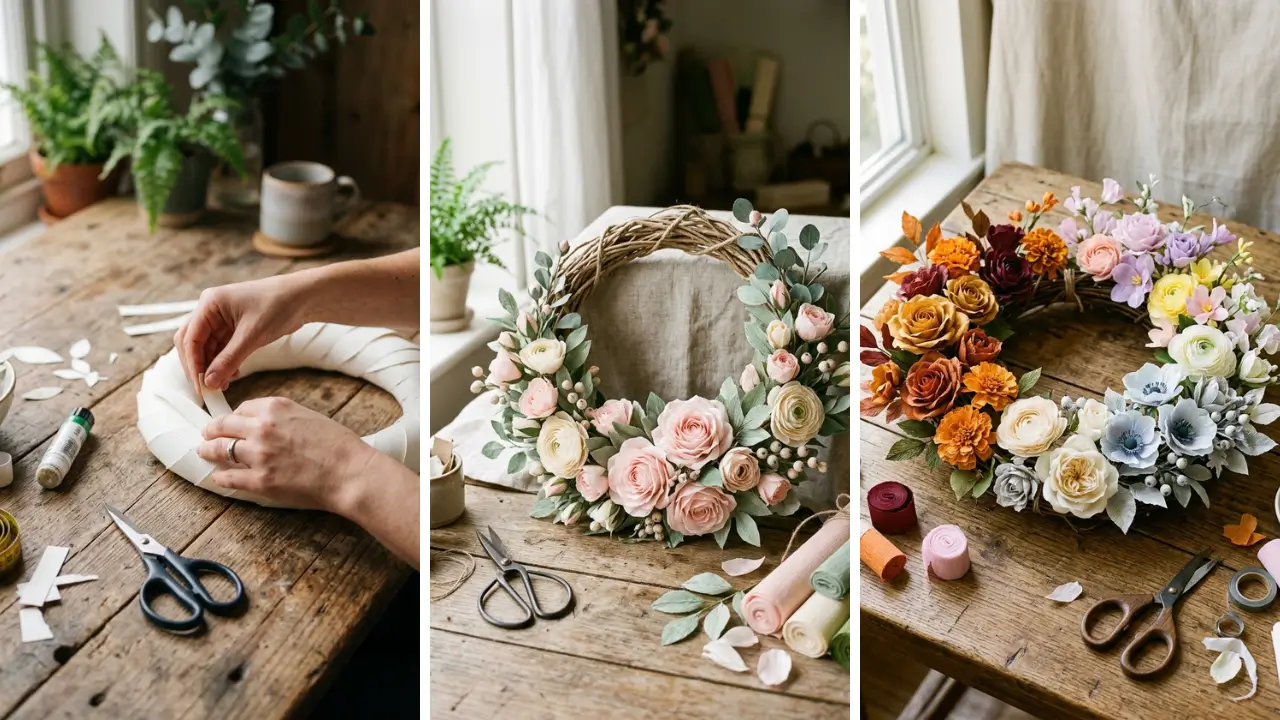
Step 1: Create Your Wreath Frame
Take a large paper plate and cut out the center, leaving a ring about 2–3 inches wide. Alternatively, cut a ring from a piece of cardboard. This becomes the backbone of your wreath and gives it that classic circular shape.
Step 2: Cut Your Paper Pieces

Cut your cardstock into strips approximately 1 inch wide and 6 inches long. You’ll need roughly 40–60 strips depending on how full you want your wreath to look. Thicker paper holds shape better, so opt for cardstock over regular printer paper when possible.
Step 3: Form the Loops or Cones
Roll each strip into a cone or loop shape and secure with a small dot of hot glue. These individual pieces become the “petals” or “pom-poms” of your wreath. This is the most meditative part of the process — put on a podcast and enjoy it.
Step 4: Attach to the Frame

Start gluing your paper pieces onto the frame, working in a circular direction. Overlap them slightly to fill gaps and create a lush, full appearance. Don’t rush this step — taking your time here makes the final result look truly professional.
Step 5: Add Your Finishing Touches
Once the base is covered, add seasonal embellishments (more on that below), attach a ribbon loop to the back for hanging, and you’re done. The whole process takes about 60–90 minutes for a first-time maker.
Seasonal Variations: Customize Your Paper Wreath Year-Round

This is where the real fun begins. The same base technique works for every season — all you change are the colors and decorative elements.
Spring Paper Wreath
Use pastel pinks, lavenders, mint greens, and whites. Add small paper butterflies, flower cutouts, or even real pressed flowers for a delicate spring feel. A few strands of green ribbon woven through the base add a lovely finishing touch.
Summer Paper Wreath
Go bold with bright yellows, oranges, turquoise, and coral. Sunflower shapes cut from yellow cardstock look stunning. You can also incorporate small paper seashells or tropical leaf shapes for a beachy vibe.
Fall Paper Wreath
This is arguably the most popular version. Deep reds, burnt oranges, golden yellows, and rich browns create that perfect autumn aesthetic. Cut leaf shapes from cardstock and layer them over your base for a dramatic effect.
A small paper pumpkin accent tied in the center is chef’s kiss.
Winter Paper Wreath
Think deep greens, icy blues, silver, gold, and classic red-and-white. Add paper snowflakes, small star cutouts, or even metallic paper strips for shimmer. A plaid ribbon bow tied at the bottom immediately elevates the whole piece.
Pro Tips to Make Your Paper Wreath Look More Expensive

There’s a big difference between a wreath that looks homemade and one that looks intentionally handcrafted. These small tweaks make all the difference.
- Use a consistent color palette — 3 to 4 colors maximum keeps the look cohesive and polished.
- Vary your paper textures — mix matte cardstock with glossy paper or patterned scrapbook sheets.
- Size matters — a 12-inch wreath looks more impressive than an 8-inch one. Go bigger if you have the materials.
- Seal with a matte spray — a light coat of clear matte spray gives paper wreaths durability and a more finished look.
- Layer your elements — don’t place everything flat. Some pieces should pop out at different angles for a 3D effect.
These tips are especially useful if you’re making wreaths as handmade gift craft ideas for friends and family. A well-crafted paper wreath genuinely rivals store-bought decor in visual impact.
How to Store and Preserve Your Paper Wreaths Between Seasons

One major advantage of paper wreaths over fresh ones is longevity — when stored properly, a paper wreath can last for years. Keep your wreath in a large zip-lock bag or wrap it loosely in tissue paper and store it in a hat box or round container. Avoid crushing the paper pieces by leaving space inside the storage container.
Keep it away from humidity, which is the biggest enemy of paper crafts. Label each wreath by season so swapping them out is quick and effortless. Many crafters make all four seasonal wreaths at once during a dedicated crafting weekend — a great idea if you want to explore more home craft projects quick and get maximum output in minimal time.
Conclusion: Your Home Deserves a Handmade Touch Every Season
Mastering how to make a paper wreath for every season (easy method) is one of those skills that keeps giving. Once you’ve made your first wreath, you’ll wonder why you ever bought decorations from a store. The process is simple, the materials are cheap, and the results are genuinely beautiful.
Whether you’re decorating your own front door, gifting a handmade piece to someone special, or simply looking for a relaxing creative outlet, paper wreaths deliver on all fronts. With just a few supplies and a couple of hours, you can have a stunning seasonal decoration that reflects your own personal style. The best part?
Each season gives you a fresh reason to try new colors, new shapes, and new ideas. So don’t stop at one — make it a tradition to craft a new wreath every few months and watch how it transforms the feel of your home. Ready to start crafting?
Grab your paper, fire up that glue gun, and make your first seasonal wreath this weekend. Share a photo of your finished creation in the comments below — we’d love to see what you make! And if you’re hungry for more creative inspiration, there are plenty of other beginner-friendly project ideas waiting for you to explore.
Frequently Asked Questions
Q: What is the easiest way to make a paper wreath for beginners? A: The easiest method involves cutting cardstock into uniform strips, rolling them into cones or loops, and hot-gluing them onto a paper plate frame. This technique requires no special tools and can be completed in under two hours.
Learning how to make a paper wreath for every season (easy method) is genuinely beginner-friendly — if you can use scissors and a glue gun, you’re ready to start. Q: What kind of paper works best for making wreaths? A: Cardstock is the top choice because it holds its shape well and comes in hundreds of colors.
Scrapbook paper is also excellent, especially for seasonal patterns. Avoid regular printer paper as it tends to flop and doesn’t hold rolled shapes effectively. Q: How long does it take to make a paper wreath?
A: Most paper wreaths take between 60 and 90 minutes for a first-time crafter. As you get more comfortable with the process, you can complete one in 45 minutes or less. The cutting and rolling of individual pieces takes the most time, but it’s a very relaxing part of the process.
Q: Can I make a paper wreath for every season using the same base technique? A: Absolutely. That’s the beauty of knowing how to make a paper wreath for every season (easy method) — the construction technique stays exactly the same.
You simply change the colors of your paper and the seasonal embellishments you add. Spring gets pastels and flowers, summer gets bold tropical colors, fall gets warm earth tones, and winter gets cool metallics and deep greens. Q: How do I make my paper wreath last longer?
A: To extend the life of your wreath, apply a light coat of clear matte sealant spray once it’s complete. Store it in a cool, dry place away from direct sunlight and humidity. When not in use, wrap it loosely in tissue paper and keep it in a round box or large zip-lock bag to protect the shape of the paper pieces.