How to Recover a Lampshade With Fabric for a Custom Look
Have you ever looked at an old, worn-out lampshade and thought, “There has to be something I can do with this”? You’re not alone. Learning how to recover a lampshade with fabric for a custom look is one of the most satisfying and budget-friendly home décor projects you can tackle on a weekend.
Instead of tossing out a perfectly good frame and buying a brand-new lamp, you can breathe fresh life into it with just a few yards of fabric and some basic supplies. Whether you want a bold pattern, a soft linen texture, or something that matches your newly redecorated room, fabric recovery gives you total creative control. In this guide, you’ll learn exactly what materials you need, how to prep your lampshade, and the step-by-step process to achieve a flawless, professional-looking result — even if you’ve never done it before.
Why Recovering a Lampshade With Fabric Is Worth Your Time

Before diving into the how-to, let’s talk about why this project deserves a spot on your crafting list. A new designer lampshade can easily cost $50 to $200 or more. Recovering one yourself?
Often under $15, depending on the fabric you choose. Beyond cost, there’s the satisfaction of creating something uniquely yours. You can match the shade to your curtains, your sofa throw pillows, or even a bold accent wall.
It’s a level of customization that store-bought options simply can’t offer. This project also fits perfectly into the world of DIY handmade gifts — a recovered lampshade makes a thoughtful, personal present for a housewarming or birthday that no one else will have. It shows effort, creativity, and taste all at once.
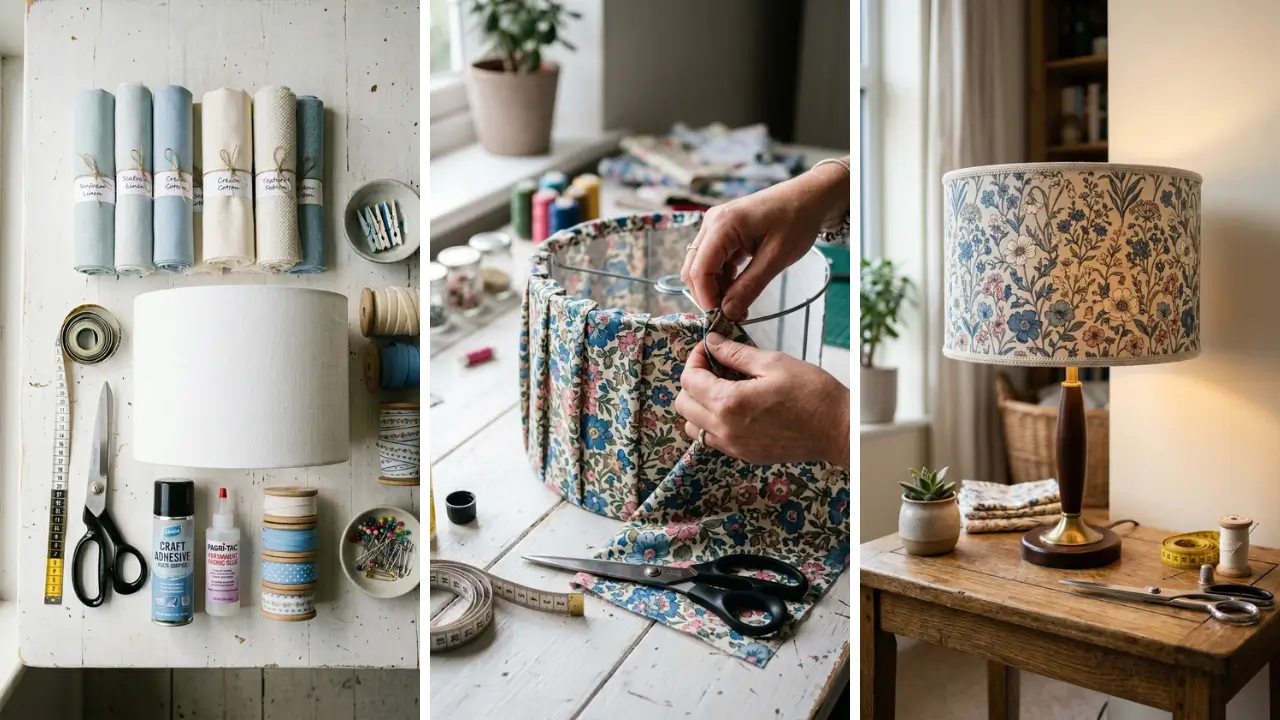
Materials You’ll Need to Recover a Lampshade With Fabric

Gathering the right supplies before you start saves you from mid-project frustration. Here’s what you’ll need:
- Old or plain lampshade (drum, empire, or coolie shapes work best)
- Fabric of your choice — cotton, linen, burlap, or even velvet
- Spray adhesive or fabric glue
- Scissors or rotary cutter
- Clothespins or binder clips
- Ruler or measuring tape
- Pen or fabric marker
- Trim or ribbon (optional, for finishing edges)
One pro tip: choose a fabric that isn’t too thick or stiff. Medium-weight fabrics drape and adhere more smoothly, giving you cleaner results. If you’re on a tight budget, checking out dollar store crafts ideas might surprise you — you can sometimes find affordable fabric remnants or decorative ribbons at dollar stores that work beautifully for this project.
Step-by-Step Guide: How to Recover a Lampshade With Fabric for a Custom Look

Now for the main event. Follow these steps carefully and you’ll have a stunning, custom lampshade in just a couple of hours.
Step 1: Prepare Your Lampshade
Start by removing any old fabric or covering from your lampshade frame. If the frame is in good condition, a quick wipe-down with a damp cloth is all you need. Let it dry completely before moving on.
If there are rough edges or old glue residue, sand them lightly or use a damp cloth with a little rubbing alcohol to clean the surface. A clean, smooth base ensures your new fabric adheres properly.
Step 2: Create a Fabric Template

Roll your lampshade across a large sheet of paper, tracing the outline as it rolls. This gives you the exact shape you need to cut your fabric. Add about one inch of extra allowance on all edges for folding and gluing.
If your shade is a simple drum (cylinder) shape, you can measure the height and circumference directly, then cut a rectangular piece of fabric with an extra inch on each side. Drum shades are the most beginner-friendly to recover.
Step 3: Cut Your Fabric
Using your template, carefully cut the fabric. Take your time here — clean, precise cuts make a noticeable difference in the final look. Use sharp scissors or a rotary cutter on a cutting mat for the cleanest edges.
If your fabric has a pattern, plan the placement before cutting. You want the pattern centered and aligned the way you envision it on the finished shade.
Step 4: Apply Adhesive and Attach Fabric

Lightly spray the outside of the lampshade with spray adhesive, working in sections. Starting at the seam line (usually the back of the shade), carefully press the fabric onto the surface, smoothing out bubbles as you go. Work slowly and methodically around the shade, pulling the fabric taut but not so tight that it warps the frame.
Use clothespins or binder clips to hold the top and bottom edges while the adhesive sets.
Step 5: Fold and Secure the Edges
Once the main fabric is attached, fold the excess fabric over the top and bottom rims of the shade. Apply a thin line of fabric glue along the inside of the rim, then press the folded fabric firmly against it. Hold each section in place for 30–60 seconds, or use clips to keep it secure while drying.
This step is what gives your shade that clean, polished finish.
Step 6: Add Trim for a Professional Finish
This is optional but highly recommended. A ribbon, lace trim, or decorative cord along the top and bottom edges hides any imperfections and elevates the entire look. Simply glue the trim along the rim using fabric glue, pressing firmly and letting it dry completely.
Choose a trim color that either matches or intentionally contrasts your fabric for a designer touch.
This small detail is what takes a DIY project from “homemade” to “custom boutique.”
Choosing the Right Fabric for Your Lampshade

Fabric selection is arguably the most important decision in this project. Light-filtering fabrics like cotton and linen allow a warm, diffused glow to pass through, creating a cozy ambiance. Darker or thicker fabrics create a more dramatic, moody effect with less light escaping through the sides.
Consider the room’s color palette and existing textures. A neutral linen shade works in almost any space, while a bold geometric print becomes a statement piece. Floral patterns work beautifully in bohemian or cottagecore-style rooms.
If you’re looking for more inspiration on what to do with different fabric scraps and materials, exploring fun crafts to make at home can spark a whole range of creative ideas that pair perfectly with this lampshade project.
Common Mistakes to Avoid When Recovering a Lampshade

Even experienced crafters run into trouble sometimes. Here are the most common pitfalls and how to avoid them:
- Using too much adhesive: This causes the fabric to bubble or warp. Apply a light, even coat and build up if needed.
- Skipping the template step: Eyeballing your cuts almost always leads to misaligned fabric. Always make a template first.
- Choosing fabric that’s too thick: Heavy fabrics don’t wrap smoothly around curves. Stick to medium-weight options.
- Rushing the drying process: Let each section dry fully before moving on. Patience here pays off.
- Ignoring the seam placement: Always position your seam at the back of the shade where it’s least visible.
Creative Variations and Ideas to Make It Your Own

Once you’ve mastered the basic technique, the creative possibilities are endless. Try layering a sheer fabric over a solid base for a textured, two-tone effect. Use iron-on patches or fabric paint to add designs after the fabric is attached.
You can also mix materials — pair a neutral fabric base with a fringe trim, or add buttons or beads along the rim for a boho-chic look. Recovered lampshades also make incredible handmade gift craft ideas that feel luxurious and personal without a luxury price tag. If you enjoy upcycling and creative home projects, this is just the beginning.
There are so many home craft projects quick enough to complete in a single afternoon that can transform your space just as dramatically as a full renovation.
Conclusion
Knowing how to recover a lampshade with fabric for a custom look is a genuinely useful skill that pays dividends every time you redecorate or want to refresh a room without spending a lot. It’s approachable for beginners, endlessly customizable, and produces results that genuinely impress. The whole process — from measuring and cutting to gluing and finishing — can be completed in an afternoon.
The best part? Every lampshade you recover will be one-of-a-kind. You’re not just updating a lamp; you’re expressing your personal style and making your home feel more intentional.
Whether this is your first craft project or your hundredth, fabric-covered lampshades are a rewarding addition to any crafter’s repertoire. Ready to give your old lampshade a glow-up? Grab your fabric, clear your workspace, and get started — your room will thank you for it.
Did you try this project? Share a photo in the comments below or tag us on social media — we’d love to see your custom lampshade creation! And if you have questions or tips of your own, drop them in the comments.
Let’s inspire each other!
Frequently Asked Questions
Q: What is the best fabric to use when you recover a lampshade with fabric for a custom look? A: Medium-weight fabrics like cotton, linen, or lightweight canvas work best. They adhere smoothly, drape well around curves, and allow enough light to pass through for a warm glow.
Avoid very thick fabrics like heavy denim or upholstery material, as these are harder to work with and may block too much light. Q: Can I recover a lampshade with fabric without removing the old covering? A: It’s possible but not recommended.
Recovering over the old fabric can cause uneven surfaces, bubbling, and a lumpy final look. For the smoothest, most professional result, always remove the old covering and start with a clean frame. Q: How do I know how much fabric I need to cover a lampshade?
A: Roll your lampshade across a sheet of paper to create a template of the exact shape, then add one inch on all sides for seam allowance. For most standard lampshades, half a yard to one yard of fabric is sufficient. Always buy a little extra to account for pattern matching or mistakes.
Q: How long does it take to recover a lampshade with fabric for a custom look from start to finish? A: Most people complete the entire project in 1.5 to 3 hours, including drying time. Simpler drum-shaped shades take less time, while more complex shapes like empire or coolie shades may require more patience and precision.
It’s a great afternoon project with impressive results. Q: Is spray adhesive or fabric glue better for lampshade recovery? A: Both work well, but each has its strengths.
Spray adhesive provides an even, quick-drying bond that’s ideal for large surface areas. Fabric glue is better for detail work like securing edges and attaching trim. Many crafters use both — spray adhesive for the main fabric and fabric glue for finishing touches.