How to Make Wood Pallet Wall Art for a Rustic Home Look
Have you ever walked into a beautifully decorated home and wondered how they achieved that perfectly imperfect rustic charm? The secret often lies in one unexpected material: reclaimed wood pallets. Learning how to make wood pallet wall art for a rustic home look is easier than you might think, and it’s one of the most rewarding DIY projects you can tackle this weekend.
Wood pallets are everywhere—behind grocery stores, at construction sites, and often available for free. With some basic tools and a bit of creativity, you can transform these humble wooden structures into stunning wall art that adds warmth, character, and that coveted farmhouse aesthetic to any room. In this comprehensive guide, you’ll discover everything from sourcing and preparing pallets to creating gorgeous designs that look like they came straight from a high-end boutique.
Whether you’re a complete beginner or a seasoned crafter, this project is accessible, affordable, and incredibly satisfying.
Why Wood Pallet Wall Art Creates the Perfect Rustic Aesthetic

There’s something magical about reclaimed wood that manufactured materials simply can’t replicate. Each pallet tells a story through its grain patterns, nail holes, and weathered surfaces. These natural imperfections create visual interest and authenticity that makes rustic decor so appealing.
Pallet wood wall art brings several benefits to your home. First, it adds texture and dimension to flat walls. Second, it introduces natural warmth through wood tones.
Third, it serves as a conversation piece that showcases your creativity. The rustic look has remained popular because it connects us to simpler times. When you display handmade pallet art, you’re not just decorating—you’re making a statement about craftsmanship and sustainability.
If you enjoy fun crafts to make at home, this project perfectly balances creative expression with practical skill-building.
Gathering Your Materials: What You Need to Make Wood Pallet Wall Art

Before diving into the creative process, let’s ensure you have everything ready. Proper preparation makes the entire project smoother and more enjoyable.
Essential Tools
You’ll need these basic tools to get started:
- Pry bar or hammer for disassembling pallets
- Sandpaper (80, 120, and 220 grit)
- Circular saw or hand saw
- Measuring tape and pencil
- Safety glasses and work gloves
- Drill with screws or nail gun
Materials for Your Project

Gather these supplies before starting:
- 2-3 wooden pallets (depending on project size)
- Wood stain or paint (optional)
- Wood glue
- Hanging hardware
- Polyurethane sealer (optional)
Most of these items are affordable and readily available. For budget-conscious crafters, checking out dollar store crafts ideas can help you find additional decorative elements without breaking the bank.
How to Find and Select the Best Pallets for Wall Art

Not all pallets are created equal, and selecting the right ones is crucial for your project’s success. Here’s what you need to know about finding quality pallets.
Where to Find Free Pallets
Look for pallets at these locations:
- Local hardware stores
- Garden centers and nurseries
- Grocery stores (ask at the loading dock)
- Construction sites
- Online marketplaces (Craigslist, Facebook Marketplace)
Always ask permission before taking pallets. Most businesses are happy to give them away since disposal costs money.
Safety Considerations When Choosing Pallets
This step is critical. Look for pallets stamped with “HT” (heat-treated), which indicates they’re safe for home use. Avoid pallets marked “MB” (methyl bromide) as they’ve been chemically treated.
Also avoid pallets that have visible stains, strong odors, or signs of pest infestation. Fresh, clean pallets from dry goods suppliers are ideal.
Step-by-Step Guide: How to Make Wood Pallet Wall Art for a Rustic Home Look

Now let’s get into the actual creation process. Follow these steps to transform raw pallets into beautiful wall art.
Step 1: Disassemble the Pallet Safely
Position your pallet on a stable surface. Using a pry bar, carefully work between the slats and support boards. Apply steady pressure to avoid splitting the wood.
Work slowly—patience here prevents cracked boards. Remove all nails using the claw end of a hammer. Run your hands over each board to check for hidden nails or splinters.
This step is essential for safety during sanding.
Step 2: Sand and Prepare Your Boards
Start with 80-grit sandpaper to remove rough spots and splinters. Progress to 120-grit for smoothing, then finish with 220-grit for a touchable surface. Sand with the grain, never against it.
After sanding, wipe boards with a damp cloth to remove dust. Let them dry completely before proceeding. This ensures stain or paint adheres properly.
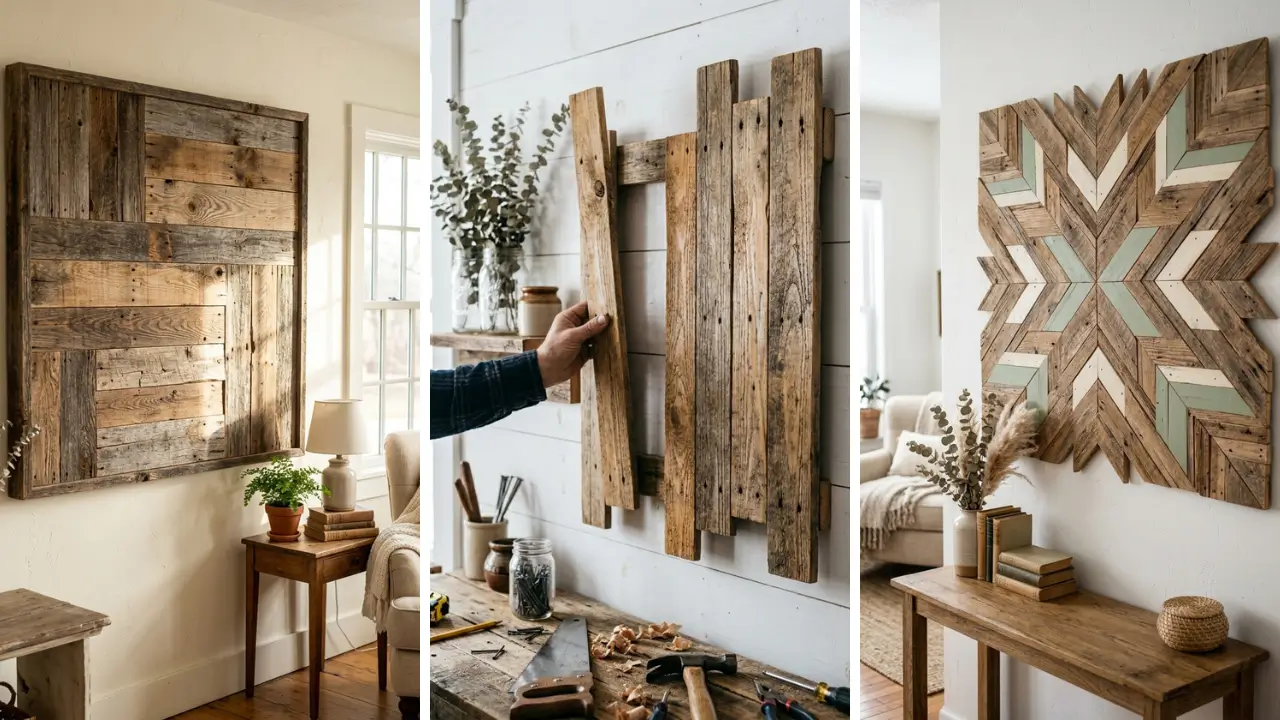
Step 3: Plan Your Design
Lay your boards on the floor and experiment with arrangements. Consider these popular designs:
- Horizontal planks: Classic farmhouse look
- Chevron pattern: Modern rustic appeal
- Herringbone: Sophisticated texture
- Mixed widths: Eclectic character
Take a photo of your chosen arrangement for reference during assembly.
Step 4: Cut and Arrange Your Boards
Measure and cut boards to your desired dimensions. For a standard wall piece, consider sizes like 24×36 inches or 30×40 inches. Cut backing boards perpendicular to your design boards—these provide structure.
Lay everything out one more time before attaching. Check that spacing is even and edges align properly.
Step 5: Assemble Your Wall Art
Place backing boards horizontally across the back of your arranged design boards. Apply wood glue along contact points, then secure with screws from the back. Use 1.5-inch screws to avoid poking through the front.
Add a third backing board in the center for larger pieces. This prevents warping and adds stability for hanging.
Step 6: Finish and Seal
Here’s where you can get creative. You have several finishing options:
- Natural: Leave the wood raw for maximum rustic appeal
- Stained: Apply wood stain for richer color
- Painted: Use chalk paint for a shabby chic look
- Whitewashed: Diluted white paint for coastal vibes
If using stain, apply with a rag in the direction of the grain. Let it sit for 5-10 minutes, then wipe excess. For longevity, apply a clear polyurethane coat once the stain dries.
Creative Design Ideas for Your Pallet Wall Art

Plain boards are beautiful, but adding elements takes your art to the next level. These ideas help customize your creation.
Add Meaningful Text or Quotes
Stencil inspirational quotes, family names, or meaningful words onto your pallet art. Use acrylic craft paint and quality stencils for crisp lettering. Consider phrases like “Home Sweet Home,” coordinates of a special location, or your family’s established year.
Incorporate Other Materials
Combine your pallet wood with complementary materials:
- Metal accents or hardware
- Rope or twine details
- Dried flowers or greenery
- Mason jar vases attached to the wood
- Vintage hooks for functional wall organizers
This type of project makes excellent DIY handmade gifts for housewarmings, weddings, or holidays. The personal touch of handmade items creates lasting impressions that store-bought decor simply cannot match.
Create Themed Pieces
Design pallet art around specific themes that match your home’s personality:
- Seasonal: Pumpkins for fall, snowflakes for winter
- Kitchen: Coffee bar signs, menu boards
- Nursery: Name art, growth charts
- Outdoor: Welcome signs, garden markers
Tips for Hanging and Displaying Your Pallet Wall Art

Proper installation ensures your art stays secure and looks professionally done.
Choose the Right Hardware
Pallet art can be heavy. Use D-ring hangers attached to your backing boards, connected with picture wire. For pieces over 20 pounds, use wall anchors rated for the weight.
French cleats work excellently for larger, heavier pieces. They distribute weight evenly and make repositioning easier.
Placement Considerations
Hang your art at eye level—generally 57-60 inches from floor to center. In living rooms, position pieces so they’re visible from seating areas. Above furniture, leave 6-8 inches between the furniture top and art bottom.
Consider lighting too. Pallet art looks stunning with accent lighting that highlights the wood’s texture. Simple picture lights or adjustable track lighting work wonderfully.
Troubleshooting Common Pallet Project Problems

Even experienced crafters encounter challenges. Here’s how to handle common issues. Warped boards: Slightly warped wood adds character.
For severe warping, clamp boards flat while applying backing, or use the warped pieces for smaller accent projects. Splitting wood: Pre-drill holes before driving screws near board edges. Use smaller screws and avoid placing them too close to ends.
Uneven stain absorption: Apply wood conditioner before staining. This helps softer parts of the grain absorb stain more evenly. If you’re looking for more home craft projects quick to complete, consider making smaller pallet pieces first to build your skills before tackling larger installations.
Sustainability and Cost Benefits of Pallet Art
Beyond aesthetics, creating wood pallet wall art for a rustic home look offers significant practical benefits. Environmental impact: You’re rescuing materials from landfills. Millions of pallets are discarded annually.
Your art project contributes to a circular economy. Cost savings: A comparable piece from a home decor store costs $100-300. Your DIY version?
Often under $20 if you source free pallets and have basic tools. These projects also provide valuable skills. You’ll improve your woodworking abilities with each piece, opening doors to more complex projects.
The knowledge gained exploring handmade gift craft ideas transfers beautifully to pallet art creation.
Conclusion: Your Rustic Wall Art Journey Starts Now
Creating beautiful wood pallet wall art for a rustic home look combines creativity, sustainability, and practical skill-building into one rewarding project. You’ve learned how to source safe pallets, prepare them properly, and transform them into stunning decor pieces. Remember, perfection isn’t the goal—character is.
Those knots, grain variations, and slight imperfections make your piece unique. Each project teaches you something new, and your skills will grow with every creation. The rustic aesthetic you achieve through pallet art brings warmth and authenticity that mass-produced decor simply cannot replicate.
Whether you create a simple plank arrangement or an elaborate chevron pattern, your handmade art tells a story. Start small if you’re nervous. A simple three-board piece with a meaningful quote makes an excellent first project.
As confidence builds, tackle larger installations and more complex designs. Ready to transform your walls? Grab a pallet this weekend and start creating.
Share your finished pieces in the comments below—we’d love to see your rustic creations! And don’t forget to pin this guide for reference during your project.
Frequently Asked Questions
Q: How long does it take to make wood pallet wall art for a rustic home look? A: Most projects take 3-6 hours spread over a weekend. Disassembly and sanding require about 2 hours, while assembly and finishing take another 2-3 hours.
Drying time between stain coats adds waiting periods but not active work. Q: Can I make pallet wall art without power tools? A: Absolutely!
A hand saw, hammer, pry bar, and manual sandpaper work fine. The process takes longer, but many crafters prefer the slower, meditative approach of hand tools. Q: What’s the best finish for indoor pallet wall art?
A: For indoor pieces, a simple matte polyurethane provides protection without excessive shine. For a more natural look, Danish oil or beeswax-based finishes enhance the wood while maintaining the rustic aesthetic. Q: How do I make wood pallet wall art for a rustic home look on a tight budget?
A: Source free pallets, borrow tools from friends, and use supplies you already have. Leftover house paint works for whitewashing, and tea or coffee create natural stains. Complete projects are possible for under $10.
Q: Is pallet wood safe for indoor use around children and pets? A: Yes, when you select heat-treated (HT stamped) pallets and sand them properly. Avoid chemically treated pallets, and ensure all nails are removed.
A sealed finish prevents splinters and makes cleaning easy.