Resin Art for Beginners: What You Need to Know Before You Start
Have you ever seen those gorgeous glossy coasters, jewelry pieces, or wall art and wondered, how on earth did someone make that? The answer is resin art — and the good news is, it’s more accessible than it looks. If you’ve been curious about resin art for beginners: what you need to know before you start, you’re in the right place.
This guide walks you through everything from the basic materials and safety precautions to pro tips that will save you from common rookie mistakes. Whether you want to create stunning home décor or thoughtful DIY handmade gifts, resin art is one of the most rewarding crafts you can pick up. Let’s dive in.
What Is Resin Art and Why Is It So Popular?

Resin art involves mixing two chemical components — a resin and a hardener — that, when combined, undergo a chemical reaction and cure into a solid, glossy material. Artists use it to create everything from jewelry and keychains to ocean-pour paintings and furniture surfaces. Its popularity has exploded in recent years, and for good reason.
The results look incredibly professional, even when made by a complete beginner. The material is also highly versatile — you can embed flowers, glitter, pigments, photos, and more inside the resin to create unique, one-of-a-kind pieces. It’s also one of those fun crafts to make at home that doesn’t require a studio or expensive equipment to get started.
All you need is a well-ventilated space, a few basic supplies, and a bit of patience.
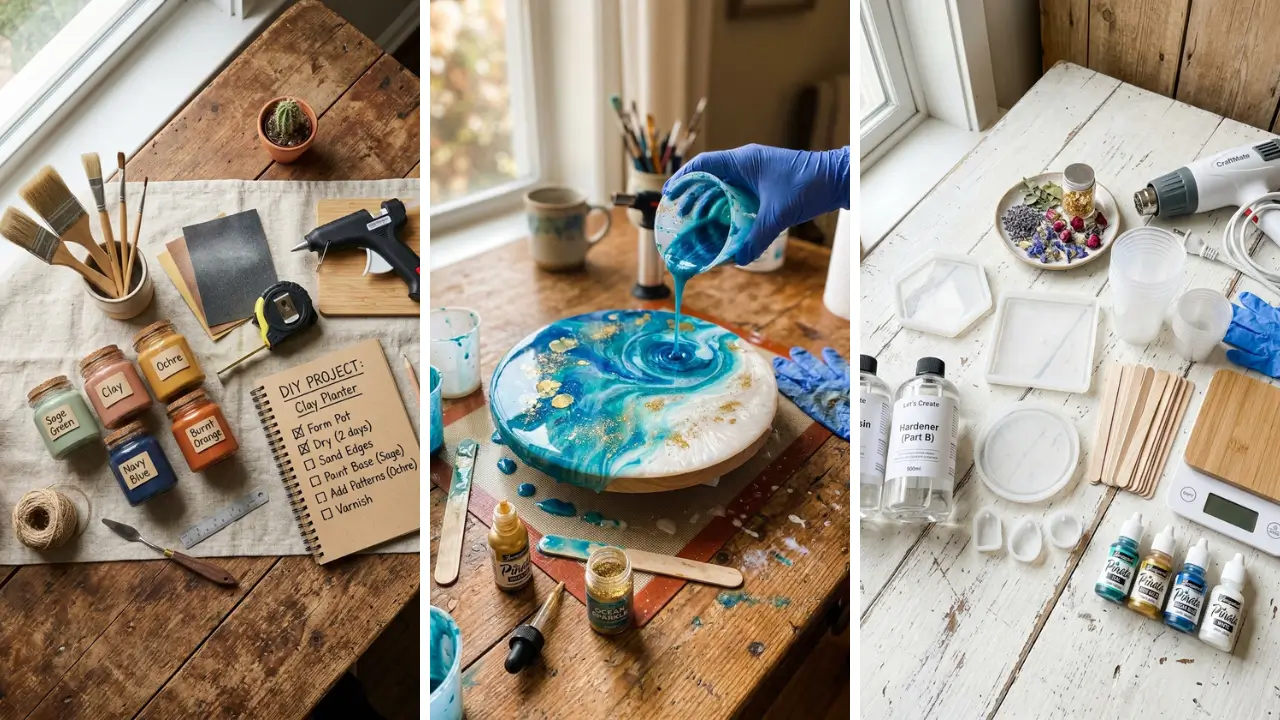
Resin Art for Beginners: Essential Supplies You’ll Need

Before you mix your first batch of resin, you need to gather the right supplies. Skipping any of these can lead to poor results — or worse, a safety hazard.
The Core Materials
- Epoxy resin kit — This includes the resin and hardener. Look for beginner-friendly kits labeled “low odor” or “self-leveling.”
- Mixing cups and stir sticks — Use graduated plastic or silicone cups for accurate measurement. Never eyeball the ratio.
- Silicone molds — Available in dozens of shapes. Resin releases cleanly from silicone without sticking.
- Pigments or alcohol inks — These add color to your resin. Alcohol inks create beautiful fluid effects.
- Heat gun or torch — Used to pop bubbles on the resin surface. A butane torch works better than a heat gun for most projects.
Safety Equipment You Cannot Skip

Resin is a chemical substance. The uncured form can cause skin irritation, eye damage, and respiratory issues if handled carelessly. Always wear nitrile gloves — not latex — and safety glasses when working with resin.
A respirator mask with organic vapor cartridges is strongly recommended, especially if you’re working in a small room. Open windows and use a fan to keep air circulating. Never work in a space without ventilation.
Lay down a silicone mat or plastic sheeting on your work surface. Cured resin is nearly impossible to remove from wood or fabric.
Understanding Resin Ratios and Mixing

One of the most critical steps in resin art for beginners is getting the mix ratio right. Every resin brand has a specific ratio — commonly 1:1 or 2:1 (resin to hardener) by volume. Always read the product instructions before mixing.
Mix slowly and thoroughly for at least 3–5 minutes, scraping the sides and bottom of the cup. Under-mixing is one of the most common mistakes beginners make, resulting in a sticky, soft surface that never fully cures. Once mixed, you typically have a “working time” or “pot life” of 20–45 minutes before the resin starts to thicken and become unusable.
Work efficiently, but don’t rush — rushing leads to spills and wasted material.
Common Resin Art Techniques for Beginners

Now for the fun part. There are several beginner-friendly techniques you can explore right away without needing advanced skills.
Resin Pouring in Molds
This is the easiest entry point. Simply pour your mixed, colored resin into silicone molds and let it cure. You can create coasters, keychains, bookmarks, and small decorative objects.
It’s perfect for making handmade gift craft ideas that look polished and store-bought.
Resin Ocean Pour (Petri Art)
")
This technique involves layering colors and using a heat source to create organic, flowing patterns — often resembling waves or cells. Alcohol inks, white pigment, and a torch are your best friends here. The results are stunning and totally unique every time.
Embedding Objects in Resin
You can preserve dried flowers, photos, coins, shells, and more by embedding them in clear resin. Pour a base layer, place your object, let it partially cure, then pour the top layer. This technique is perfect for memorial pieces or personalized jewelry.
Resin Geode Art

Geode art mimics the look of natural crystals and minerals. You’ll use chunky glitter, colored pigments, and white paint on a canvas or wooden panel. It’s one of the most visually striking styles and surprisingly achievable for beginners with a little practice.
Tips to Avoid the Most Common Beginner Mistakes

Even with all the right supplies, beginners often run into a few predictable problems. Here’s how to avoid them before they ruin your project.
- Don’t skip measuring. Even being slightly off on your ratio can cause your resin to stay sticky forever.
- Work in a warm room. Resin cures best between 70–80°F (21–27°C). Cold temperatures slow or prevent curing.
- Cover your work while it cures. Dust, hair, and bugs love landing in wet resin. Use a box or plastic dome to protect your pieces overnight.
- Start small. Your first few projects will have imperfections. That’s completely normal — start with small molds and cheap materials.
- Be patient. Most resins need 24 hours to cure enough to demold and 72 hours to fully harden. Don’t rush it.
If you’re already a fan of home craft projects quick results, just know that resin art rewards patience more than speed. The wait is always worth it.
Budget-Friendly Ways to Get Started with Resin Art
You don’t need to spend a fortune to start making beautiful resin pieces. Many beginners are surprised at how affordable the entry point can be. Starter epoxy resin kits are available for as little as $15–$25 and include enough material for several small projects.
Silicone molds can often be found in multi-packs for just a few dollars. If you’re looking for creative ways to cut costs even further, exploring dollar store crafts ideas can help you source molds, organizers, and embellishments without breaking the bank. Reinvest in better tools — like a proper torch or higher-quality pigments — once you know resin art is something you want to continue.
There’s no need to buy everything at once.
How to Know If Resin Art Is Right for You
Resin art is incredibly rewarding, but it does require attention to detail and a tolerance for working with chemicals. If you enjoy crafts that produce tangible, beautiful results and don’t mind a bit of a learning curve, you’ll love it. It’s also a fantastic hobby for gift-makers.
Few handmade items get as much attention and appreciation as a well-made resin piece — whether it’s a personalized keychain, a floral paperweight, or a custom set of coasters. If you’re still on the fence, think of it this way: the skills you build with resin art overlap with many other creative crafts. Once you understand how materials behave, mixing, and layering, you’ll find it easier to branch out into all kinds of creative projects.
Conclusion: Your Resin Art Journey Starts Here
Getting into resin art doesn’t have to be overwhelming. With the right supplies, a safe workspace, and a little patience, you can create genuinely impressive pieces from your very first session. The key takeaway from this guide on resin art for beginners: what you need to know before you start is simple — prepare well, respect the material, and don’t be afraid to experiment.
Every great resin artist started exactly where you are now: curious, a little nervous, and excited to try something new. Your first piece probably won’t be perfect, and that’s completely okay. What matters is that you start.
Resin art opens the door to an entire world of creative possibilities — from decorative home pieces to meaningful, personalized gifts. The more you practice, the more intuitive it becomes. And once you’re hooked, you’ll wonder how you ever spent a weekend without it.
Ready to get started? Grab a beginner resin kit, set up your workspace, and make your first pour this weekend. Share your results in the comments below — we’d love to see what you create!
Frequently Asked Questions About Resin Art for Beginners
Q: What is the best resin for beginners to start with? A: Epoxy resin is by far the most beginner-friendly option. It has a longer working time, cures clear and glossy, and is available in easy-to-use kits.
Look for a kit labeled “low odor” or “beginner” with a simple 1:1 mix ratio to keep things straightforward when you’re just learning. Q: How long does resin take to cure completely? A: Most epoxy resins are safe to demold after 24 hours, but they reach full hardness after about 72 hours.
Some thicker pours or specialty resins may take longer. Always check your specific product’s instructions, and avoid exposing the piece to heavy use or UV light until it’s fully cured. Q: Is resin art for beginners truly safe to do at home?
A: Yes — when done correctly, resin art for beginners: what you need to know before you start includes understanding safety protocols. Always wear nitrile gloves and eye protection, use a respirator mask, and work in a well-ventilated area. Once cured, resin is inert and completely safe to handle without protection.
Q: Can I use regular acrylic paint to color resin? A: You can, but it’s not the ideal choice. Acrylic paint can introduce water into the resin mixture, which may cause cloudiness or affect curing.
Alcohol inks, resin-specific pigment pastes, and mica powders are far better options for vibrant, reliable color results. Q: How much does it cost to start making resin art at home? A: A basic beginner setup — including a resin kit, silicone molds, mixing cups, gloves, and basic pigments — typically costs between $30 and $60.
This is enough to complete multiple small projects. As you advance, you can invest in better tools and materials, but starting small keeps the risk low while you’re still learning the craft.