10 Creative DIY Storage Projects to Start in January for an Organized Home
Is your home drowning in clutter after the holiday chaos? January brings the perfect opportunity to reset your space and embrace organization. Starting fresh with smart storage solutions transforms cluttered rooms into peaceful havens.
The good news is you don’t need expensive organizers from fancy stores. These 10 DIY storage projects help you maximize every inch of your home while keeping your budget intact. Let’s dive in…
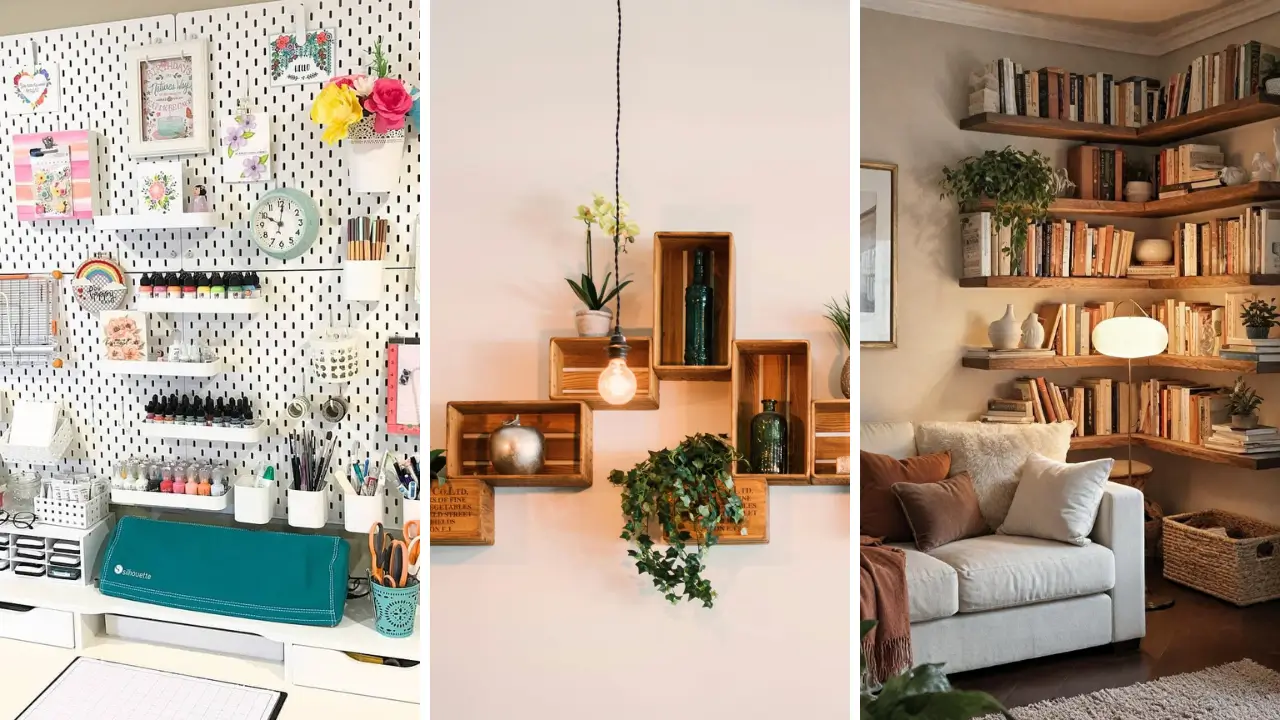
1. Rustic Wooden Crate Shelving

- 4-6 wooden crates
- Wood stain or paint
- L-brackets and screws
- Sandpaper
- Wall anchors
Transform ordinary wooden crates into stunning wall-mounted storage. Sand each crate smooth, then apply your chosen stain for a polished finish. This versatile shelving works perfectly in living rooms, bedrooms, or home offices.
The modular design lets you arrange crates in countless configurations. Stack them vertically for a bookshelf effect or create an asymmetrical pattern for visual interest. Each crate provides deep storage for books, plants, and decorative items.
If you enjoy fun crafts to make at home, this project makes an excellent starting point for beginners.
2. Fabric-Covered Storage Boxes

- Cardboard boxes
- Fabric of choice
- Mod Podge or fabric glue
- Scissors
- Decorative ribbon
Give ugly cardboard boxes a designer makeover with beautiful fabric coverings. Choose patterns that complement your existing decor for a cohesive look. These boxes become attractive storage for closets, shelves, and bathroom vanities.
Apply Mod Podge evenly across the box exterior before smoothing fabric into place. Work slowly to eliminate bubbles and wrinkles. Fold edges neatly inside the box and secure with additional adhesive.
Finish with coordinating ribbon trim along the top edge. Label each box with decorative tags for easy identification of contents.
3. Pegboard Organization Wall

- Large pegboard panel
- Pegboard hooks and accessories
- Wood frame pieces
- Spray paint
- Mounting hardware
A pegboard wall revolutionizes storage in craft rooms, garages, and home offices. Paint the board your favorite color before installation for a custom look. Frame the edges with painted wood trim for a polished appearance.
The beauty lies in complete customization flexibility. Rearrange hooks and baskets whenever your needs change. Add small shelves, cup holders, and wire baskets to maximize vertical space.
This project works wonderfully for organizing craft supplies. Explore more home craft projects quick to keep your creative space tidy and functional.
4. Mason Jar Bathroom Organizer

- 3-4 mason jars
- Reclaimed wood board
- Hose clamps
- Screws
- Chalk paint
Create charming bathroom storage using mason jars mounted on rustic wood. This organizer keeps cotton balls, swabs, toothbrushes, and cosmetics within easy reach. The farmhouse aesthetic adds warmth to any bathroom.
Secure jars to the board using metal hose clamps tightened around each jar. Distress the wood with chalk paint for an aged appearance. Mount the finished piece at a convenient height beside your vanity.
Consider painting jar lids in coordinating colors for extra visual appeal. Chalkboard labels help family members identify contents quickly.
5. Under-Bed Rolling Drawers

- Plywood sheets
- Caster wheels
- Wood screws
- Drawer pulls
- Wood stain
Reclaim valuable space beneath your bed with custom rolling drawers. Measure your bed clearance carefully before cutting plywood to size. These drawers provide perfect storage for seasonal clothing, shoes, and extra bedding.
Attach four caster wheels to each drawer bottom for smooth gliding. Add attractive drawer pulls to the front for easy access. Stain or paint drawers to match your bedroom furniture.
Line drawer interiors with cedar planks to protect wool items from moths. Dividers inside help separate different categories of stored items.
6. Entryway Command Center

- Large picture frame
- Cork board or magnetic sheet
- Decorative hooks
- Small baskets
- Chalkboard paint
Build a command center that corrals keys, mail, and daily essentials in one spot. Transform an oversized picture frame into the perfect organizational hub. This project eliminates morning chaos and lost item searches.
Divide the frame interior into functional zones. Include a magnetic section for notes, a cork area for pinning reminders, and hooks for hanging keys. Small wire baskets hold sunglasses and wallets.
Paint one section with chalkboard paint for writing grocery lists and family messages. This becomes the household communication headquarters.
7. PVC Pipe Shoe Rack

- Large PVC pipes
- PVC pipe cutter
- Spray paint
- Strong adhesive
- Sandpaper
Construct a modern shoe rack from inexpensive PVC pipes. Cut pipes into sections slightly longer than your largest shoes. Sand cut edges smooth to prevent snags and scratches on footwear.
Stack and glue pipes in a honeycomb pattern for stability. Spray paint the entire structure in colors matching your closet or entryway. Each pipe compartment holds one pair of shoes.
This design works especially well in closets with limited floor space. The vertical stacking maximizes storage while keeping shoes visible and accessible. Looking for more budget-friendly projects?
Check out these dollar store crafts ideas for inspiration.
8. Floating Corner Shelves

- Triangular wood pieces
- Hidden shelf brackets
- Wood stain
- Level tool
- Wall anchors
Corner spaces often go completely unused in most rooms. Custom floating shelves transform these forgotten areas into valuable storage. Perfect for displaying collections or storing small items you need frequently.
Cut triangular shelf pieces from quality wood or purchase pre-made corner shelves. Install hidden brackets for a clean, floating appearance. Stack multiple shelves at varying heights for maximum impact.
Use a level carefully during installation. Uneven shelves look unprofessional and may cause items to slide off unexpectedly.
9. Upcycled Drawer Organizers

- Old drawers or dresser pieces
- Paint and primer
- Decorative knobs
- Mounting brackets
- Contact paper
Give discarded furniture drawers new life as wall-mounted shelving. Salvage drawers from thrift stores, garage sales, or furniture destined for trash. Each drawer becomes a deep shadow box perfect for storage and display.
Prime and paint drawers in coordinating colors. Line interiors with attractive contact paper for a finished look. Replace old hardware with decorative knobs or pulls that match your decor style.
Mount drawers horizontally or vertically depending on your space. Group several drawers together for dramatic visual impact on feature walls. This sustainable approach creates beautiful DIY handmade gifts for friends who appreciate unique home decor.
10. Rope Basket Storage

- Thick cotton rope
- Hot glue gun
- Fabric for lining
- Leather strips
- Scissors
Craft beautiful rope baskets in any size you need. Coil rope tightly while applying hot glue between layers. These baskets provide stylish storage for blankets, toys, magazines, and bathroom towels.
Create various sizes by adjusting the coil base diameter. Add leather handle strips for easy carrying. Line basket interiors with fabric to protect delicate items from rope texture.
Experiment with dip-dyeing rope ends in your favorite colors. Ombre effects add modern flair to this classic craft technique. These baskets also make thoughtful handmade gift craft ideas for housewarmings.
Starting your new year with an organized home sets a positive tone for months ahead. These 10 DIY storage projects tackle clutter while adding personal style to every room. Grab your supplies and start creating!
Share your favorite project ideas in the comments below. Rate this post!