Best Sandpaper Grits for Furniture Refinishing: A Quick Guide
Ever looked at a worn-out dresser or scratched dining table and wondered if you could bring it back to life? Here’s the thing—successful furniture refinishing isn’t about expensive tools or years of experience. It comes down to understanding one crucial element: best sandpaper grits for furniture refinishing.
Using the wrong grit at the wrong stage can ruin your project, leaving deep scratches or a surface that won’t accept stain properly. In this quick guide, you’ll learn exactly which sandpaper grits to use at each stage of refinishing. We’ll cover everything from aggressive paint stripping to achieving that silky-smooth final finish.
Whether you’re tackling your first project or your fiftieth, this knowledge will save you time, money, and frustration. Let’s dive into the world of sandpaper grits and transform your old furniture into stunning pieces you’ll be proud to display.
Understanding Sandpaper Grit Numbers: The Basics

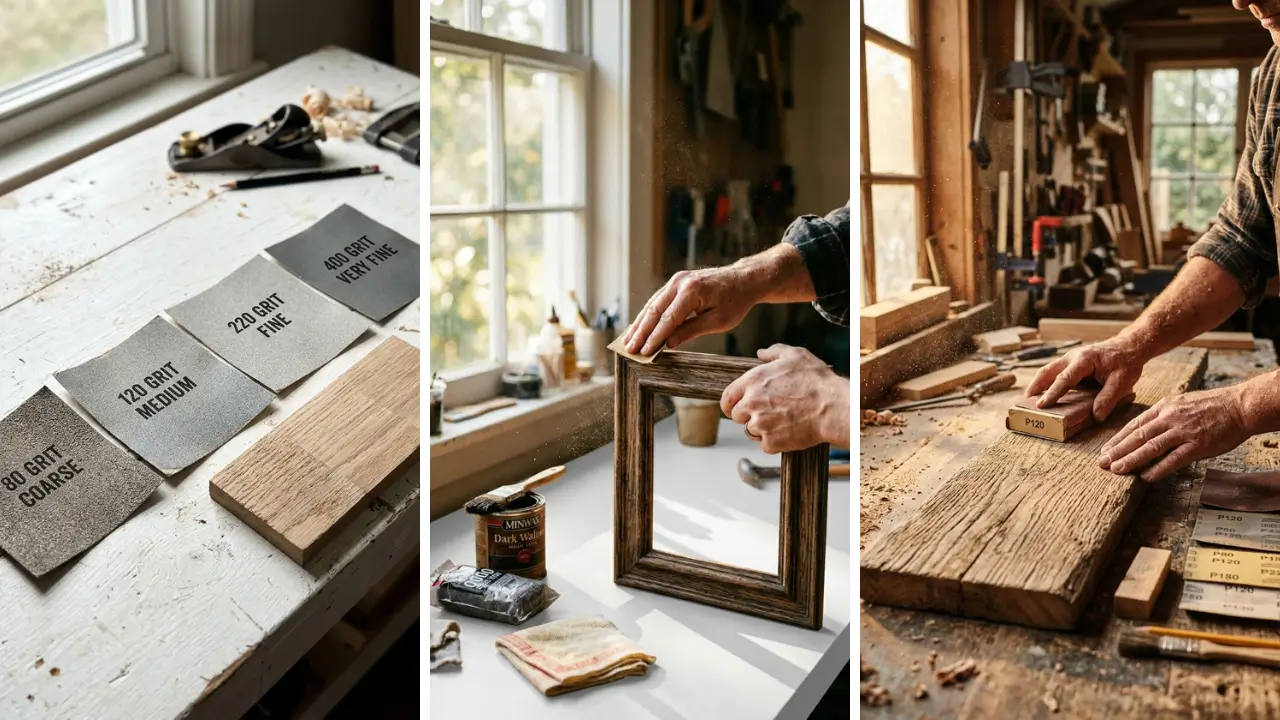
Before selecting the best sandpaper grits for furniture refinishing, you need to understand what those numbers actually mean. Sandpaper grit refers to the size of abrasive particles bonded to the paper. The numbering system is straightforward once you get it.
Lower numbers mean coarser, more aggressive sandpaper. A 40-grit paper has large particles that remove material quickly but leave visible scratches. Higher numbers indicate finer grits with smaller particles that create smoother surfaces.
Here’s a quick breakdown of grit categories:
- Coarse (40-60 grit): Heavy material removal, stripping paint and varnish
- Medium (80-120 grit): Shaping and removing scratches from coarse grits
- Fine (150-180 grit): Preparing surfaces for stain or finish
- Very Fine (220-320 grit): Final smoothing and between-coat sanding
- Extra Fine (400+ grit): Polishing and ultra-smooth finishes
Think of it like this: you’re progressively erasing the scratches from the previous grit while creating finer scratches that eventually become invisible to the naked eye.
Choosing the Best Sandpaper Grits for Furniture Refinishing Projects

Different furniture conditions require different starting points. Jumping straight to fine sandpaper on heavily damaged wood wastes time and wears out your paper quickly. Starting too coarse on delicate veneers can sand right through the thin wood layer.
For Paint or Heavy Finish Removal
When stripping old paint or thick polyurethane, start with 60 to 80 grit sandpaper. This aggressive grit removes material efficiently without excessive effort. Work with the wood grain, applying even pressure.
A common mistake is staying on coarse grit too long. Switch to medium grit once the old finish is mostly removed. The remaining traces will come off with 100-grit paper without creating deeper scratches.
For Light Surface Preparation

If your furniture just needs freshening up or has a thin finish, skip the coarse grits entirely. Start with 120 grit to scuff the surface and remove minor imperfections. This approach works great for pieces you’re repainting rather than staining.
Many people enjoy tackling fun crafts to make at home like furniture refinishing because the results are so satisfying. With the right sandpaper progression, even beginners achieve professional-looking results.
The Perfect Grit Progression for Flawless Results

Here’s the secret professional refinishers know: never skip more than one grit level. Jumping from 80 grit directly to 220 grit leaves scratches that show through your finish. Each grit removes the scratches from the previous one. A typical progression for furniture refinishing looks like this:
- 80 grit: Remove old finish and major scratches
- 120 grit: Smooth out 80-grit scratches, refine surface
- 150 grit: Prepare surface for staining
- 180-220 grit: Final smoothing before first coat of finish
After applying your first coat of stain or finish, the wood grain raises slightly. Sand lightly with 220 grit or higher between coats. This removes the raised grain and ensures subsequent coats adhere properly.
For pieces that will remain natural or receive a clear finish, extra attention to the final sanding stages pays dividends. Any scratches will be visible through clear finishes.
Best Sandpaper Grits for Different Wood Types
Not all wood responds the same way to sandpaper. Hardwoods like oak and maple can handle more aggressive initial grits. Softwoods like pine scratch easily and require a gentler approach.
Hardwoods: Oak, Maple, Walnut
These dense woods tolerate coarse sandpaper well. You can confidently start with 60-80 grit when stripping heavy finishes. The tight grain structure resists deep scratches that might occur in softer species.
For oak specifically, use the standard progression but spend extra time on each grit. The open grain pattern can trap sanding dust, so vacuum between grits for best results.
Softwoods: Pine, Cedar, Fir
Start no coarser than 100 grit on softwoods unless dealing with severely damaged surfaces. These woods scratch easily, and aggressive sanding creates fuzzy surfaces that are difficult to fix. Pine furniture has become popular among those exploring home craft projects quick solutions.
Its affordability makes it perfect for practicing refinishing techniques before tackling valuable antiques.
Veneered Furniture
Veneer requires the most careful approach. The decorative wood layer is typically only 1/32 to 1/16 inch thick. Never use sandpaper coarser than 150 grit on veneer, and sand with an extremely light touch.
When refinishing veneer, your goal is scuffing the old finish rather than removing wood. Power sanders can quickly burn through veneer, so hand sanding is often safer.
Hand Sanding vs. Power Sanding: Which Grits Work Best

Your sanding method affects which grits you’ll need. Power sanders remove material faster, meaning you might start with a finer grit than hand sanding. They also generate heat that can damage wood if you’re not careful.
Power Sanding Tips
Random orbital sanders work best for furniture refinishing. They minimize swirl marks and sand evenly. Start one grit finer than you would with hand sanding—if you’d normally start at 80 grit by hand, try 100 grit with a power sander.
Keep the sander moving constantly. Staying in one spot creates uneven surfaces and heat damage. Let the weight of the tool do the work; pressing down increases scratches and accelerates paper wear.
When Hand Sanding is Better
Detail areas, curves, and delicate pieces demand hand sanding. Wrap sandpaper around a sanding block for flat surfaces, or fold it for getting into corners and grooves. Hand sanding gives you more control over pressure and direction.
Creating DIY handmade gifts from refinished furniture has become incredibly popular. A hand-refinished vintage piece makes a meaningful present that shows real effort and care.
Special Situations: When Standard Grits Won’t Work

Some furniture presents unique challenges that standard grit progressions can’t solve. Knowing when to adapt your approach prevents frustration and wasted effort.
Painted Furniture with Multiple Layers
Decades-old painted furniture might have five or more paint layers. Sandpaper alone isn’t efficient here. Consider using a chemical stripper first, then sand with 120 grit to remove residue and smooth the surface.
For a distressed look, strategic sanding with 80 grit on edges and high-wear areas creates authentic-looking worn spots. This technique works beautifully on pieces destined for shabby chic or farmhouse décor.
Water-Damaged or Stained Wood
Water rings and dark stains penetrate below the surface. You’ll need to sand deeper than usual, starting with 80 grit and working through the progression until the stain disappears. Sometimes oxalic acid (wood bleach) is necessary before sanding if stains are particularly deep.
If you’re looking for budget-friendly project ideas, check out these dollar store crafts ideas that can complement your refinished furniture beautifully.
Essential Tips for Using the Best Sandpaper Grits Effectively

Even with the right grits, technique matters enormously. These tips will help you get professional results from your sandpaper investment. Always sand with the grain.
Sanding across the grain creates scratches that show through finishes. The only exception is when using very coarse grit to remove heavy material quickly—even then, switch to with-the-grain as soon as possible. Change sandpaper frequently.
Worn sandpaper doesn’t cut properly. It burnishes the wood surface instead of cutting it, creating a glazed effect that prevents stains from penetrating evenly. Fresh paper works faster and produces better results.
Clean between grits. Dust from coarser grits can scratch your surface when you move to finer papers. Vacuum thoroughly or wipe with a tack cloth between each grit change.
Inspect your progress regularly. Wipe the surface with mineral spirits to reveal how the finish will actually look. This “wet preview” shows scratches that dust can hide.
Common Sandpaper Mistakes That Ruin Furniture Projects
Learning from others’ mistakes saves you from ruining your own projects. Here are the most common errors people make when selecting and using sandpaper grits. Skipping grits to save time: This always backfires.
You’ll spend more time trying to remove scratches from the coarser grit than you would have spent using the intermediate grit properly. Using the wrong sandpaper type: Garnet paper works great for bare wood but clogs quickly on finishes. Aluminum oxide lasts longer and handles finishes better.
For the best sandpaper grits for furniture refinishing, choose aluminum oxide or ceramic papers. Sanding too aggressively on edges: Edges sand faster than flat surfaces. Use lighter pressure near edges and corners to avoid rounding them over or sanding through to bare wood unevenly.
Many crafters who enjoy making handmade gift craft ideas have learned these lessons through trial and error. Starting with proper knowledge saves that frustration.
Conclusion: Mastering Sandpaper Grits for Beautiful Furniture
Understanding the best sandpaper grits for furniture refinishing transforms intimidating projects into manageable ones. Remember the key principles: start with the coarsest grit necessary for your situation, never skip more than one grit level, and always sand with the grain. The progression from coarse to fine grits creates the foundation for a flawless finish.
Whether you’re restoring an antique dresser or giving new life to a thrift store find, proper sanding makes all the difference. Your furniture refinishing journey starts with that first piece of sandpaper. Choose wisely, progress patiently through the grits, and you’ll achieve results that look professionally done.
Ready to start your furniture refinishing project? Share your before-and-after photos in the comments, or tell us about the piece you’re planning to tackle next. We’d love to hear about your sanding adventures and any tips you’ve discovered along the way!
Frequently Asked Questions
Q: What is the best sandpaper grit to start with for furniture refinishing? A: For most furniture refinishing projects with existing finishes, start with 80-100 grit sandpaper. If the furniture has heavy paint or varnish, you may need 60 grit.
For light refinishing or pieces with thin finishes, 120 grit is a good starting point. Q: How do I know when to move to the next sandpaper grit? A: Move to the next grit when scratches from the current grit appear uniform across the entire surface.
Wipe with mineral spirits to check for remaining deep scratches or finish residue. If the surface looks even and consistent, you’re ready for the finer grit. Q: What sandpaper grits should I use for the best furniture refinishing results on oak?
A: For oak furniture, follow a progression of 80, 120, 150, and 180-220 grit. Oak’s open grain handles coarser starting grits well. Spend extra time vacuuming between grits to remove dust trapped in the grain pattern for optimal results.
Q: Can I use the same sandpaper grits for painted furniture and stained furniture? A: Yes, but your approach differs. Painted furniture often requires coarser starting grits (60-80) due to thicker coatings.
Stained furniture typically needs lighter treatment starting around 100-120 grit since stains penetrate the wood rather than sitting on top. Q: What grit sandpaper should I use between coats of finish? A: Use 220-320 grit sandpaper between coats of finish.
This removes raised grain and any dust nibs without cutting through the finish layer. Sand very lightly—you’re scuffing for adhesion, not removing material. Always wipe clean with a tack cloth before applying the next coat.