15 Resin Mold Ideas to Make Beautiful Home Decor Pieces
Have you ever walked into a home store and admired those glossy, crystal-clear decorative pieces with hefty price tags? The good news is you can create stunning resin home decor yourself for a fraction of the cost. Resin crafting has exploded in popularity because it offers endless creative possibilities.
From elegant coasters to eye-catching wall art, these 15 resin mold ideas to make beautiful home decor pieces will transform your space. Whether you are a beginner or experienced crafter, these projects deliver professional results. Let’s dive in…
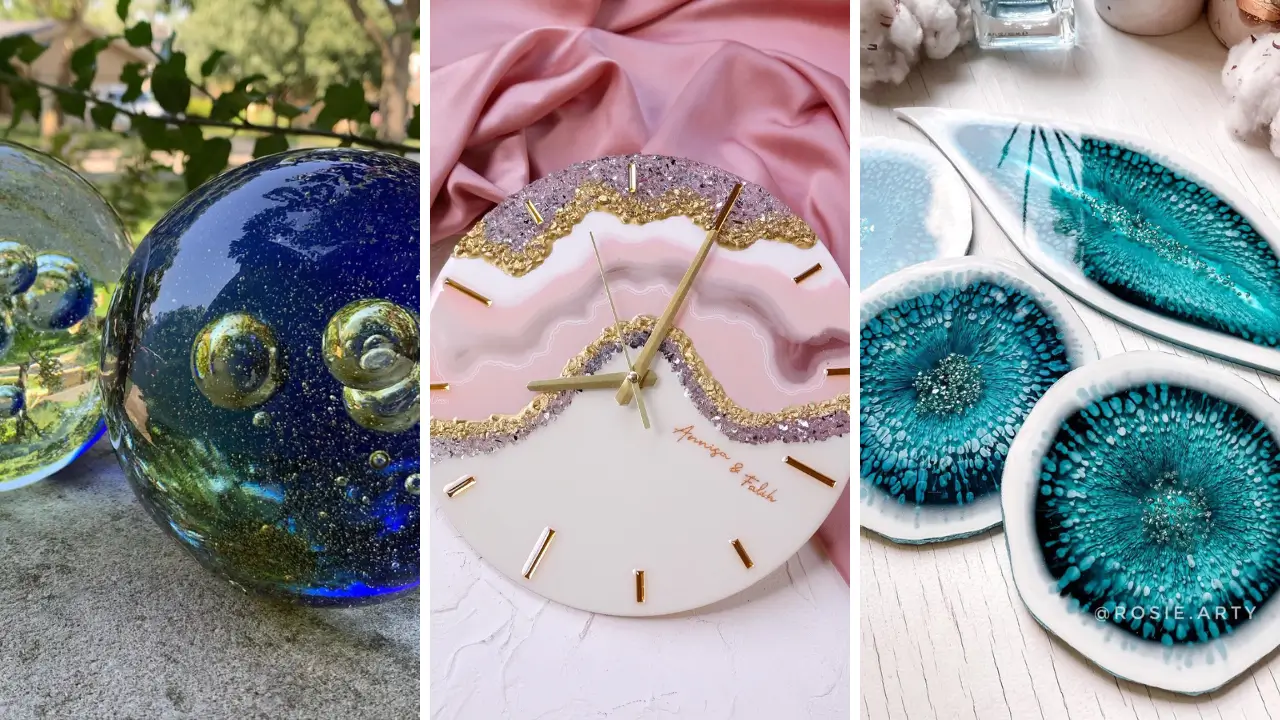
1. Elegant Geode Coasters

- Silicone coaster molds
- Epoxy resin and hardener
- Metallic pigment powders
- Crushed glass or crystals
- Gold leaf flakes
These geode-inspired coasters bring natural elegance to any coffee table. The layered effect mimics real crystal formations with stunning depth and shimmer. Pour your clear epoxy resin in stages, adding metallic pigments between layers.
Press crushed glass along one edge to create the crystal cluster effect. Finish with gold leaf accents around the edges for a luxurious touch. These coasters make perfect gifts and conversation starters.
2. Ocean Wave Serving Tray

- Wooden tray base with handles
- Deep pour epoxy resin
- Blue and white resin pigments
- Fine sand
- Small seashells
Bring the beach indoors with a stunning ocean wave tray. This functional art piece captures rolling waves frozen in time. Apply sand along one section of your wooden tray base.
Pour blue-tinted resin and use a heat gun to create wave patterns by manipulating the surface. Add white resin swirls for foam effects using the dirty pour technique. Position small seashells along the sandy shore section before curing.
3. Botanical Specimen Paperweights
- Sphere or dome silicone molds
- Crystal clear casting resin
- Pressed dried flowers
- Small fern leaves
Preserve nature’s beauty forever in these botanical paperweights. Dried flowers and leaves suspended in crystal-clear resin create mesmerizing desktop art. Arrange your pressed botanicals carefully using tweezers for precise placement.
Pour resin in thin layers to prevent flowers from floating. These paperweights work beautifully for preserving wedding bouquet flowers or garden specimens. They also serve as thoughtful DIY handmade gifts for nature lovers.
4. Marbled Jewelry Dish

- Shallow dish silicone mold
- Epoxy resin
- White and gold alcohol inks
- Black resin pigment
Create a luxurious marbled dish perfect for rings, earrings, or small trinkets. The swirling patterns ensure each piece is completely unique. Mix your resin and divide into separate cups.
Add different pigments to each portion for your marble effect. Pour all colors simultaneously into the mold, then gently swirl with a toothpick. The alcohol ink technique creates beautiful organic veining throughout.
5. Glowing Night Light

- Geometric silicone mold
- Epoxy resin
- Glow-in-the-dark pigment powder
- Battery-operated LED base
These luminescent resin pieces absorb light during the day and emit a soft glow at night. They create magical ambiance in bedrooms or hallways. Mix generous amounts of glow pigment powder into your resin for maximum brightness.
Geometric shapes work best for light refraction. Place your cured piece on an LED light base for enhanced illumination effects. This project makes excellent additions to your fun crafts to make at home collection.
6. Rustic Wood River Table Coasters

- Small wood slices with natural edges
- Deep pour epoxy resin
- Turquoise or blue pigment
- Sandpaper in various grits
Miniature river table coasters capture the popular furniture trend in a compact form. Live edge wood pieces frame stunning colored resin rivers. Split your wood slice down the center, leaving natural irregular edges.
Create a dam with tape, then pour tinted resin between the pieces. Sand progressively through grits for a glass-smooth finish. Apply food-safe finish for functional coasters that impress guests.
7. Abstract Wall Art Panel

- Wooden panel or canvas board
- Epoxy resin
- Multiple resin pigment colors
- Silicone oil for cell effects
Transform blank walls with fluid art resin panels. These eye-catching pieces feature organic cell patterns and flowing color combinations. Add small drops of silicone oil to pigmented resin for dramatic cell formations.
Pour colors onto your panel and tilt to spread naturally. Use a torch briefly to activate cells and remove bubbles. Each abstract composition becomes a unique masterpiece for your gallery wall.
8. Crystal Clock Face

- Large round silicone mold
- Epoxy resin
- Metallic pigments and glitter
- Clock mechanism kit
- Drill with appropriate bit
Craft a functional resin clock that doubles as wall art. Custom colors and embedded elements make each timepiece truly personal. Pour your decorated resin into a round mold, ensuring even thickness.
After curing, drill a center hole for the clock mechanism shaft. Install battery-operated clock parts from any craft store. Add metallic hour markers for easy time reading with artistic flair.
9. Terrazzo Style Planters
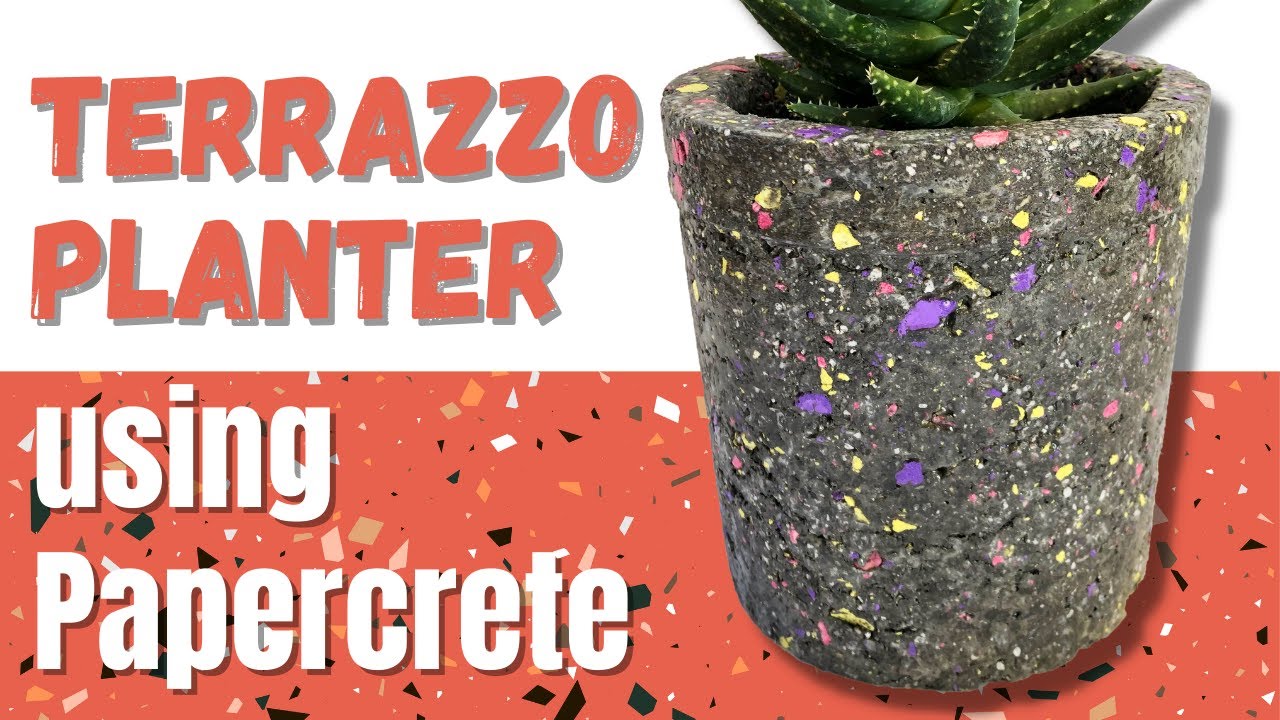
- Planter silicone mold
- White epoxy resin
- Colored resin chips or polymer clay pieces
- Drainage hole drill bit
Trendy terrazzo planters add modern style to your indoor garden. These speckled beauties showcase colorful embedded fragments throughout. Create your own terrazzo chips from cured colored resin pieces.
Mix these colorful fragments into white resin before pouring. The random distribution creates authentic terrazzo patterns every time. Drill drainage holes for real plants or leave solid for artificial arrangements.
These planters are perfect home craft projects quick enough for weekend completion.
10. Agate Slice Ornaments

- Thin irregular-shaped molds
- Transparent epoxy resin
- Alcohol inks in gradient colors
- Fine gold glitter
- Eye hooks for hanging
These faux agate ornaments capture the beauty of natural gemstone slices. Layered colors and crystalline effects create stunning light catchers. Apply alcohol inks in concentric rings, working from dark outer edges toward lighter centers.
Let colors blend naturally at boundaries. Embed eye hooks before curing for easy hanging. These translucent pieces sparkle beautifully in windows or on holiday trees.
11. Decorative Door Knobs

- Sphere or knob silicone molds
- Crystal clear epoxy resin
- Dried flowers or glitter
- Knob hardware with screws
Replace boring cabinet hardware with custom resin knobs. These small details transform furniture and cabinetry instantly. Embed dried flowers, glitter, or colored pigments in clear resin.
Cast around threaded knob inserts for easy installation. Match your knobs to room decor themes for cohesive styling. These decorative hardware pieces add personality to dressers, cabinets, and doors.
12. Layered Mountain Landscape

- Rectangular silicone mold
- Epoxy resin
- Blue, white, and gray pigments
- Wood base pieces
Create dimensional mountain scenes with layered resin pours. These scenic pieces bring peaceful nature vibes into any room. Pour graduated blue layers for sky effects, allowing each to partially cure.
Add white pigment swirls for clouds between layers. Insert wood pieces angled to represent mountain silhouettes. The three-dimensional depth creates stunning visual interest from every angle.
13. Embedded Photo Keepsakes

- Rectangular or circular molds
- Crystal clear casting resin
- Sealed photographs
- Mod Podge or clear sealant
Preserve precious memories in crystal-clear resin blocks. Photos suspended in resin gain depth and protection lasting generations. Seal photographs completely with multiple Mod Podge coats before embedding.
This prevents resin from saturating and discoloring images. Position photos at angles for dynamic displays. These keepsakes make meaningful handmade gift craft ideas for anniversaries and memorials.
14. Galaxy Themed Bookends

- L-shaped or geometric molds
- Epoxy resin
- Purple, blue, and black pigments
- Fine holographic glitter
- Weighted inserts
Support your book collection with cosmic galaxy bookends. Deep space colors and sparkling stars create otherworldly beauty. Layer dark pigments starting with black, then swirl in purple and blue nebula clouds.
Add holographic glitter throughout for star effects. Include weighted metal inserts during casting for sturdy book support. These bookends become focal points on any shelf.
15. Faux Stained Glass Panels

- Flat rectangular mold
- Clear epoxy resin
- Transparent resin dyes in multiple colors
- Black acrylic paint
- Fine detail brush
Create stunning stained glass effects without traditional glassworking skills. These panels filter light beautifully when displayed in windows. Pour thin clear resin layers, adding transparent dyes in geometric sections.
Use barriers or careful pouring to separate color areas. After curing, paint black leading lines between colors with acrylic paint. The finished faux stained glass rivals traditional craftsmanship.
Combine these with dollar store crafts ideas for budget-friendly window treatments.
These 15 resin mold ideas to make beautiful home decor pieces offer something for every skill level and style preference. From functional coasters to dramatic wall art, resin crafting opens unlimited creative possibilities. Grab your silicone molds and epoxy resin and start creating today!
Share your favorite resin project ideas in the comments below! We love seeing what inspires you most. Rate this post and tell us which project you will try first!