How to Paint Furniture With Chalk Paint: Beginner Guide
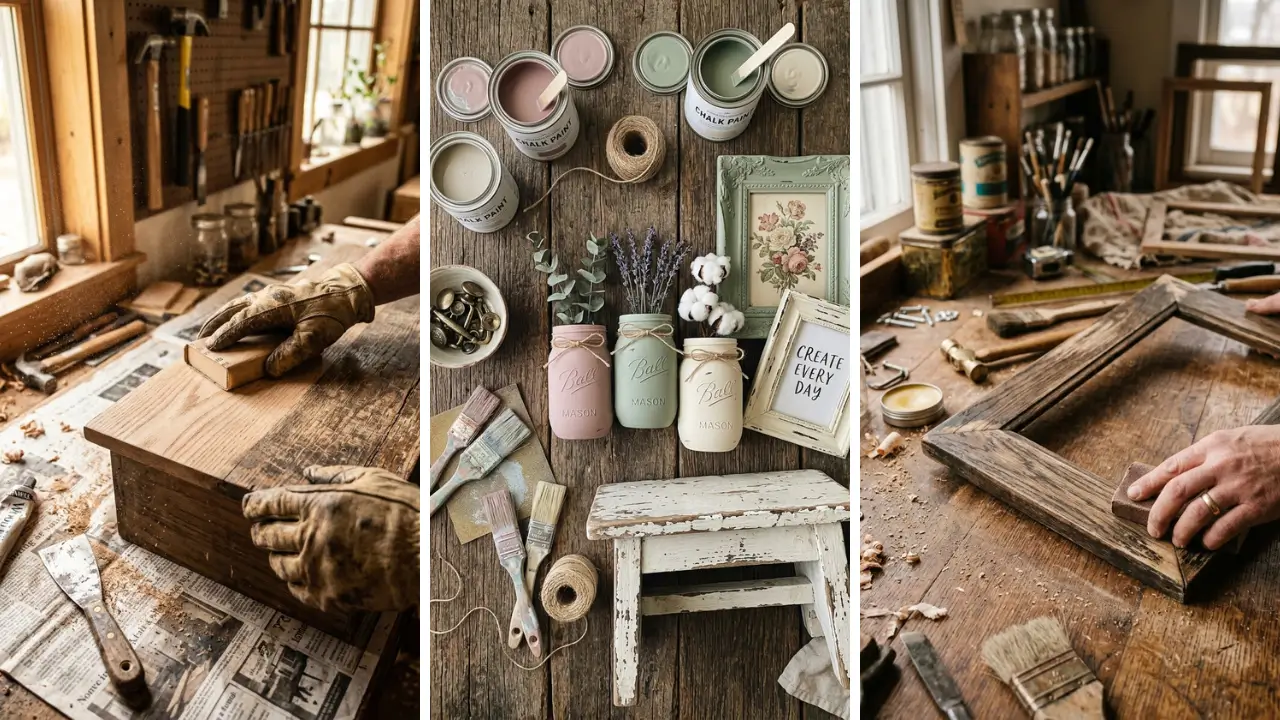
Have you ever walked past a tired, outdated piece of furniture and imagined its potential? That scratched dresser or boring nightstand could become a stunning statement piece with just a few hours of work. Learning how to paint furniture with chalk paint is one of the most rewarding skills you can develop, and honestly, it’s far easier than you might think.
Chalk paint has revolutionized furniture makeovers because it requires minimal prep work, adheres to almost any surface, and dries to a beautiful matte finish. Whether you’re transforming a thrift store find or updating family heirlooms, this complete beginner guide will walk you through everything you need to know. By the end, you’ll have the confidence to tackle your first project and create pieces that look professionally done.
What Makes Chalk Paint Perfect for Furniture Projects

Chalk paint isn’t your typical wall paint. It’s a decorative paint with a thick, creamy consistency that adheres beautifully to furniture without the headache of sanding or priming. The formula contains calcium carbonate, which gives it that signature matte, chalky appearance that’s become incredibly popular in home décor.
Unlike traditional paints, chalk paint grips onto surfaces like wood, laminate, metal, and even fabric. This means you can transform almost anything sitting in your garage or found at a yard sale. The quick drying time—usually 30 minutes to an hour—allows you to complete multiple coats in a single afternoon.
Many crafters who enjoy fun crafts to make at home discover that chalk painting becomes their favorite hobby. The forgiving nature of the paint means mistakes are easily fixed, making it ideal for beginners who are still building confidence.
Essential Supplies You Need Before Starting

Gathering the right materials before you begin saves time and frustration. Here’s what you’ll need for a successful chalk paint project: Paint and Finishing Products:
- Chalk paint in your chosen color (start with one quart for a medium-sized piece)
- Clear wax or topcoat for sealing
- Dark wax for antiquing (optional but recommended)
Application Tools:
- Natural bristle brush or chalk paint brush
- Wax brush or lint-free cloths
- Small artist brush for detailed areas
- Paint tray or paper plate
Prep and Cleanup:
- TSP cleaner or dish soap
- Clean rags
- Fine-grit sandpaper (220-grit)
- Drop cloth or old sheets
- Painter’s tape
Quality brushes make a significant difference in your final results. Invest in at least one good chalk paint brush—the stiff bristles create beautiful texture and help the paint adhere evenly.
How to Paint Furniture With Chalk Paint: Step-by-Step Process

Now let’s dive into the actual painting process. Following these steps ensures professional-looking results every time.
Step 1: Clean Your Furniture Thoroughly
Even though chalk paint doesn’t require extensive prep, cleaning is non-negotiable. Dirt, grease, and grime prevent proper adhesion and show through your beautiful paint job. Use TSP cleaner mixed with warm water, or simply use dish soap for lightly soiled pieces.
Wipe down every surface, including inside drawers and underneath. Pay special attention to areas around handles where oils from hands accumulate. Let the piece dry completely—rushing this step leads to adhesion problems later.
Step 2: Light Sanding and Repairs

While heavy sanding isn’t necessary, a quick scuff with fine-grit sandpaper helps on glossy surfaces. This creates tiny scratches that give the paint something to grip. You’re not removing finish—just dulling the sheen slightly.
Fill any deep scratches or holes with wood filler. Sand smooth once dry. Remove all hardware like knobs and hinges, storing screws in labeled bags so nothing gets lost.
Step 3: Apply Your First Coat
Stir your chalk paint well—the pigments settle at the bottom. Dip your brush about one-third into the paint and tap off excess. Apply using long, even strokes in the direction of the wood grain.
Don’t worry about achieving perfect coverage with the first coat. Chalk paint is meant to look slightly imperfect and textured. Brush marks are normal and add character to your piece.
Work in manageable sections and maintain a wet edge to avoid lap marks.
Step 4: Second Coat and Beyond
Wait at least one hour between coats—longer in humid conditions. Most pieces need two coats for solid coverage. Some colors, particularly reds and yellows, may need three coats.
If you want a more distressed look, one coat might be enough. The transparency allows the original finish to peek through, creating an authentically aged appearance. This technique works beautifully for DIY handmade gifts like jewelry boxes or small decorative items.
Distressing Techniques for Vintage Appeal

One of chalk paint’s greatest advantages is how easily it distresses. Creating that perfectly worn, vintage look takes just minutes with the right approach. Sandpaper Method: Once your paint is completely dry, use fine sandpaper to gently rub areas that would naturally wear over time.
Focus on edges, corners, and raised details. Start light—you can always remove more, but adding paint back looks obvious. Wet Distressing: While the second coat is still slightly tacky, use a damp cloth to wipe away paint from high points.
This creates a softer, more gradual distressed effect that looks incredibly natural. Dry Brushing: Load a small amount of contrasting paint onto a dry brush, wipe most of it off on a paper towel, then lightly drag across raised details. This highlights texture and adds depth to carved pieces.
If you’re someone who enjoys home craft projects quick and satisfying, distressing is incredibly addictive. The transformation happens in seconds and dramatically changes the character of your piece.
Sealing Your Chalk Painted Furniture

Unsealed chalk paint remains porous and vulnerable to stains and damage. Sealing protects your hard work and makes the surface wipeable.
Wax Application
Clear wax is the traditional sealant for chalk paint. Apply with a wax brush or lint-free cloth in thin layers, working in small sections. The wax melts slightly from your body heat and the friction of application, penetrating into the paint.
Buff with a clean cloth after 10-15 minutes. The surface should feel smooth, not tacky or sticky. Dark wax applied sparingly into crevices and corners creates beautiful depth and an antique patina.
Topcoat Alternatives
For high-traffic pieces like kitchen tables, consider water-based polyurethane instead. It provides harder protection than wax and doesn’t require reapplication. The trade-off is a slightly less matte finish, though many products now offer dead-flat options.
Spray topcoats work well for intricate pieces with lots of detail. Apply several thin coats rather than one heavy coat to prevent drips and runs.
Common Mistakes and How to Avoid Them

Even experienced painters make these errors occasionally. Knowing what to watch for helps you achieve better results from your first project. Applying Too Thick: Thick coats take forever to dry and remain soft underneath.
They’re also prone to chipping. Two thin coats beat one thick coat every time. Skipping the Seal: Your gorgeous finish will stain, watermark, and wear without protection.
Always seal, even decorative pieces that won’t see heavy use. Not Cleaning Properly: Silicone residue from furniture polishes causes “fish eyes”—spots where paint refuses to adhere. Clean with degreaser if you suspect previous products were used.
Impatience with Curing: Paint may be dry to touch in an hour but takes up to 30 days to fully cure. Treat newly painted furniture gently during this period. Those who love dollar store crafts ideas often find that painting inexpensive furniture is a fantastic way to practice before tackling valuable pieces.
Grab a cheap wooden tray or picture frame to test your technique first.
Creative Ideas for Your Chalk Paint Projects

Once you’ve mastered the basics of how to paint furniture with chalk paint, endless possibilities open up. Consider these project ideas to expand your skills: Two-Tone Dressers: Paint the body one color and drawers another. Navy and white or soft gray with blush pink create stunning contrasts.
Ombre Effects: Blend two or three shades of the same color family from dark at the bottom to light at the top. This requires working quickly while paint is wet. Stenciled Details: Add patterns to drawer fronts or tabletops using stencils and contrasting paint.
Floral motifs, geometric patterns, and typography all work beautifully. Color Washing: Thin chalk paint with water and apply over a base coat for a translucent, layered effect. This technique mimics expensive lime-washed furniture at a fraction of the cost.
Painted furniture also makes wonderful handmade gift craft ideas. Small tables, vintage chairs, or decorative boxes transformed with chalk paint become treasured presents for housewarmings and special occasions.
Conclusion: Start Your Chalk Paint Journey Today
Learning how to paint furniture with chalk paint opens up a world of creative possibilities without requiring professional skills or expensive equipment. The forgiving nature of chalk paint, combined with its beautiful matte finish and easy application, makes furniture transformation accessible to everyone. Start with a small, low-pressure project—perhaps a thrift store find you won’t be heartbroken to mess up.
Practice your technique, experiment with distressing, and build confidence before tackling that antique dresser you’ve been eyeing. Remember that imperfections often add character, and the beauty of chalk paint lies in its ability to create pieces with soul and history. The satisfaction of bringing worn, forgotten furniture back to life is genuinely addictive.
Your first successful project will lead to another, then another, and soon you’ll find yourself eyeing every piece of furniture as a potential canvas. Ready to start your first project? Share your chalk paint transformation plans in the comments below, or let us know if you have questions about specific techniques.
We’d love to see your before and after photos once you complete your masterpiece!
FAQ
Do I need to sand furniture before using chalk paint? Heavy sanding isn’t required with chalk paint. A light scuff with fine sandpaper on glossy surfaces improves adhesion, but thorough cleaning matters more.
Skip sanding entirely on raw wood or already matte surfaces. How long does chalk painted furniture last? Properly sealed chalk paint lasts for years with normal use.
Waxed pieces may need touch-ups annually, while polyurethane-sealed surfaces can go five years or more. The durability depends heavily on your sealing method and how the piece is used. What’s the best way to paint furniture with chalk paint if I want minimal brush marks?
Use a foam roller for large flat surfaces to minimize texture. Apply thin, even coats and maintain a wet edge. Lightly sand between coats with 320-grit sandpaper for an ultra-smooth finish.
Some painters thin their chalk paint slightly with water for smoother application. Can I use chalk paint on laminate furniture? Yes!
Chalk paint adheres well to laminate without primer. Clean the surface thoroughly, apply thin coats, and seal properly. Laminate furniture accepts chalk paint just as well as solid wood pieces.
How do I fix mistakes when learning how to paint furniture with chalk paint? Wet paint wipes off easily with a damp cloth. Dried mistakes can be sanded smooth and repainted.
Drips and runs disappear with light sanding once dry. Chalk paint is extremely forgiving—most errors are simple to correct even for complete beginners.