10 Epoxy Resin Table Top Ideas That Transform Furniture Into Stunning Art
Are you tired of boring, plain furniture that lacks personality? Epoxy resin offers an incredible solution to transform ordinary tables into extraordinary conversation pieces. This versatile material creates stunning visual effects that make your furniture look like expensive designer pieces.
Whether you want ocean-inspired waves, glowing river tables, or embedded treasures, these 10 epoxy resin table top ideas that transform furniture will inspire your next project. Let’s dive in…
1. Mesmerizing Ocean Wave Design

- Clear epoxy resin and hardener
- Blue and white resin pigments
- Heat gun or torch
- Wooden table base
- Mixing cups and stir sticks
The ocean wave technique creates a stunning seascape right on your table surface. You’ll layer different shades of blue pigmented resin to mimic rolling waves. The effect captures the beauty of the ocean frozen in time.
Start by pouring your base layer of deep blue resin. Add lighter blue and white swirls on top while the resin is still wet. Use a heat gun to create realistic wave peaks and foam effects.
This design works perfectly on coffee tables and dining surfaces. If you enjoy fun crafts to make at home, this project offers a rewarding weekend challenge.
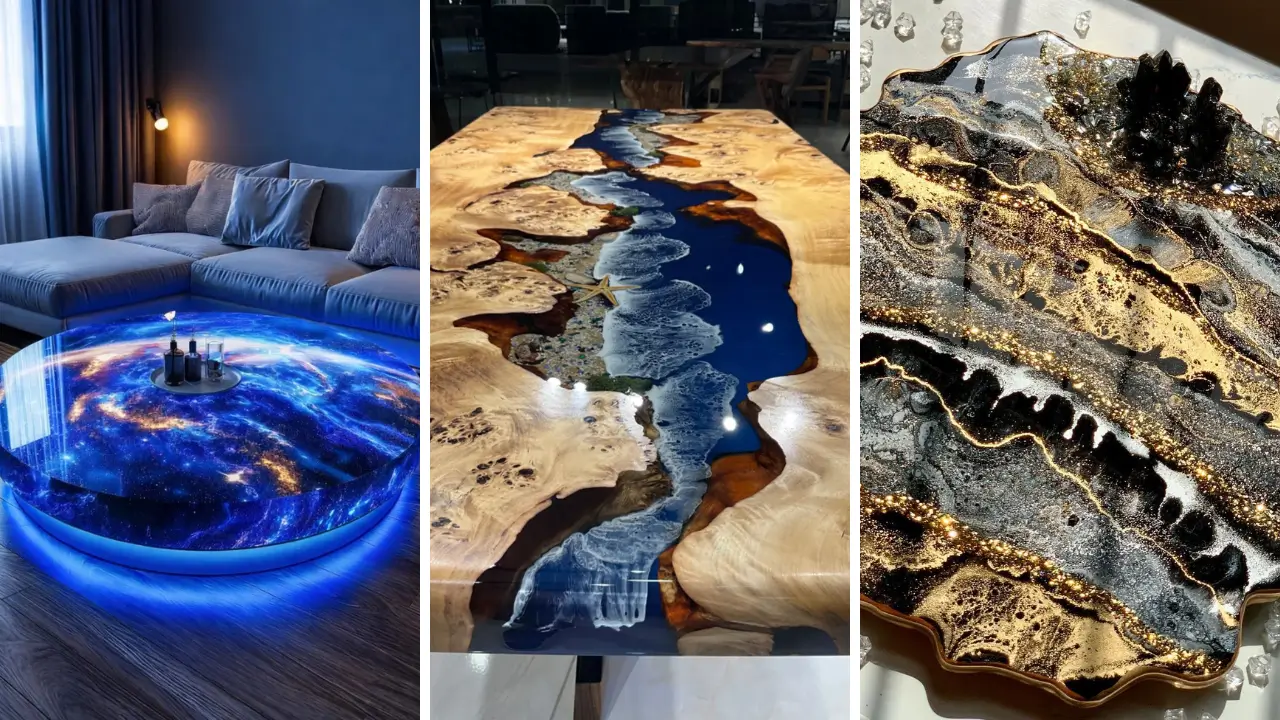
2. Glowing River Table

- Live edge wood slabs
- Glow-in-the-dark powder
- Crystal clear epoxy
- UV flashlight for charging
- Sandpaper various grits
The glowing river table creates magical nighttime ambiance in any room. This design features a center channel filled with luminescent resin between two wood pieces. During the day, it looks elegantly natural with clear or tinted resin.
Mix phosphorescent powder thoroughly into your clear epoxy before pouring. The powder charges under natural or artificial light. At night, your table transforms into a glowing masterpiece that lasts for hours.
3. Embedded Botanical Beauty

- Preserved flowers and leaves
- Crystal clear casting resin
- Tweezers for positioning
- Wooden frame or mold
- Sealant spray
Capture nature’s beauty forever with botanical embedded tables. Dried flowers, ferns, and leaves suspended in clear resin create breathtaking organic artwork. Each piece becomes completely unique based on your plant selections.
Press and dry your botanicals thoroughly before embedding. Any moisture causes cloudiness or decay over time. Seal each piece with clear sealant spray to prevent discoloration.
Position your flowers using tweezers after pouring a thin base layer. Add more resin gradually to suspend elements at different depths. This creates a three-dimensional garden effect.
4. Dramatic Lava Flow Effect

- Black and dark gray wood stain
- Red, orange, and yellow pigments
- Deep pour epoxy resin
- Burnt wood or charred pieces
- Heat resistant gloves
Create volcanic drama with a lava flow table design. This bold statement piece combines charred black wood with glowing red and orange resin rivers. The contrast makes an incredibly powerful visual impact.
Char your wood pieces using a torch technique called shou sugi ban. This creates an authentic volcanic rock appearance. Pour your lava-colored resin into the natural cracks and gaps.
Layer your warm pigments from deep red at the bottom to bright orange and yellow on top. This mimics real molten lava cooling at the surface.
5. Geode Crystal Cluster

- Crushed glass or crystal pieces
- Metallic resin pigments
- Purple, blue, and teal dyes
- Gold leaf flakes
- Round or irregular shaped mold
Transform your table into a stunning geode-inspired masterpiece. This design mimics the crystalline beauty found inside natural rock formations. Deep jewel tones and metallic accents create luxurious visual depth.
Build your geode from the outside inward. Start with dark outer rings and progress to lighter crystal centers. Add crushed glass or real crystals in the middle section.
Apply gold leaf accents between color layers for authentic geode veining. The metallic lines catch light beautifully and add expensive-looking detail. This project makes excellent DIY handmade gifts for special occasions.
6. Rustic Wood And Stone Blend

- Reclaimed barn wood
- Natural river stones
- Clear casting resin
- Wood stabilizer
- Orbital sander
Combine natural elements for an organic rustic aesthetic. This design arranges smooth river stones within weathered wood, filled with crystal clear resin. The result resembles a serene riverbed captured in time.
Select flat-bottomed stones that sit stable in your arrangement. Varying sizes and colors create more visual interest. Clean and dry each stone thoroughly before placement.
Apply wood stabilizer to your reclaimed materials first. This prevents air bubbles from escaping wood pores into your resin during curing.
7. Galaxy Nebula Swirl

- Black epoxy base coat
- Purple, blue, and pink pigments
- Fine glitter and metallic powder
- White pigment for stars
- Silicone mold or table form
Bring the cosmos into your home with a galaxy-themed table. Swirling nebula colors and sparkling star effects create an otherworldly furniture piece. This design sparks imagination and conversation.
Pour your black base layer first and let it partially cure. Add swirls of deep purple, electric blue, and magenta on top. Blend edges gently with a stick or heat gun.
Sprinkle fine glitter across the surface for distant stars. Use white pigment drops for larger star clusters. The depth effect makes viewers feel like they’re gazing into space.
8. Vintage Map Preservation

- Vintage maps or nautical charts
- Mod Podge sealant
- Ultra-clear table top resin
- Foam brush
- Heavy books for pressing
Preserve meaningful documents under a protective resin coating. Vintage maps, family documents, or nautical charts become functional art pieces. This technique works wonderfully for travel enthusiasts and history lovers.
Flatten your paper thoroughly under heavy books for several days. Apply multiple thin coats of Mod Podge sealant to both sides. This prevents resin from soaking through and discoloring the paper.
Position your sealed document on the table surface and pour resin slowly. Pop any bubbles immediately with a heat gun. This preserves your memories permanently.
9. Metallic Marble Elegance

- White and gray resin pigments
- Gold or rose gold metallic powder
- Clear epoxy resin
- Plastic cups for separate colors
- Craft sticks for veining
Achieve a luxurious marble look without the heavy weight or expensive cost. Epoxy resin marble effects can perfectly mimic Carrara, Calacatta, or fantasy marble patterns. Your guests will never guess it’s not real stone.
Mix your white base color and pour it first. Add thin streams of gray in organic vein patterns. Drag a craft stick gently through the colors for realistic marble movement.
Apply metallic gold veining last using a fine brush or stick. The gold catches light and adds sophistication. If you enjoy home craft projects quick, this technique produces fast impressive results.
10. Treasure Chest Display

- Collectible items or memorabilia
- Crystal clear casting resin
- Shadow box frame or deep mold
- Positioning wire or tape
- UV-resistant topcoat
Create a memory preservation table with embedded treasures and collectibles. Coins, shells, vintage toys, or sports memorabilia become permanent display pieces. This design tells your personal story through furniture.
Choose items that can withstand resin embedding without damage. Avoid anything with moisture sensitivity or materials that react with chemicals. Test small items separately first.
Pour thin layers and position items gradually for three-dimensional depth. Some items can float suspended while others rest on the bottom. This creates visual interest at every viewing angle.
Looking for more creative projects? Explore handmade gift craft ideas for additional inspiration.
Essential Safety Guidelines
- Nitrile gloves
- Respirator mask with organic vapor filters
- Safety glasses
- Well-ventilated workspace
- Protective clothing
Working with epoxy resin requires proper safety precautions. The chemicals can irritate skin, eyes, and respiratory systems. Always protect yourself before starting any resin project.
Set up your workspace with excellent ventilation. Open windows and use fans to move air away from your breathing zone. Outdoor work areas are ideal when weather permits.
Wear your protective equipment throughout the entire process. Keep gear on until resin is fully cured and off-gassing has stopped completely. For more affordable project ideas, check out dollar store crafts ideas that complement your resin work.
These 10 epoxy resin table top ideas that transform furniture offer endless creative possibilities for your home. From ocean waves to galaxy swirls, you can create truly unique statement pieces. Each project allows personal expression while adding functional beauty to your space.
Grab your resin, pigments, and creative spirit and start creating! Share your favorite ideas in the comments below and let us know which design you’ll try first. Rate this post and inspire fellow DIY enthusiasts with your creations!