Must-Have Resin Supplies for Beginners: The Starter Shopping List
Ever scrolled through social media and fallen in love with those gorgeous resin coasters, jewelry pieces, or decorative trays — then wondered, “Can I actually make that?” The answer is yes, absolutely. But before you dive in, knowing exactly what to buy is half the battle. Having the right must-have resin supplies for beginners: the starter shopping list in hand means you won’t waste money on unnecessary gadgets or end up frustrated with a cloudy, sticky mess on your first try.
This guide breaks down every essential item you need, explains why each one matters, and helps you shop smart from day one. Whether you’re crafting for fun or planning to create DIY handmade gifts for friends and family, this list has you covered.
Why Choosing the Right Resin Supplies Matters for Beginners

Resin art looks effortless in videos, but the reality is that your results depend heavily on the quality of your supplies. Using the wrong type of resin, incorrect ratios, or skipping safety gear can turn a fun project into a costly, smelly disaster. Beginners especially need a solid foundation — not the fanciest tools, but the right tools.
The good news? You don’t need to spend a fortune. A well-curated starter kit covers everything from mixing to molding to finishing, and most items are reusable across dozens of projects.
Understanding what each supply does helps you make confident decisions at the store or online. Once you’ve mastered the basics, resin opens up a world of creative possibilities. It’s one of those fun crafts to make at home that genuinely impresses people — and it’s more beginner-friendly than most expect when you start with the right setup.
Must-Have Resin Supplies for Beginners: The Complete Starter Shopping List

Let’s get into the actual list. These are the core items every beginner should have before pouring their first batch of resin. Think of this as your non-negotiable foundation.
1. Epoxy Resin (Two-Part Formula)
Epoxy resin is the gold standard for beginners. It comes in two parts — resin and hardener — that you mix together to create a chemical reaction. Look for a formula specifically labeled “beginner-friendly” or “low-odor” for a more pleasant first experience.
Choose a resin with a longer working time (also called “pot life”), ideally 30–45 minutes, so you have enough time to add colors, embed objects, and make adjustments before it starts to cure. Brands like ArtResin, HXDZFX, and Let’s Resin are popular choices among beginners for their clarity and ease of use.
2. Silicone Molds

Silicone molds are your best friend as a beginner. Unlike plastic or metal molds, silicone is flexible, making it incredibly easy to pop your cured resin piece out without damage. They come in endless shapes — coasters, jewelry bezels, trays, keychains, and more.
Start with a variety pack that includes a few different shapes. Coaster molds and small jewelry molds are ideal starting points because they’re forgiving in terms of volume and curing time.
3. Mixing Cups and Stir Sticks
You’ll need dedicated mixing cups — not your kitchen cups. Graduated (measurement-marked) plastic mixing cups make it easy to measure precise resin-to-hardener ratios. Off-ratio mixing is one of the most common beginner mistakes and leads to sticky, uncured resin.
Wooden craft sticks or silicone stir sticks work perfectly. Avoid using cardboard or paper sticks, as they can introduce moisture and bubbles into your mix.
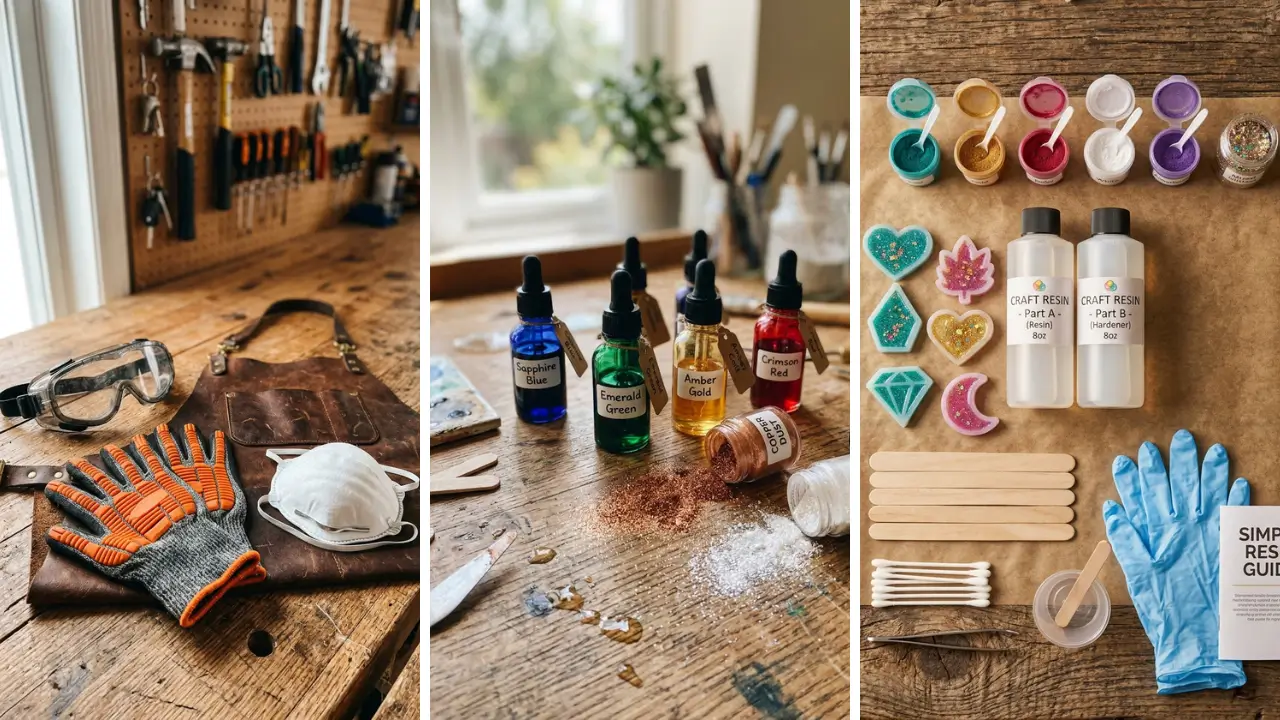
4. Protective Safety Gear

This one is non-negotiable. Resin is a chemical compound, and skin contact or inhalation of fumes can cause sensitization over time. Before you pour anything, make sure you have:
- Nitrile gloves (not latex — resin can seep through latex)
- Safety glasses or goggles
- A respirator mask rated for organic vapors (N95 is a minimum)
Work in a well-ventilated area or near an open window. Safety isn’t boring — it’s what lets you keep crafting long-term.
5. Heat Gun or Butane Torch
Bubbles are the bane of every resin artist. When you mix resin, tiny air bubbles get trapped in the liquid. A heat gun or small butane torch passed lightly over the surface pops those bubbles almost instantly, leaving you with a crystal-clear finish.
A heat gun is often safer for beginners since it’s easier to control than an open flame. Keep the tool moving and hold it a few inches above the surface — never let it hover in one spot or you risk scorching the resin.
6. Resin Colorants and Pigments

Plain clear resin is beautiful on its own, but adding color is where the magic really happens. You have several options:
- Alcohol inks — vibrant, transparent colors that create gorgeous swirls
- Mica powder pigments — metallic, pearlescent finishes
- Resin-specific dyes — solid, opaque colors
Start with a small set of alcohol inks and a basic mica powder kit. They’re versatile across dozens of designs and a little goes a very long way.
7. Plastic Drop Sheet or Silicone Work Mat
Resin sticks to almost everything — except silicone. Line your work surface with a silicone mat or a plastic drop sheet to protect your table and make cleanup much easier. Resin peels right off silicone once cured, saving you a headache.
A dedicated resin workspace mat is a small investment that prevents big messes. It’s one of those things you’ll wish you bought before your very first pour.
8. Measuring Tools (Digital Scale or Syringes)
")
Accurate measurement is critical. Many epoxy resins require a 1:1 ratio by volume, but some use 2:1 or even 3:1 ratios by weight. A digital kitchen scale gives you the most accuracy and takes the guesswork out of mixing.
Alternatively, measuring syringes work well for small batches, especially in jewelry-making.
9. Embellishments and Inclusions
This is where you personalize your work. Common inclusions for beginners include:
- Dried flowers and botanicals
- Glitter (cosmetic or craft grade)
- Shells, beads, or small charms
- Gold or silver leaf flakes
These elements are what transform a simple resin pour into something truly special. If you’re making handmade gift craft ideas for loved ones, personalized inclusions — like a favorite flower or meaningful charm — make the gift incredibly thoughtful.
10. Finishing Supplies: Sandpaper and Resin Polish
After your piece cures, edges can be sharp and the surface might have minor imperfections. Wet/dry sandpaper (start at 400 grit and work up to 2000 grit) smooths edges beautifully. Follow up with a resin-specific polish or car headlight restorer compound to bring back that high-gloss shine.
Don’t skip this step — finishing is what separates a handmade piece from a professional-looking creation.
Budget Tips: Building Your Resin Starter Kit Without Overspending

You don’t need to buy everything at once or at premium prices. Many supplies overlap with other craft projects, making resin a great addition to your existing hobby toolkit. If you’re already into home craft projects quick and easy, you may already own stir sticks, drop sheets, or a digital scale.
Shopping smart matters too. You’d be surprised how many resin embellishments — glitter, small charms, plastic gems — you can find at bargain prices. For example, exploring dollar store crafts ideas can reveal affordable supplies like silicone molds, decorative items, and mixing tools that work just as well as expensive craft store versions.
Aim to spend $50–$80 USD on your very first kit. That budget comfortably covers resin, a few molds, colorants, and safety gear — enough to complete 8–12 beginner projects.
Common Beginner Mistakes to Avoid
Even with the right supplies, a few habits can derail your early projects. Here’s what to watch out for:
- Incorrect ratios: Always measure precisely. Eyeballing never works with resin.
- Mixing too fast: Stir slowly and thoroughly for at least 3–4 minutes to avoid introducing excess bubbles.
- Skipping the warm-up: If your resin is cold (below 70°F/21°C), warm the bottles in warm water for 5–10 minutes before mixing. Cold resin cures slowly and unevenly.
- Pouring too thick too fast: Deep pours generate heat. For thick molds, pour in layers and let each layer cure partially before adding the next.
- Not covering curing pieces: Dust and pet hair love wet resin. Cover your pieces with a box or dome while they cure.
Conclusion: Start Your Resin Journey with Confidence
Resin crafting is one of the most rewarding creative hobbies you can pick up, and getting started is simpler than you think when you have the right information. This must-have resin supplies for beginners: the starter shopping list gives you a clear, no-fluff roadmap to your first successful pour. From choosing the right epoxy formula to finishing your piece like a pro, every item on this list serves a real purpose.
Remember — you don’t need to buy the most expensive supplies or the biggest collection. Start lean, learn the basics, and build from there. Your first coaster or pendant won’t be perfect, and that’s completely okay.
Every pour teaches you something new. With practice, you’ll be creating stunning pieces that look like they came from a boutique shop. The most important thing?
Just start. Your supplies are waiting, your molds are ready, and your next favorite creative outlet is just one pour away. Ready to get crafting?
Bookmark this list before your next shopping trip, share it with a friend who’s been curious about resin art, and drop a comment below telling us what you plan to make first — we’d love to cheer you on!
Frequently Asked Questions
Q: What is the most important item on the must-have resin supplies for beginners starter shopping list? A: Safety gear comes first — always. Nitrile gloves, eye protection, and a respirator mask protect you from chemical exposure during every session.
After safety, a high-quality two-part epoxy resin is your most critical purchase, as the resin itself determines the clarity and durability of your finished pieces. Q: How much does it cost to buy a complete beginner resin starter kit? A: A solid beginner kit typically costs between $50–$80 USD.
This covers a small bottle of epoxy resin, a few silicone molds, basic colorants, mixing cups, safety gear, and a heat gun. You can reduce costs by sourcing embellishments and some tools from budget-friendly retailers. Q: Can I use any mold for resin, or does it need to be silicone?
A: Silicone molds are strongly recommended for beginners because cured resin releases from silicone easily and cleanly. You can use plastic molds, but resin may stick or be harder to remove. Metal and ceramic molds generally require a mold release spray.
Avoid paper or cardboard molds entirely — resin will soak through and ruin the piece. Q: How long does epoxy resin take to cure for beginners? A: Most beginner-friendly epoxy resins are tack-free (touchable) within 24 hours and fully cured within 48–72 hours.
Some specialty resins cure faster (as little as 12 hours), but full hardness and clarity often take up to 7 days. Avoid moving or using your piece until it’s fully cured to prevent dents or fingerprints. Q: Are the must-have resin supplies for beginners available at regular craft stores?
A: Yes, most essential resin supplies are available at major craft retailers like Michaels, Hobby Lobby, and Joann Fabrics. Epoxy resin, silicone molds, pigments, and mixing tools are commonly stocked. For a wider variety and better pricing, online platforms like Amazon or specialty resin suppliers often offer better starter bundles and bulk options.