How to Make a DIY Edison Bulb Chandelier for a Dining Room: A Complete Step-by-Step Guide
Have you ever walked into a restaurant and felt instantly charmed by the warm, vintage glow of Edison bulb chandeliers hanging above every table? That same cozy, industrial-chic atmosphere is 100% achievable in your own home — and it doesn’t require a professional electrician or a massive budget. Learning how to make a DIY Edison bulb chandelier for a dining room is one of the most rewarding home improvement projects you can tackle on a weekend.
In this guide, you’ll discover exactly what materials you need, the safest wiring approach for beginners, and styling tips to make your chandelier look like it came straight from a high-end lighting boutique. Whether you’re a seasoned crafter or just starting to explore fun crafts to make at home, this project is well within your reach.
Why an Edison Bulb Chandelier Is Perfect for Your Dining Room

The dining room is arguably the most social space in any home. It’s where family dinners happen, where guests gather, and where memories are made over good food. Lighting plays a massive role in setting the right mood — and Edison bulbs deliver a warm, amber glow (typically around 2200K color temperature) that makes everything look more inviting.
Beyond aesthetics, a DIY Edison bulb chandelier is surprisingly cost-effective. A comparable store-bought fixture can run anywhere from $150 to $500+. By building your own, you can often achieve the same look for under $60, especially if you source smart.
Speaking of saving money on supplies, there are plenty of dollar store crafts ideas that can help you source decorative elements like chains, hooks, and accent pieces at a fraction of retail cost. A custom chandelier also lets you control the exact size, number of bulbs, and style — rustic farmhouse, modern industrial, or bohemian vintage. No off-the-shelf fixture can offer that level of personalization.
Materials You’ll Need Before You Start

Getting your materials together before you begin saves a ton of frustration mid-project. Here’s a comprehensive list of what you’ll need:
- Edison bulbs (4–8 recommended, depending on fixture size) — ST64 or A19 style work beautifully
- Pendant light cord kits (one per bulb) — available at hardware stores or online
- Canopy/ceiling mounting kit — this is the plate that attaches to your ceiling junction box
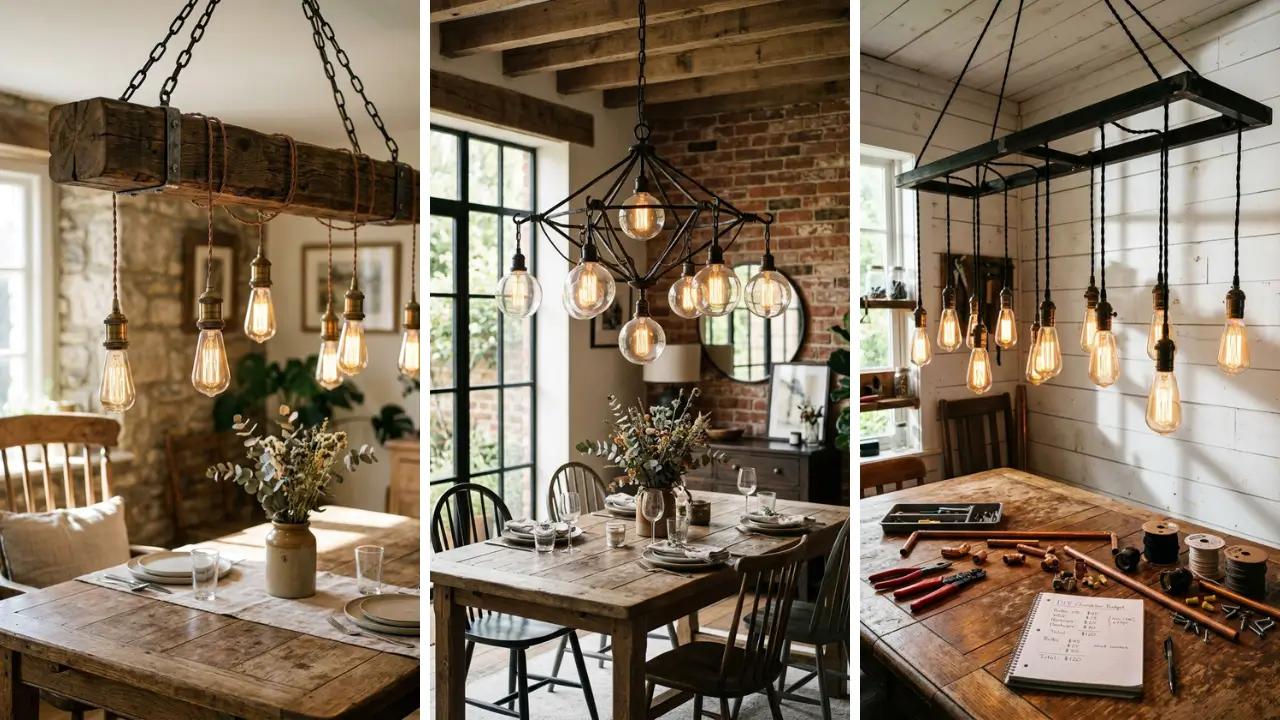
- Wooden beam, pipe, or metal ring — serves as the frame from which bulbs hang
- Electrical wire (cloth-covered wire looks stunning for vintage aesthetics)
- Wire nuts and electrical tape
- Ceiling hook or mounting bracket
- Basic tools: wire stripper, screwdriver, voltage tester, pliers
If you want a truly rustic look, reclaimed wood makes an excellent chandelier bar. A pipe from your local hardware store gives a more industrial vibe. Both options are affordable and easy to work with.
How to Make a DIY Edison Bulb Chandelier for a Dining Room: Step-by-Step Instructions

Ready to build? Follow these steps carefully, and don’t rush the electrical portions. Safety first — always.
Step 1: Turn Off the Power and Prepare Your Ceiling Junction Box
Before touching anything electrical, go to your breaker box and cut power to the dining room circuit. Use a voltage tester to confirm the ceiling junction box is completely dead before proceeding. This step is non-negotiable for your safety.
Inspect the junction box to confirm it’s rated for a light fixture (not just a fan or junction-only box). If your box isn’t properly rated, replace it — this is a quick job even for beginners.
Step 2: Build Your Chandelier Frame

Cut your wooden beam or pipe to your desired length. For a dining table that seats 6, a 36–48 inch frame works well. Sand wood smooth and stain or paint it to match your room’s aesthetic — dark walnut and matte black are popular choices that complement Edison bulbs perfectly.
Drill evenly spaced holes along the frame where each pendant cord will pass through. Space them symmetrically for a clean, balanced look. Mark the center of the frame — this is where your main support chain or rod will attach.
Step 3: Wire Each Pendant Cord
Thread each pendant cord through its designated hole in the frame. Most pendant cord kits come pre-wired with a socket at the bottom — simply screw in your Edison bulb when done. If you’re using raw wire, strip about ¾ inch of insulation from each wire end using your wire stripper.
Connect the neutral wire (usually white or ribbed) and the hot wire (black or smooth) from each pendant to the main supply wires using wire nuts. Bundle them neatly and wrap with electrical tape for extra security.
Step 4: Attach the Canopy and Mount to Ceiling

Feed all your grouped wires through the ceiling canopy plate. Connect the combined wires to the ceiling junction box wires — white to white, black to black, and ground to ground (bare copper or green). Secure the canopy plate to the junction box cover.
Hang your frame from the ceiling using your support chain, rod, or cable. Adjust the height so the bottom of the bulbs hang approximately 30–36 inches above your dining table surface — this is the sweet spot for both illumination and visual impact.
Step 5: Install Bulbs and Test
Screw in all your Edison bulbs, restore power at the breaker, and flip the switch. That first glow is genuinely satisfying. If a bulb doesn’t light, double-check that connection’s wire nut is tight and the socket is properly engaged.
This entire project pairs beautifully with other home craft projects quick wins that can transform your dining space on a single weekend — think DIY table runners, painted accent walls, or handmade centerpieces.
Design Tips to Make Your Edison Chandelier Look Professional

The difference between a chandelier that looks homemade and one that looks intentionally designer often comes down to a few small details. First, use bulbs of identical wattage and style. Mixing bulb shapes in a multi-pendant design looks cluttered rather than curated.
Consider adding a dimmer switch — this is a game changer. Edison bulbs at 20–30% brightness create a candlelit atmosphere that’s perfect for dinner parties. Most standard dimmers are compatible with LED Edison bulbs, but double-check the packaging.
Use cloth-covered wire in black, white, or metallic gold instead of standard plastic-sheathed wire. This single upgrade makes your fixture look like it costs three times more. Many crafters who love creating handmade gift craft ideas actually build these chandeliers as gifts for housewarming parties — they’re that impressive as a finished piece.
Finally, hang your chandelier centered directly over the dining table, not the center of the room. The table is the focal point, and your lighting should reinforce that.
Safety Considerations You Should Never Skip

Electrical safety isn’t optional — it’s essential. Always verify power is off before touching any wires. Use a junction box rated for the total weight of your fixture (most standard boxes support up to 35 lbs; heavy fixtures need a fan-rated box).
Don’t exceed the wattage rating of your pendant sockets. Most standard sockets handle up to 60W incandescent, but LED Edison bulbs typically draw only 4–8W, so this is rarely an issue. Use bulbs with the correct base type (E26 is standard in North America).
If you’re ever unsure about any electrical step, consult a licensed electrician for that portion. The woodworking and design aspects are great DIY territory; the electrical connections are where precision genuinely matters.
Budget Breakdown: How Much Does a DIY Edison Chandelier Really Cost?

Here’s an honest breakdown of typical costs for a 6-bulb chandelier:
- Edison bulbs (6-pack): $15–$25
- Pendant cord kits (6): $18–$30
- Ceiling canopy kit: $8–$15
- Wood beam or pipe: $5–$20
- Cloth-covered wire (10 ft): $8–$12
- Miscellaneous hardware: $5–$10
Total estimated cost: $59–$112 — a fraction of what comparable retail fixtures cost. This project is also a wonderful entry point into the world of DIY handmade gifts and home decor crafting, as the skills you learn here transfer directly to dozens of other projects.
Conclusion: Light Up Your Dining Room with Confidence
Building your own Edison bulb chandelier is more than a craft project — it’s a meaningful upgrade to one of the most important rooms in your home. You’ve learned how to select materials, wire pendant cords safely, build a stylish frame, and mount everything securely. Knowing how to make a DIY Edison bulb chandelier for a dining room from scratch gives you a fixture that’s perfectly sized, styled exactly to your taste, and built with your own hands — something no store-bought light can replicate.
The warm glow of Edison bulbs transforms an ordinary dinner into an experience. Whether it’s a quiet family meal or a dinner party, the right lighting makes everyone feel welcome. And the best part?
You made it yourself. Start gathering your materials this weekend and give your dining room the centerpiece it deserves. Once you’ve completed this project, you’ll want to explore even more creative builds — there’s a whole world of inspiring projects waiting for you.
Ready to get crafting? Save this guide, grab your tools, and start building your dream dining room chandelier today. Share a photo of your finished fixture in the comments — we’d love to see how yours turns out!
If you enjoyed this project, share it with a friend who loves DIY home decor. The more people who discover how approachable and affordable this build is, the better.
Frequently Asked Questions
Q: How hard is it to make a DIY Edison bulb chandelier for a dining room as a complete beginner? A: It’s genuinely beginner-friendly if you take it step by step. The woodworking portion requires basic measuring and drilling, and the electrical work involves simple wire connections using wire nuts.
As long as you turn off power at the breaker and use a voltage tester, the process is safe and straightforward for most adults. Q: How many Edison bulbs do I need for a dining room chandelier? A: For a standard dining table (seats 4–6), four to six bulbs is the ideal range.
This provides enough light coverage while maintaining that warm, intimate atmosphere Edison bulbs are known for. Larger tables or open-plan spaces may benefit from eight or more bulbs. Q: What height should I hang a DIY Edison bulb chandelier over a dining room table?
A: The bottom of your chandelier or lowest bulb should hang approximately 30–36 inches above the table surface. This height provides excellent illumination without obstructing sightlines across the table or creating glare. For rooms with ceilings higher than 8 feet, add 3 inches per additional foot of ceiling height.
Q: Can I use LED Edison bulbs instead of incandescent for my DIY chandelier? A: Absolutely — LED Edison bulbs are actually the preferred choice today. They produce the same warm amber glow (look for bulbs rated 2200K–2700K) while using 80% less energy and lasting 15–25 times longer than incandescent versions.
Just make sure your dimmer switch is LED-compatible if you plan to install one. Q: How to make a DIY Edison bulb chandelier for a dining room without spending a lot of money? A: The key to keeping costs low is smart material sourcing.
Buy Edison bulbs in multipacks, use reclaimed wood for the frame, and look for pendant cord kits in bulk online. You can often find decorative hardware and chain at thrift stores or discount shops. With careful sourcing, a stunning 6-bulb chandelier is easily achievable for under $60.