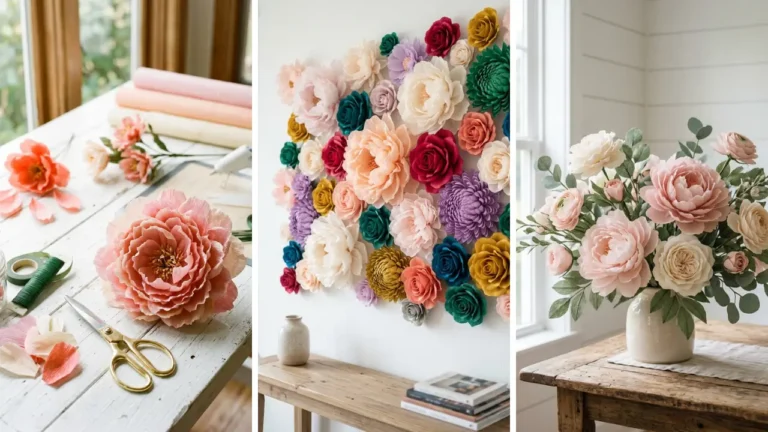
How to Make a Spring Flower Garland to Decorate Your Home

Have you ever walked into a room and felt instantly uplifted by a simple touch of floral beauty? There’s something magical about bringing the freshness of spring indoors, and learning how to make a spring flower garland to decorate your home is one of the most rewarding ways to do exactly that. Whether you’re preparing for a special celebration or simply craving a seasonal refresh, a handmade flower garland transforms any space into a blooming paradise.
In this comprehensive guide, you’ll discover everything from choosing the perfect flowers to creating garlands that last for weeks. The best part? You don’t need any prior crafting experience.
By the end of this article, you’ll have the confidence and know-how to create stunning floral decorations that will impress everyone who walks through your door. Let’s dive into the wonderful world of flower garland making and unlock your creative potential!
Why Spring Flower Garlands Are Perfect for Home Decoration

Spring flower garlands offer a versatility that few other decorations can match. They work beautifully draped across mantels, winding down staircases, framing doorways, or even serving as stunning table centerpieces. Unlike store-bought artificial decorations, handmade flower garlands carry a personal touch that makes your home feel uniquely yours.
They’re also surprisingly budget-friendly when you know where to source your materials. If you enjoy exploring dollar store crafts ideas, you’ll be thrilled to know that many garland supplies can be found at bargain prices. Creating your own garland also means complete customization.
You control the colors, the flower types, the length, and the overall aesthetic. Whether your home features a modern minimalist style or cozy farmhouse charm, there’s a spring garland design waiting for you.
Essential Materials You Need to Make a Spring Flower Garland

Before you start crafting, gathering the right materials sets you up for success. Here’s what you’ll need: For the base:
- Floral wire or grapevine garland base (6-8 feet recommended for beginners)
- Green floral tape
- Wire cutters or sharp scissors
- Zip ties or twist ties for securing elements
For the flowers and greenery:
- Fresh or faux spring flowers (tulips, peonies, ranunculus, cherry blossoms)
- Eucalyptus, fern fronds, or ivy for greenery
- Accent elements like baby’s breath or lavender sprigs
Optional embellishments:
- Ribbon in complementary colors
- Fairy lights for evening ambiance
- Small decorative birds or butterflies
This project falls perfectly into the category of fun crafts to make at home because you can gather materials gradually and work at your own pace.
How to Make a Spring Flower Garland: Step-by-Step Instructions

Step 1: Prepare Your Workspace
Clear a large table or floor space where you can spread out your garland fully. Working in sections without seeing the whole picture often leads to unbalanced results. Lay out all your materials within arm’s reach.
Organize your flowers by type and color so you can easily visualize your design as you build.
Step 2: Create or Prepare Your Base

If you’re using a grapevine base, gently stretch it out and work out any kinks. For a wire base, bend it into a flexible rope-like shape. Measure the space where your garland will hang.
Add about 12 extra inches on each end for draping. Most standard mantel garlands range from 5 to 9 feet long.
Step 3: Add the Greenery Foundation
Start by attaching your greenery to the base using floral wire or tape. Work in one direction consistently—this creates a flowing, natural appearance. Overlap each piece of greenery slightly with the previous one.
This technique covers any visible wire and creates fullness. Aim for a lush, abundant look rather than sparse coverage. Alternate between different types of greenery for visual interest.
Mix eucalyptus with ferns, or combine olive branches with ivy trails.
Step 4: Position Your Focal Flowers
Your largest, most eye-catching flowers serve as focal points. Space these evenly along the garland—typically every 8 to 12 inches works well. Insert flower stems at slight angles rather than straight up.
This mimics how flowers grow naturally and adds movement to your design. Secure each stem with floral tape wrapped around both the stem and the base. For extra security, add a small piece of wire.
Step 5: Fill in with Secondary Blooms
Now add your medium-sized flowers around the focal blooms. These create transitions and fill gaps in your greenery foundation. Vary the heights and angles of these flowers.
Some should peek out from behind larger blooms while others sit alongside them. Step back frequently to assess your progress from a distance. This perspective reveals any bare spots or unbalanced sections.
Step 6: Add Accent Elements and Finishing Touches
Tuck in smaller accent flowers like baby’s breath or wax flowers. These delicate additions add texture and fill tiny gaps. If desired, weave ribbon through the garland or attach bows at intervals.
Fairy lights can be wrapped around the entire length for a magical evening glow. Give everything a final check. Adjust any flowers that seem out of place and secure any loose elements.
Best Flower Choices for Your Spring Garland

Selecting the right flowers dramatically impacts both the appearance and longevity of your garland. Here are top picks for spring: Fresh flowers with excellent lasting power:
- Chrysanthemums (up to 2 weeks)
- Carnations (1-2 weeks)
- Alstroemeria (up to 2 weeks)
- Statice (dries beautifully)
Stunning but shorter-lived options:
- Tulips (5-7 days)
- Peonies (5-7 days)
- Ranunculus (7-10 days)
For garlands meant to last throughout the season, high-quality silk or faux flowers are excellent alternatives. Modern artificial flowers look remarkably realistic and can be reused year after year. This type of creative project makes wonderful DIY handmade gifts too.
A custom garland created for someone’s specific home colors shows thoughtfulness that store-bought decorations simply can’t match.
Creative Ways to Display Your Spring Flower Garland at Home

Once you’ve created your masterpiece, displaying it properly showcases all your hard work. Mantel magic: Drape your garland along your fireplace mantel, letting the ends cascade down the sides. Add candles of varying heights for a complete vignette.
Staircase statement: Wind the garland around stair railings, securing it every few balusters with zip ties or ribbon. This creates a welcoming entry statement. Doorway delight: Frame your front door or an interior archway with garland.
Use command hooks to avoid damaging walls. Table runner: Lay your garland down the center of a dining table as a stunning alternative to traditional centerpieces. Headboard accent: Drape garland above your bed’s headboard for a romantic, spring-inspired bedroom refresh.
When you start exploring home craft projects quick ideas, you’ll realize how many surfaces in your home can benefit from floral touches.
Tips for Making Your Spring Flower Garland Last Longer

Extending the life of fresh flower garlands requires some simple maintenance strategies. Keep them cool: Direct sunlight and heat sources cause flowers to wilt faster. Display your garland away from sunny windows and heating vents.
Mist daily: A light spray of water helps fresh flowers stay hydrated. Use a fine mist setting and spray in the morning. Use water tubes: For garlands that need to last several days, insert flower stems into small water-filled tubes before attaching to the base.
Condition properly: Before arranging, cut all fresh flower stems at a 45-degree angle and let them drink water for several hours. Start late: If creating a garland for an event, assemble it the day before or morning of. Fresh garlands look best within 24-48 hours of creation.
Budget-Friendly Alternatives for Flower Garland Materials

Creating beautiful spring garlands doesn’t require an expensive budget. Smart shopping and creative thinking stretch your dollars further. Grocery store flowers: Supermarket floral sections offer surprisingly fresh blooms at fraction of florist prices.
Shop early in the week when deliveries arrive. Garden clippings: Your own backyard provides free greenery. Clip ivy, fern fronds, or flowering branches from established plants.
Seasonal sales: Buy faux flowers during post-season clearances. Stock up on spring flowers when stores discount them in summer. Combine real and faux: Use real greenery as your base and mix in faux flowers.
This cuts costs while maintaining natural appeal. Many crafters who enjoy exploring handmade gift craft ideas discover that beautiful results come from creativity rather than expensive supplies.
Common Mistakes to Avoid When Making Flower Garlands
Learning from common pitfalls helps you achieve better results from your first attempt. Don’t skip the greenery: Jumping straight to flowers leaves garlands looking sparse and unfinished. Greenery provides the essential foundation.
Avoid color chaos: Stick to a cohesive color palette of 3-4 complementary colors. Too many different hues create visual confusion. Don’t overcrowd: More isn’t always better.
Leave some breathing room between elements for a natural, organic appearance. Don’t forget the back: If your garland will be viewed from multiple angles, add some greenery and flowers to the back side too. Avoid weak attachment points: Garlands that fall apart are frustrating.
Take time to secure each element properly.
Seasonal Variations: Adapting Your Garland Throughout the Year
Once you master spring garlands, adapting the technique for other seasons becomes simple. For summer, incorporate sunflowers, dahlias, and bright tropical colors. Add lemons or other citrus elements for a fresh twist.
For fall, swap spring blooms for autumn leaves, dried wheat, mini pumpkins, and flowers in rust and burgundy tones. For winter, use evergreen branches, pinecones, holly berries, and white flowers for a classic holiday look. The base techniques remain identical—only your material choices change.
Conclusion: Bring Spring Into Your Home With Handmade Garlands
Learning how to make a spring flower garland to decorate your home opens up endless creative possibilities. From simple greenery swags to elaborate floral masterpieces, these handmade decorations bring natural beauty indoors and add personal character to any room. The skills you’ve learned today—building a strong base, layering greenery, positioning focal flowers, and adding finishing touches—apply to countless other floral projects too.
Each garland you create builds your confidence and refines your artistic eye. Remember, perfection isn’t the goal. Nature isn’t perfect, and that’s precisely what makes it beautiful.
Your handmade garland, with all its unique character, will bring more joy than any mass-produced decoration ever could. Now it’s your turn! Gather your materials this weekend and create a spring flower garland that transforms your space.
Share your finished creation in the comments below—we’d love to see how your garland turns out. And if you found this guide helpful, pass it along to a friend who might enjoy this craft too!
FAQ
How long does it take to make a spring flower garland to decorate your home? For beginners, expect to spend 1-2 hours creating a 6-foot garland. As you gain experience, you’ll work faster.
Preparation time for conditioning fresh flowers adds another 2-4 hours beforehand. Can I make a spring flower garland with artificial flowers instead of fresh ones? Absolutely!
High-quality faux flowers create beautiful garlands that last for years. They require no maintenance and can be stored and reused each spring season. What’s the best way to hang a flower garland without damaging walls?
Command hooks work excellently for most applications. Use clear hooks for subtle support or decorative hooks as part of your design. Removable adhesive strips also work well for lighter garlands.
How do I make my spring flower garland look fuller and more professional? Layer multiple types of greenery as your foundation before adding flowers. Work in consistent directions, overlap materials generously, and vary the depths at which you position flowers.
Adding accent elements like baby’s breath fills gaps effectively. How to make a spring flower garland to decorate your home on a tight budget? Use garden clippings for greenery, shop grocery store floral sections, and combine real greenery with affordable faux flowers.
Dollar stores and craft store sales offer excellent supplies at low prices. Focus on fewer high-impact blooms rather than many small flowers.