15 Dollar Store Craft Ideas That Look Expensive You Can Make Today
Want to decorate your home with stunning pieces without breaking the bank? The secret lies in your local dollar store. With a few simple supplies and creative techniques, you can transform budget items into gorgeous decor that looks like it came from a high-end boutique.
These 15 dollar store craft ideas that look expensive will help you achieve designer-worthy results on a shoestring budget. Each project costs just a few dollars but delivers maximum visual impact. Let’s dive in…
1. Elegant Glass Vase Collection

- Dollar store glass vases (3-4)
- Metallic spray paint
- Painter’s tape
- Clear gloss sealer
Transform plain glass vases into sophisticated statement pieces using simple metallic spray paint. Apply painter’s tape in geometric patterns before spraying to create modern color-blocked designs. The key is layering multiple thin coats rather than one heavy application.
This prevents drips and creates a smooth, professional finish. Gold, rose gold, and copper tones work beautifully together. Group three vases of varying heights on your mantel or dining table.
This clustered arrangement creates visual interest and mimics expensive designer collections you’d find at upscale home stores.
2. Luxurious Faux Marble Trays

- Wooden serving tray
- White contact paper
- Gold cabinet handles
- Craft knife
Create stunning faux marble trays that rival expensive versions from home decor stores. Dollar store wooden trays provide the perfect base for this transformation. Simply cover with marble-print contact paper for instant elegance.
Replace existing handles with gold or brass cabinet hardware for an upscale touch. These finishing details make all the difference in achieving a high-end appearance. Use your finished tray for organizing bathroom essentials, displaying candles, or serving guests.
It’s one of those home craft projects quick enough to complete in under an hour.
3. Sophisticated Candle Holders
![Top 10 Candlestick Holders [ Home Decor 2018 ]: James Scott Classical Crystal Candlestick Pair - Set](https://www.okihere.com/wp-content/cache/flying-press/47a7a9a59d88b54dcc9179afd3bc6380.jpg)
- Glass candlestick holders
- Spray adhesive
- Gold leaf sheets
- Soft brush
Dollar store glass candlestick holders become showstopping centerpieces with gold leaf application. This technique creates an authentic antique look that appears far more expensive than its actual cost. Apply spray adhesive in sections, then gently press gold leaf sheets onto the surface.
Use a soft brush to remove excess and reveal beautiful gilded patterns beneath. The imperfect, weathered appearance adds character and sophistication. Display these gilded beauties on your dining table or fireplace mantel for instant glamour.
4. Designer Mirror Makeover

- Round dollar store mirror
- Wooden craft sticks
- Hot glue gun
- Wood stain or paint
Create a stunning sunburst mirror using inexpensive craft sticks arranged in a radiating pattern. This project transforms a basic round mirror into an eye-catching wall statement. Stain the wooden sticks in walnut or espresso for a rich, sophisticated look.
Attach them to the mirror’s back using hot glue, varying the lengths for visual interest. Hang your finished piece above a console table or in your entryway. If you enjoy creating DIY wall art ideas for living room spaces, this mirror project delivers impressive results.
5. Chic Textured Planters

- Plastic planters
- Joint compound
- Putty knife
- Acrylic paint
Give cheap plastic planters an expensive ceramic appearance using textured joint compound. This technique creates stunning organic textures that mimic artisan pottery. Apply joint compound in random strokes using a putty knife.
Create ridges, swirls, and imperfections for authentic handmade character. Let dry completely before painting. Finish with matte white or terracotta paint for a Mediterranean-inspired look.
These transformed planters work beautifully for succulents, herbs, or trailing plants.
6. Glamorous Picture Frames

- Basic wooden frames
- Decorative molding pieces
- Wood glue
- Spray paint
Elevate plain wooden frames into ornate masterpieces by adding decorative molding appliques. Dollar stores carry both frames and small wooden embellishments perfect for this project. Glue molding pieces at corners and along edges to create vintage-inspired designs.
Once dry, spray paint everything in matte black or antique gold for cohesive elegance. These upgraded frames make perfect DIY handmade gifts for housewarmings, weddings, or special occasions. They look like expensive antique finds from European markets.
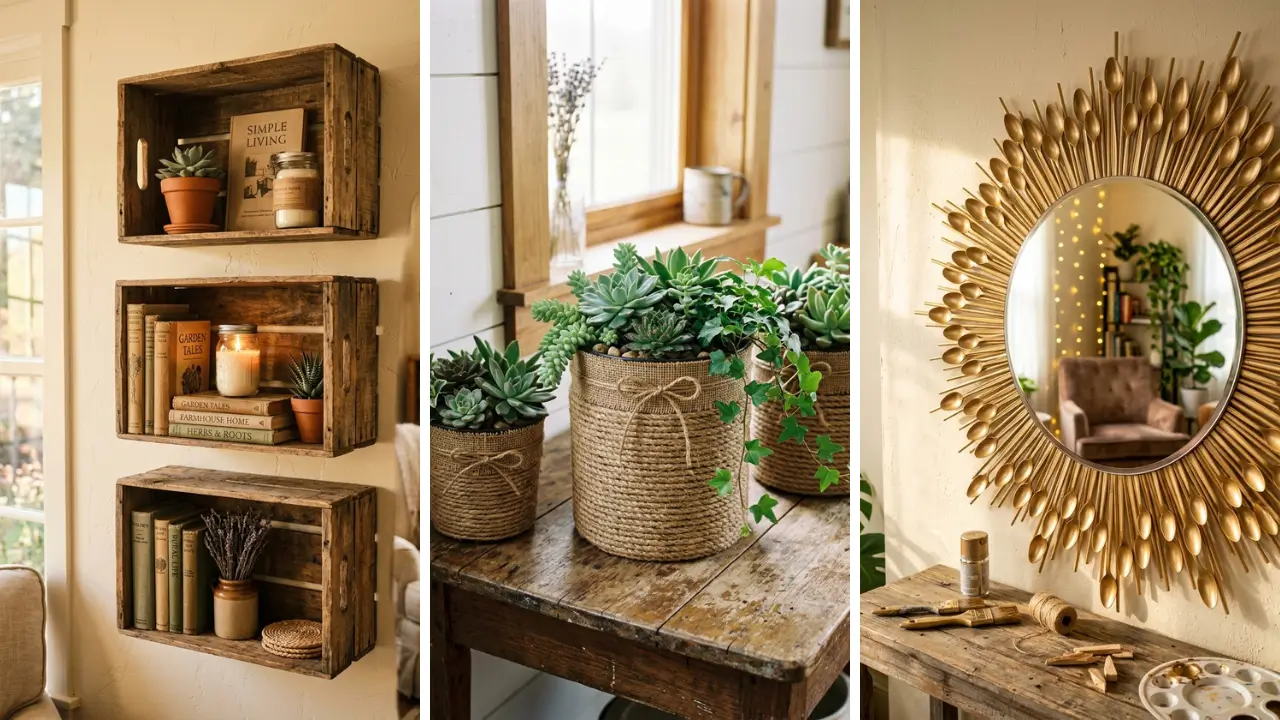
7. Rustic Wooden Crate Shelves

- Wooden crates (2-3)
- Sandpaper
- Wood stain
- Wall mounting hardware
Stack or hang wooden crates to create farmhouse-style shelving that costs a fraction of retail alternatives. Dollar store crates provide excellent bones for this rustic project. Sand edges lightly to distress the wood naturally.
Apply dark wood stain and wipe away excess for a weathered, antique appearance that adds instant character. Mount crates horizontally on walls for unique floating shelves in bathrooms, kitchens, or living areas. They’re perfect for displaying plants, books, and decorative objects.
8. Elegant Tiered Stands

- Ceramic plates (3 sizes)
- Glass candlestick holders
- E6000 adhesive
- Spray paint
Build gorgeous tiered serving stands by stacking plates with candlestick holders between them. This classic technique produces stunning results for fraction of retail prices. Use E6000 adhesive for permanent bonding that withstands regular use.
Let cure for 24 hours before handling to ensure maximum strength. Paint everything in coordinating colors like white, gold, or soft pastels. Your finished tiered stand works beautifully for jewelry storage, bathroom organization, or party displays.
9. Boho Woven Baskets

- Plain wire baskets
- Cotton rope or yarn
- Hot glue gun
- Leather strips
Transform basic wire baskets into trendy woven storage pieces using cotton rope. This technique creates the expensive boho look seen in high-end home stores. Weave rope through wire openings in a horizontal pattern.
Secure ends with hot glue on the interior where they won’t be visible. Add leather handle wraps or decorative tassels for extra style. Looking for more fun crafts to make at home?
This basket project is wonderfully satisfying.
10. Stunning Terracotta Vessels

- Glass vases or jars
- Baking soda
- Acrylic paint
- Foam brush
Create beautiful terracotta-style vessels by mixing baking soda into acrylic paint. This simple trick produces authentic matte texture that mimics expensive clay pottery. Mix one tablespoon of baking soda per cup of paint.
Apply with a foam brush in gentle dabbing motions to create subtle texture variations. Layer multiple coats for deeper color saturation. These faux terracotta pieces look stunning displayed alone or grouped with real plants and dried florals.
11. Decorative Book Stacks

- Old hardcover books
- Chalk paint
- Fine sandpaper
- Twine or ribbon
Turn thrift store hardcover books into stylish decorative objects using chalk paint. This technique creates those coveted neutral book stacks seen in designer spaces. Remove dust jackets and paint covers in white or cream tones.
Sand edges lightly after drying for an authentically aged, vintage appearance. Stack books and tie together with twine or satin ribbon. Top with a small decorative object like a crystal, shell, or small plant for polished styling.
12. Crystal Drawer Knobs
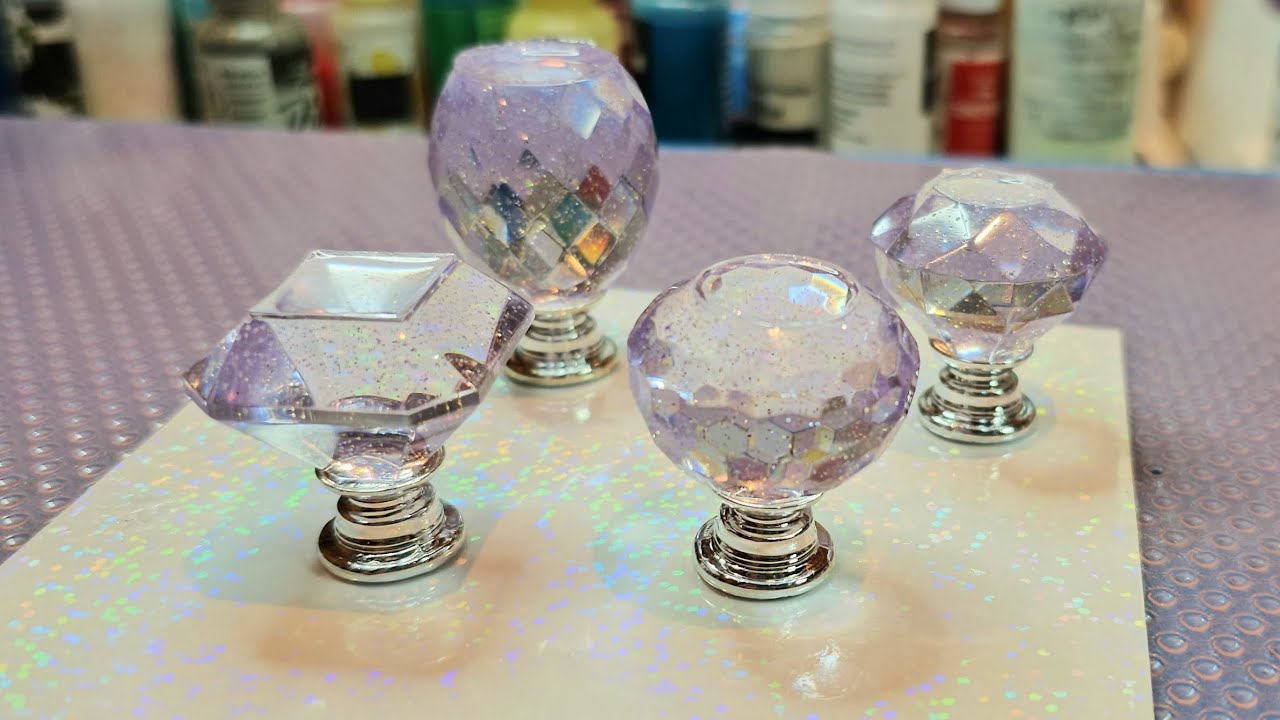
- Dollar store crystal ornaments
- Drawer knob hardware
- E6000 adhesive
- Pliers
Create glamorous crystal drawer knobs using holiday ornaments and basic hardware. This clever hack produces stunning results that look like expensive designer hardware. Remove ornament tops and caps carefully with pliers.
Attach knob screws using strong adhesive, ensuring proper alignment for functional installation. These sparkling knobs transform plain dressers and cabinets into statement furniture pieces. They’re perfect for bedrooms, bathrooms, or any space needing glamorous touches.
13. Minimalist Concrete Planters

- Plastic containers (molds)
- Quick-set concrete
- Cooking spray
- Sandpaper
Pour your own concrete planters using plastic containers as molds. This technique creates modern, minimalist vessels that cost pennies compared to retail alternatives. Spray molds with cooking oil for easy release.
Mix quick-set concrete according to package directions and pour carefully, tapping sides to release air bubbles. Sand rough edges after demolding for a polished finish. These industrial-chic planters work beautifully for succulents, air plants, or small cacti collections.
14. Vintage Mercury Glass

- Glass vases or jars
- Mirror-effect spray paint
- Vinegar in spray bottle
- Paper towels
Recreate expensive mercury glass effects using simple spray paint techniques. This antiquing method produces gorgeous spotted finishes that look authentically vintage. Spray vinegar inside the glass, then immediately apply mirror spray paint.
The vinegar creates resistance, producing characteristic mercury glass mottling and spots. Repeat the process until achieving desired coverage. These faux antique pieces make stunning candleholders, vases, or purely decorative objects.
They also work wonderfully as handmade gift craft ideas for anyone who loves vintage decor.
15. Statement Wall Clocks

- Basic clock mechanism
- Wooden embroidery hoops
- Acrylic paint
- Number stickers or stencils
Build oversized statement clocks using embroidery hoops and basic clock mechanisms. Dollar stores carry both supplies, making this an incredibly budget-friendly project. Paint hoops in metallic gold, matte black, or natural wood tones.
Add number markers using stickers, stencils, or simple painted dots at quarter positions. Install the clock mechanism through the hoop’s center point. Your finished minimalist timepiece rivals expensive designer versions costing hundreds of dollars.
These 15 dollar store craft ideas that look expensive prove that stunning home decor doesn’t require a massive budget. With creativity and simple techniques, you can transform inexpensive supplies into designer-worthy pieces that impress everyone who visits. Grab your supplies and start creating!
Share your favorite ideas in the comments below and rate this post!