How to Upcycle Furniture for a Personalized Holiday Gift
Are you tired of giving generic holiday gifts that end up forgotten in a closet? Here’s a game-changer: holiday gift idea: how to upcycle furniture for a personalized present that your loved ones will actually treasure. Imagine transforming an old, worn-out piece of furniture into a stunning, one-of-a-kind gift that tells a story and reflects the recipient’s personality.
Upcycled furniture gifts combine creativity, sustainability, and heartfelt meaning into one incredible package. Whether you’re working with a thrift store find or repurposing a family heirloom, this approach to gift-giving stands out from mass-produced alternatives. You’ll save money while creating something truly special.
In this comprehensive guide, you’ll learn everything from selecting the perfect piece to master finishing techniques. We’ll walk through practical tips, creative ideas, and insider secrets that will transform you into an upcycling gift-giving pro. Ready to create holiday magic with your own hands?
Let’s dive in.
Why Upcycled Furniture Makes the Perfect Holiday Gift Idea

There’s something incredibly special about receiving a handmade gift. Unlike store-bought items, upcycled furniture carries emotional weight and demonstrates genuine thoughtfulness. When you invest your time and creativity, the recipient feels valued in a way that no Amazon Prime delivery can replicate.
The environmental benefits are equally compelling. According to the EPA, furniture accounts for a significant portion of landfill waste. By upcycling, you’re giving both a gift and making an eco-conscious choice.
This resonates deeply with environmentally aware recipients. Cost savings represent another major advantage. A beautiful vintage dresser from a thrift store might cost $30, while the same style new could run $300 or more.
With some paint, new hardware, and your creativity, you’ve created a high-end look at a fraction of the price. If you enjoy DIY handmade gifts, furniture upcycling takes your crafting to an impressive new level. It’s satisfying, practical, and creates lasting memories.
Finding the Perfect Piece to Upcycle for Your Holiday Gift

The hunt for the right furniture piece is half the fun. You’ll want to consider both the recipient’s needs and your skill level. Start by asking yourself: what would genuinely improve their daily life?
Where to Source Upcycling Materials
Thrift stores remain the gold standard for furniture hunting. Goodwill, Salvation Army, and local charity shops often have solid wood pieces at bargain prices. Visit regularly since inventory changes quickly during the holiday season.
Estate sales and garage sales offer excellent opportunities for unique finds. Facebook Marketplace and Craigslist have “free” sections where people give away furniture they no longer want. Sometimes the best pieces come from your own attic or basement.
For budget-friendly supplies like paint and hardware, explore dollar store crafts ideas that can help you achieve expensive-looking results without breaking the bank.
What to Look For in Furniture Candidates

Prioritize solid wood construction over particle board. Check for structural integrity—wobbly legs and broken joints require more advanced repair skills. Avoid pieces with water damage, mold, or strong odors that might be difficult to eliminate. Good candidates include:
- Nightstands and side tables
- Small dressers and chests
- Chairs and stools
- Bookshelves and storage units
- Coffee tables and ottomans
Holiday Gift Idea: How to Upcycle Furniture Step-by-Step

Once you’ve found your perfect piece, the transformation begins. Follow this proven process to achieve professional-looking results even as a beginner.
Preparation and Cleaning
Start by removing all hardware, drawers, and removable parts. Clean every surface thoroughly with a mixture of warm water and dish soap. For stubborn grime, use TSP (trisodium phosphate) substitute.
Sand the entire piece lightly with 120-grit sandpaper. This creates tooth for the new finish to grip. Wipe away dust with a tack cloth before proceeding.
Fill any holes or dents with wood filler. Allow it to dry completely, then sand smooth. This extra step makes a noticeable difference in the final result.
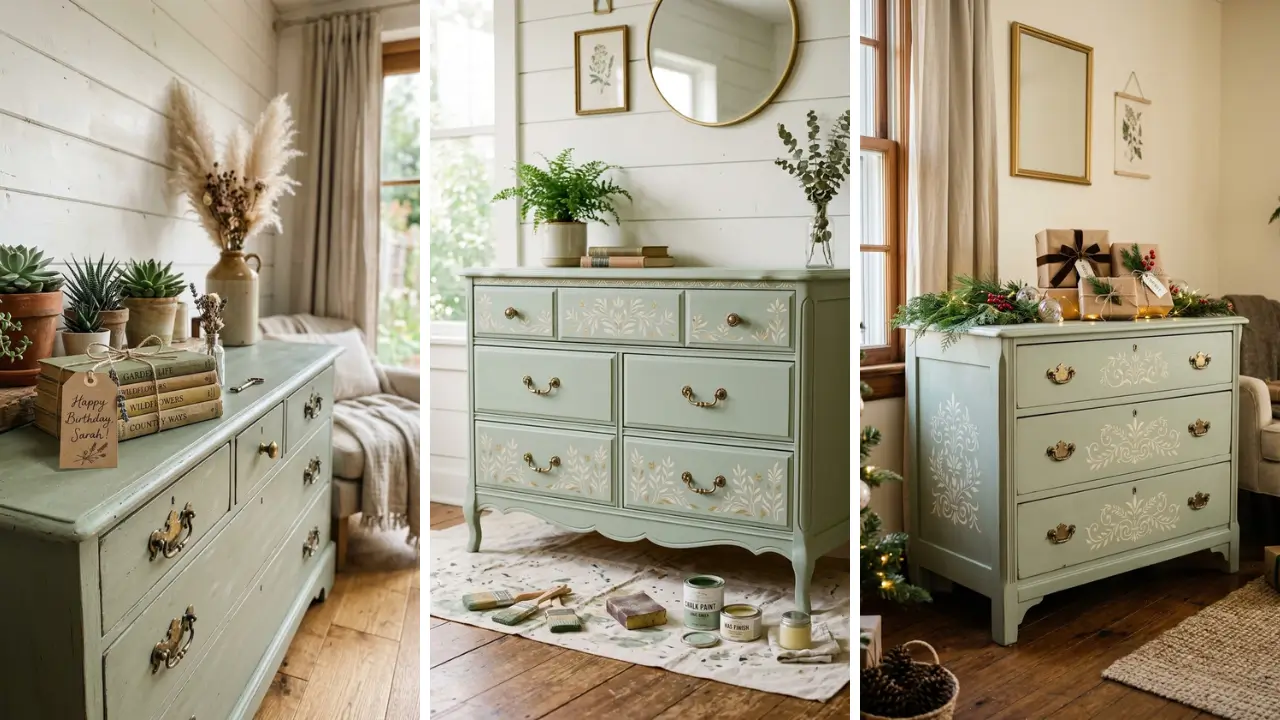
Priming and Painting Techniques
Apply a quality primer appropriate for your topcoat. Oil-based primers block stains and tannin bleed from older wood. Water-based primers work well for most applications and clean up easily.
Pro tip: Use a foam roller for large flat surfaces and an angled brush for details. Apply thin, even coats rather than thick ones that might drip or orange-peel. Popular paint options include chalk paint for a matte, vintage look, or furniture-grade latex for durability.
Consider the recipient’s style when choosing colors—neutrals appeal to most tastes, while bold colors make dramatic statements. Looking for more creative projects? Check out fun crafts to make at home that complement your furniture upcycling journey.
Finishing Touches That Make the Difference
New hardware transforms furniture instantly. Replace dated brass handles with brushed nickel, matte black, or crystal knobs. This single change can modernize any piece. Consider these finishing options:
- Wax for a soft, matte finish
- Polyurethane for maximum durability
- Decoupage with meaningful papers or photos
- Stenciling for decorative patterns
Distressing creates that coveted vintage aesthetic. Lightly sand edges and corners where natural wear would occur. Use varying pressure for an authentic, lived-in look.
Creative Upcycling Ideas for Different Recipients

Personalization makes your holiday gift idea truly memorable. Consider who will receive the piece and customize accordingly.
For the Book Lover
Transform a simple bookshelf into a literary masterpiece. Paint the interior backs in contrasting colors, or line them with vintage book pages. Add small LED lights for a cozy reading nook atmosphere.
For the Jewelry Enthusiast
Convert an old silverware drawer into an elegant jewelry organizer. Line compartments with velvet, add small hooks for necklaces, and paint the exterior in their favorite color. This personalized touch shows real thoughtfulness.
For Parents and Grandparents
Restore a family piece to its former glory while adding modern functionality. A grandmother’s vanity might become a stunning entryway table. Include a small plaque noting its history for an emotional connection.
These projects align perfectly with handmade gift craft ideas that create meaningful connections through creativity.
For Kids and Teens
Bright colors and fun patterns work wonderfully for younger recipients. Transform a plain dresser into a gaming storage station. Paint a desk in their school colors or favorite team’s palette.
Budget-Friendly Tips for Your Furniture Upcycling Project

You don’t need expensive supplies to create stunning results. Smart shopping and resourcefulness stretch your budget significantly. Paint samples from hardware stores provide enough coverage for small projects at minimal cost.
Mix similar colors to create custom shades when you run short. Thrift stores sell hardware, knobs, and decorative elements for pennies on the dollar. Old curtain tie-backs become unique drawer pulls.
Vintage brooches transform into one-of-a-kind knobs. Borrow or rent specialized tools instead of buying. Many libraries now offer tool lending programs.
Community makerspaces provide access to sanders, sprayers, and other equipment. For quick weekend projects, explore home craft projects quick to supplement your furniture gift with coordinating handmade accessories.
Common Mistakes to Avoid When Upcycling Furniture as Gifts

Learning from others’ errors saves time, money, and frustration. Here are the pitfalls to dodge. Skipping proper preparation ranks as the number one mistake.
Paint adhesion depends entirely on clean, properly sanded surfaces. Rushing this step leads to peeling and chipping within months. Choosing the wrong paint type creates problems.
Exterior paint indoors produces overwhelming fumes. Artist acrylics lack durability for furniture use. Research appropriate products for your specific project.
Over-personalizing can backfire. While you want the piece to feel special, avoid choices that won’t fit the recipient’s existing décor. When in doubt, stick with versatile colors and classic styles.
Starting too late causes holiday stress. Proper paint curing takes one to two weeks. Factor in shopping time, work time, and curing time when planning your project timeline.
How to Present Your Upcycled Furniture Gift

Presentation matters almost as much as the gift itself. Consider these ideas for memorable reveals. Create a “before” photo album showing the transformation journey.
Recipients love seeing the original piece and appreciating the work involved. Include pictures of you working on the project for extra sentimentality. Write a care card explaining how to maintain the finish.
Include touch-up paint samples for future repairs. This thoughtful extra shows attention to detail. If possible, deliver and set up the piece yourself.
Seeing it in its new home completes the experience. Take photos together to commemorate the moment.
Conclusion: Your Perfect Personalized Holiday Gift Awaits
This holiday season, step away from generic gift cards and forgettable trinkets. The holiday gift idea: how to upcycle furniture for a personalized present offers something far more meaningful—a tangible expression of your creativity, effort, and love. You’ve learned how to source the perfect piece, prepare it properly, and transform it into something beautiful.
The techniques covered here work for beginners and experienced crafters alike. Most importantly, you now understand how personalization creates emotional connections that mass-produced items simply cannot match. Upcycled furniture gifts tell stories.
They demonstrate environmental consciousness while saving money. They showcase your skills and thoughtfulness in ways recipients will appreciate for years to come. Start exploring your local thrift stores this weekend.
That perfect piece is waiting for you to discover it and bring it back to life. Your loved ones deserve something special this holiday season—and you have everything you need to create it. Ready to begin your upcycling adventure?
Share your project ideas or finished pieces in the comments below! We’d love to see your creative transformations and hear about your gift-giving successes. Don’t forget to save this guide for reference during your project.
FAQ
Q: How long does it take to upcycle furniture for a holiday gift? A: Most projects require 2-4 weekends from start to finish. Simple paint transformations might take one weekend, while more complex projects with repairs and multiple techniques need additional time.
Always allow 1-2 weeks for paint curing before wrapping or delivering. Q: What’s the best holiday gift idea for someone who loves upcycled furniture? A: Consider their practical needs and personal style.
Nightstands work great for bedroom enthusiasts, while statement chairs suit bold personalities. Including a personalized element—like their initials stenciled inside a drawer—makes any upcycled furniture holiday gift extra special. Q: How much does it cost to upcycle furniture for a personalized present?
A: Budget $30-100 for most projects. This includes the furniture piece ($0-50 from thrift stores), paint and primer ($15-30), and new hardware ($10-25). Using supplies you already own or finding free furniture reduces costs significantly.
Q: Can beginners successfully upcycle furniture as holiday gifts? A: Absolutely! Start with simple projects like painting a small side table or nightstand.
These pieces have minimal detail work and teach fundamental skills. Watch tutorial videos for specific techniques and practice on inexpensive items before tackling your gift project. Q: What tools do I need for a basic furniture upcycling project?
A: Essential tools include sandpaper (120 and 220 grit), quality brushes or foam rollers, painter’s tape, drop cloths, and a screwdriver for hardware removal. A palm sander speeds up prep work but isn’t mandatory. Most other items can be improvised from household supplies.