How to Make a Rustic DIY Christmas Wreath From Scratch: Complete Step-by-Step Guide
Have you ever walked past a gorgeous rustic wreath hanging on someone’s door and wondered if you could create something equally stunning yourself? The answer is absolutely yes. Learning how to make a rustic DIY Christmas wreath from scratch is simpler than you might think, and the results are far more rewarding than anything you’d find at a store.
There’s something magical about crafting your own holiday decorations. The scent of fresh evergreens, the satisfaction of arranging natural elements, and the pride of displaying your handmade creation make the entire process worthwhile. Plus, rustic wreaths have that timeless, cozy appeal that perfectly captures the warmth of the holiday season.
In this comprehensive guide, you’ll discover everything you need to know about creating a beautiful rustic wreath. From gathering materials to adding those final decorative touches, I’ll walk you through each step. Whether you’re a complete beginner or looking to refine your wreath-making skills, you’ll find practical tips and creative inspiration here.
Let’s dive in and get those crafting hands ready!
Essential Materials for Your Rustic DIY Christmas Wreath

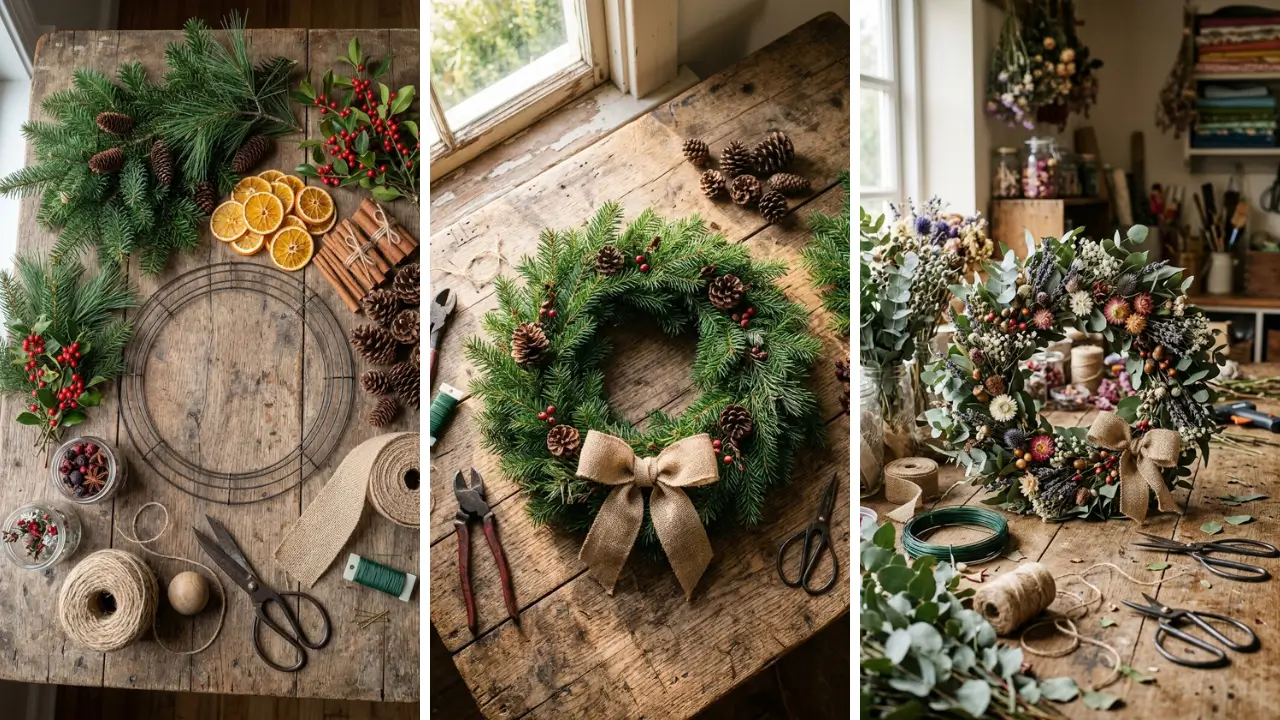
Before you start crafting, gathering the right materials is crucial. The beauty of rustic wreaths lies in their natural, organic aesthetic. You don’t need expensive supplies—many items can be found in your backyard or purchased affordably. Here’s what you’ll need for your base materials:
- A wire wreath frame (12-18 inches depending on your preference)
- Grapevine or willow branches for the rustic base
- Floral wire (22-24 gauge works best)
- Wire cutters and scissors
- Hot glue gun with plenty of glue sticks
For the greenery and natural elements, consider collecting:
- Fresh or faux evergreen branches (pine, cedar, or fir)
- Pinecones in various sizes
- Dried berries or berry picks
- Eucalyptus or magnolia leaves
- Cinnamon sticks and dried orange slices
If you enjoy exploring fun crafts to make at home, wreath-making is an excellent addition to your creative repertoire. The materials are flexible, so feel free to substitute based on what’s available in your area.
How to Make a Rustic DIY Christmas Wreath From Scratch: Step-by-Step Process

Now comes the exciting part—actually creating your wreath! Follow these detailed steps to achieve professional-looking results, even if this is your first attempt.
Step 1: Create Your Grapevine Base
Start by soaking grapevine branches in warm water for about 30 minutes. This makes them pliable and easier to shape. Once softened, begin weaving them around your wire frame, securing with floral wire as you go.
Don’t stress about perfection here. The irregular, organic shape is exactly what gives rustic wreaths their charm. Layer 3-4 rounds of grapevine until you achieve the desired thickness.
Let the ends stick out naturally—they add character!
Step 2: Add Your Evergreen Foundation

Cut your evergreen branches into 6-8 inch sections. Starting at one point of your wreath, tuck the stem end under the grapevine and secure it with floral wire. Continue adding branches in the same direction, overlapping each piece to hide the stems of the previous one.
Work your way around the entire wreath, maintaining a consistent fullness. The key is layering different types of greenery for texture. Mix pine with cedar, or add some boxwood for variety.
This technique is similar to other home craft projects quick enough to complete in an afternoon.
Step 3: Incorporate Natural Decorative Elements
This is where your wreath truly becomes unique. Gather your pinecones, dried citrus, cinnamon sticks, and other natural elements. Before attaching, lay them on the wreath to plan your arrangement.
Use hot glue for lightweight items and floral wire for heavier pieces like large pinecones. Create clusters of elements rather than spacing them evenly—this creates visual interest and a more organic look. Tuck some pieces deep into the greenery while letting others sit on top for dimension.
Creative Design Ideas for Rustic Christmas Wreaths

Once you’ve mastered the basics, the creative possibilities are endless. Your wreath should reflect your personal style and complement your home’s aesthetic. Here are some design directions to consider.
The Classic Woodland Theme
Focus on natural browns, greens, and touches of red. Incorporate lots of pinecones, acorns, dried mushrooms, and twigs. Add a burlap bow as the finishing touch.
This style works beautifully on farmhouse-style homes and creates a cozy, cabin-like atmosphere.
The Scandinavian Minimalist Approach
Keep it simple with a sparse greenery arrangement, white dried flowers, and perhaps a few wooden ornaments. The beauty here lies in restraint. This style proves that making DIY handmade gifts doesn’t require overwhelming complexity.
The Aromatic Harvest Style
Load up on fragrant elements—cinnamon sticks, dried orange slices, star anise, and cloves. Every time someone opens your door, they’ll be greeted with the scent of the holidays. This style engages multiple senses and creates lasting impressions.
Budget-Friendly Tips for Your Wreath Project

Creating a stunning rustic wreath doesn’t require emptying your wallet. With some creativity and resourcefulness, you can craft a showstopper for just a few dollars. Forage from nature.
Take a walk through your neighborhood or local park. Fallen branches, pinecones, and interesting twigs are free and add authentic rustic character. Just make sure to collect from public areas or ask permission on private property.
Shop smart. Visit discount stores for supplies like wire frames, ribbons, and basic craft tools. You’ll be amazed at what you can find when exploring dollar store crafts ideas for inspiration.
Many seasonal items appear at incredible prices if you shop early. Repurpose and recycle. Old fabric scraps become ribbon.
Broken ornaments can be carefully incorporated into designs. Last year’s artificial garland can be cut apart for greenery. Think creatively before buying new.
Make it a group activity. Split material costs with friends or family members. Host a wreath-making party where everyone contributes different supplies.
You’ll save money and create wonderful memories together.
Common Mistakes to Avoid When Making Your First Wreath

Even experienced crafters sometimes stumble. Learning from common mistakes will help you achieve better results right from the start. Don’t skimp on the base.
A flimsy grapevine base makes the entire wreath look cheap and won’t support heavy decorations. Take time to build a sturdy foundation with multiple layers of woven vines. Avoid symmetrical arrangements.
Rustic style celebrates imperfection. Placing elements in perfectly even intervals creates a formal look that contradicts the natural aesthetic you’re aiming for. Embrace asymmetry.
Don’t forget the back. If your wreath will hang on a glass door or anywhere visible from multiple angles, remember to finish the back neatly. Cover any messy wire with ribbon or extra greenery.
Resist over-decorating. The temptation to add “just one more thing” is real. Step back frequently to assess your work.
Sometimes the most impactful wreaths are those with breathing room between elements.
How to Preserve and Store Your Rustic Christmas Wreath

A well-made wreath can last the entire holiday season or even be stored for reuse next year. Proper care extends the life of your creation significantly. For fresh greenery wreaths, mist lightly with water every few days if displayed indoors.
Avoid placing near heat sources like fireplaces or heating vents. If displayed outdoors, cold temperatures actually help preserve freshness. If you’ve used dried or artificial materials, your wreath should last indefinitely with proper storage.
After the holidays, place it in a large plastic bag, add a few silica gel packets to absorb moisture, and store in a cool, dry location. These preservation tips are valuable for anyone who loves creating handmade gift craft ideas throughout the year. Proper storage means you can reuse bases and some elements for future projects.
Taking Your Wreath-Making Skills Further

Once you’ve successfully completed your first rustic Christmas wreath, a whole world of creative possibilities opens up. Consider making wreaths for other seasons—spring wreaths with dried lavender, summer versions with seashells, or autumn wreaths featuring colorful leaves. You might also explore different base shapes.
Oval frames, heart shapes, or even rectangular “swag” arrangements use similar techniques but create entirely different visual impacts. Each project builds your skills and confidence. Many crafters discover that wreath-making becomes a profitable hobby.
Handmade rustic wreaths sell exceptionally well at craft fairs, farmers markets, and online marketplaces. What starts as a personal project could become a seasonal side business.
Conclusion: Your Perfect Rustic Wreath Awaits
Learning how to make a rustic DIY Christmas wreath from scratch transforms you from a holiday decorator into a true artisan. The process combines creativity, nature appreciation, and hands-on crafting into one deeply satisfying activity. Remember, your first wreath doesn’t need to be perfect.
The beauty of rustic style lies in its organic, handmade quality. Those small imperfections you might worry about actually add charm and authenticity. With each wreath you create, your skills will grow, and your designs will become more sophisticated.
The materials are affordable, the techniques are learnable, and the results bring joy throughout the holiday season. Whether you’re decorating your own home, creating gifts for loved ones, or simply seeking a relaxing creative outlet, rustic wreath-making delivers on all fronts. Now it’s your turn to get crafting!
Gather your materials this weekend, put on some holiday music, and create something beautiful. I’d love to hear about your wreath-making adventures—drop a comment below sharing your favorite design elements or any creative twists you discover. And if this guide helped you, share it with fellow craft enthusiasts who might be looking for their next project!
FAQ
Q: How long does it take to make a rustic DIY Christmas wreath from scratch? A: For beginners, expect to spend 2-3 hours on your first wreath. This includes gathering materials, preparing the base, and adding decorations.
As you gain experience, you can complete a wreath in 1-1.5 hours. The grapevine soaking time adds about 30 minutes of passive waiting. Q: Can I make a rustic Christmas wreath without a wire frame?
A: Absolutely! You can create a completely natural base using only grapevine or willow branches woven into a circle shape. Simply form the vines into a ring and secure with twine or wire at several points.
This method creates an even more organic, rustic appearance. Q: How to make a rustic DIY Christmas wreath from scratch using only foraged materials? A: Start by collecting flexible vines for your base.
Gather fallen evergreen branches from pine or cedar trees. Look for pinecones, dried seedpods, interesting twigs, and berries. Use natural twine instead of wire where possible.
The only item you might need to purchase is a hot glue gun for secure attachment. Q: How long will a fresh rustic wreath last? A: When displayed outdoors in cool temperatures, a fresh wreath can last 3-4 weeks or longer.
Indoor wreaths typically last 2-3 weeks with proper care. Misting with water, keeping away from heat sources, and using an anti-desiccant spray can extend freshness significantly. Q: What’s the best ribbon style for rustic Christmas wreaths?
A: Burlap ribbon is the classic choice for rustic wreaths due to its natural texture and neutral color. Wired cotton ribbon in buffalo plaid, gingham, or solid natural tones also works beautifully. Avoid satin or shiny ribbons—they clash with the organic aesthetic.
Consider using torn fabric strips for an extra rustic touch.