15+ Creative DIY How to Press and Frame Flowers for Beautiful Botanical Wall Art Ideas
Have you ever wanted to preserve the beauty of fresh flowers and turn them into timeless art? Pressing and framing flowers is an elegant way to capture nature’s fleeting moments. This craft transforms ordinary blooms into stunning botanical wall displays.
Whether you’re a beginner or seasoned crafter, these techniques offer endless creative possibilities. You’ll discover methods ranging from traditional book pressing to modern microwave techniques. Let’s dive in…
1. Classic Heavy Book Method

- Heavy hardcover books
- Parchment paper sheets
- Fresh flowers with flat profiles
- Additional weights or bricks
The heavy book pressing method remains the most popular technique for beginners. Simply place your fresh flowers between sheets of parchment paper inside a thick book. Stack additional heavy objects on top for extra pressure.
This process takes approximately two to four weeks depending on flower thickness. The slow drying method preserves colors beautifully and prevents browning. Check your flowers weekly to monitor progress.
Thinner flowers like pansies and violets work exceptionally well with this technique. Your patience will be rewarded with perfectly flat specimens ready for framing.
2. Quick Microwave Pressing

- Microwave-safe ceramic tiles
- Paper towels or coffee filters
- Rubber bands
- Microwave oven
When time is limited, the microwave pressing technique delivers results in minutes rather than weeks. Layer your flowers between paper towels and sandwich them between two ceramic tiles. Secure everything with rubber bands tightly.
Microwave in short bursts of 30 seconds to one minute. Allow cooling between intervals to prevent burning. This method works wonderfully for urgent craft projects or spontaneous creativity.
Be careful not to overheat delicate blooms as they can become brittle. The quick turnaround time makes this perfect for same-day crafting sessions.
3. Wooden Flower Press Kit

- Wooden press boards
- Wing nuts and bolts
- Cardboard sheets
- Blotting paper
A dedicated wooden flower press offers consistent results and adjustable pressure control. These beautiful tools double as decorative items when not in use. The sturdy construction applies even pressure across all your specimens.
Layer cardboard and blotting paper between each flower for optimal moisture absorption. Tighten the wing nuts gradually over several days. This method produces professional-quality pressed flowers every time.
If you enjoy fun crafts to make at home, investing in a quality press is worthwhile. Your botanical art collection will grow beautifully over time.
4. Iron-On Heat Method

- Household iron
- Thin cotton fabric scraps
- Parchment paper
- Hard flat surface
The iron pressing technique combines speed with excellent color preservation. Set your iron to low heat without steam. Place flowers between parchment paper on a hard surface.
Press gently with the iron for 10 to 15 seconds at a time. Lift and check progress between each press. This method flattens flowers quickly while maintaining vibrant natural colors.
Cover your work surface with fabric to prevent heat damage. The controlled heat application removes moisture efficiently without scorching delicate petals.
5. Floating Glass Frame Display

- Double-sided glass frame
- Pressed flowers
- Tweezers
- Clear adhesive dots
A floating glass frame showcases pressed flowers with stunning transparency. Light passes through from both sides creating an ethereal effect. This display method highlights delicate petal details beautifully.
Use tiny adhesive dots to position flowers before sealing the frame. The transparent background works wonderfully near windows. Your botanical art becomes a natural light catcher.
These frames make excellent DIY handmade gifts for nature lovers and home decorators. The minimalist aesthetic complements any interior design style perfectly.
6. Shadow Box Arrangement

- Deep shadow box frame
- Acid-free mounting board
- Craft glue
- Pressed flowers and leaves
Shadow boxes add depth and dimension to your botanical wall art displays. The recessed design protects delicate pressed flowers from dust and damage. You can create elaborate scenes with multiple flower varieties.
Arrange flowers on acid-free backing to prevent yellowing over time. Add labels with botanical names for an educational touch. This style creates museum-quality presentations at home.
Layer different flower sizes to create visual interest and depth. Your shadow box arrangement becomes a conversation piece in any room.
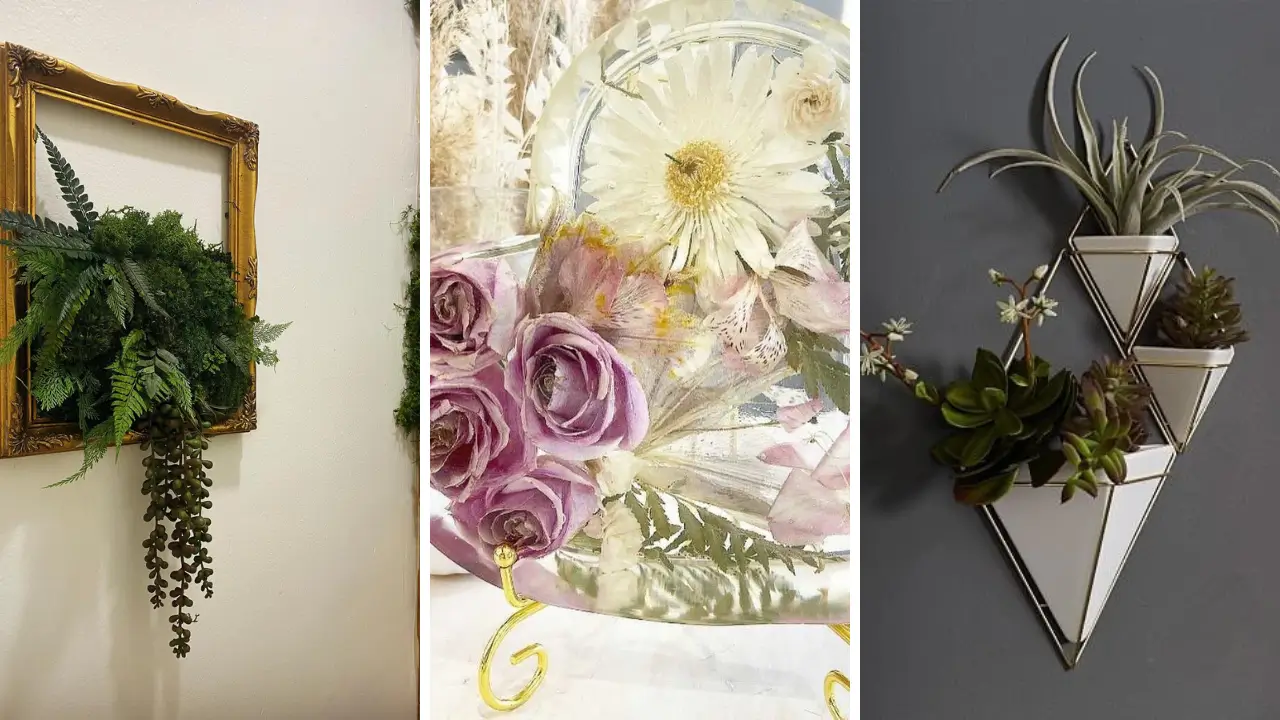
7. Vintage Frame Collection

- Thrifted ornate frames
- Spray paint
- Linen or burlap backing
- Assorted pressed flowers
Transform thrifted vintage frames into elegant botanical displays with character. Mismatched frames create an eclectic gallery wall effect. Sand and repaint frames in coordinating colors for cohesion.
Natural fabric backings like linen or burlap add rustic texture behind your flowers. The contrast between ornate frames and simple botanicals creates visual appeal. This approach celebrates both old and new elements.
Finding unique frames is part of the creative adventure. Your vintage frame collection tells a story through its carefully curated imperfections.
8. Resin Encapsulation Art

- Epoxy resin kit
- Silicone molds
- Dried pressed flowers
- Mixing cups and sticks
Preserving flowers in clear epoxy resin creates stunning three-dimensional art pieces. This technique encapsulates blooms permanently in crystal-clear material. The result resembles precious botanical specimens frozen in time.
Work in a well-ventilated area when mixing two-part epoxy components. Pour in thin layers to prevent air bubbles around delicate petals. Each layer needs proper curing time before adding the next.
Resin pieces make durable wall hangings and decorative objects. Your encapsulated botanical art will last for generations with proper care.
9. Herbarium Style Sheets

- Heavy watercolor paper
- Archival mounting tape
- Calligraphy pen
- Pressed botanical specimens
Create scientific-style herbarium sheets that blend education with artistic display. This traditional method documents plants with written information. Botanical gardens and universities have used this technique for centuries.
Mount pressed flowers using archival tape strips that won’t damage specimens over time. Add handwritten labels including common names, Latin names, and collection dates. This creates authentic museum-quality documentation.
These sheets work beautifully displayed in simple black frames. Your herbarium collection adds intellectual sophistication to any space.
10. Minimalist Acrylic Panels

- Clear acrylic sheets
- Standoff mounting hardware
- Pressed single stems
- UV-resistant spray
Modern acrylic panel displays offer a contemporary take on botanical art. The clean lines and floating appearance suit minimalist interiors perfectly. Single pressed stems create striking focal points.
Use standoff hardware to mount panels slightly away from the wall. This creates shadows and adds visual depth to simple compositions. The transparent material showcases flowers without visual obstruction.
Apply UV-resistant spray to protect colors from fading. Your minimalist botanical panels make sophisticated statement pieces in any room.
11. Pressed Flower Collage Art

- Large canvas or board
- Various pressed flowers
- Mod Podge or craft sealant
- Background paint
Create expressive flower collage artwork by layering multiple pressed specimens creatively. This freeform approach allows artistic expression without strict rules. Mix colors, sizes, and textures for dynamic compositions.
Apply a painted background before arranging your pressed flower collection. Seal everything with multiple coats of clear sealant. This protects delicate petals while creating a unified surface.
Collage art works wonderfully for covering large wall spaces affordably. Your botanical collage becomes a unique masterpiece reflecting your personal style.
12. Clipboard Gallery Display

- Vintage clipboards
- Cardstock paper
- Washi tape
- Pressed flowers
Repurposed vintage clipboards create charming interchangeable botanical displays. The clip mechanism allows easy artwork rotation with seasons. This casual approach suits farmhouse and cottage aesthetics perfectly.
Mount pressed flowers on colored cardstock for added visual interest. Use decorative washi tape to secure specimens attractively. Group multiple clipboards together for impressive gallery walls.
This project exemplifies creative home craft projects quick enough for weekend completion. Your clipboard gallery can evolve with your growing collection.
13. Pressed Flower Bookmarks

- Heavy cardstock strips
- Clear contact paper
- Small pressed flowers
- Hole punch and ribbon
While not wall art, pressed flower bookmarks showcase your preservation skills beautifully. These small projects use leftover flowers from larger displays. Each bookmark becomes a miniature botanical treasure.
Laminate flowers between clear contact paper for durability and protection. Add decorative ribbon through punched holes for finishing touches. These make thoughtful handmade gifts for book lovers.
Bookmarks are excellent beginner projects to practice pressing techniques. Your botanical bookmark collection can feature seasonal flower varieties throughout the year.
14. Geometric Wire Frame Art

- Geometric wire frames
- Fishing line or thin wire
- Pressed flowers
- Small binder clips
Trendy geometric wire frames offer modern alternatives to traditional rectangular frames. Hexagons, circles, and triangles add contemporary flair. The open design creates airy displays with minimal visual weight.
Suspend pressed flowers using nearly invisible fishing line within geometric shapes. Cluster multiple frames together for dramatic installations. This style suits modern and Scandinavian interior designs perfectly.
These frames are available at most craft stores affordably. Your geometric botanical display brings fresh energy to any wall space.
15. Fabric-Backed Canvas Display

- Stretched canvas
- Decorative fabric
- Fabric glue
- Pressed flowers
Transform plain canvases with decorative fabric backing for textured botanical displays. Patterned fabrics add color and visual interest behind pressed flowers. This technique creates depth without complex framing.
Choose fabrics that complement your flower color palette without overwhelming delicate specimens. Florals, stripes, or subtle textures all work beautifully. Attach flowers directly to fabric with small glue dots.
For more creative inspiration, explore dollar store crafts ideas using affordable materials. Your fabric-backed botanical canvas looks expensive while remaining budget-friendly.
16. Botanical Print Combination

- Vintage botanical prints
- Coordinating frames
- Pressed flower accents
- Acid-free adhesive
Combine printed botanical illustrations with real pressed flowers for layered displays. This mixed-media approach adds dimension to flat artwork. Vintage prints provide beautiful backgrounds for actual specimens.
Position real pressed flowers to complement printed botanical elements naturally. The combination creates visual intrigue and conversation starters. This technique works especially well with antique reproduction prints.
Looking for more handmade gift craft ideas? Combined botanical art makes memorable presents. Your layered botanical display showcases creativity and artistic vision beautifully.
Now you have everything needed to master how to press and frame flowers for beautiful botanical wall art. These fifteen creative methods offer options for every skill level and design preference. From traditional book pressing to modern resin encapsulation, the possibilities are endless.
Grab your favorite flowers and supplies, then start creating your own botanical masterpieces today! Share your favorite ideas and finished projects in the comments below. Rate this post and let us know which technique you’ll try first!