How to Transfer Photos to Canvas for Beautiful Wall Art
Have you ever walked past a gallery-quality canvas print and wondered if you could create something similar at home? The good news is that learning how to transfer photos to canvas for beautiful wall art is much simpler than you might think. With the right techniques and a bit of patience, you can transform your favorite photographs into stunning personalized artwork that rivals expensive store-bought pieces.
Whether you want to display cherished family memories, breathtaking travel shots, or artistic compositions, photo canvas transfers offer an affordable and deeply satisfying creative outlet. This guide will walk you through multiple transfer methods, essential materials, and pro tips to ensure your first project turns out beautifully. By the end, you’ll have all the knowledge needed to create impressive wall art that sparks conversations and adds warmth to any room.
Why Transfer Photos to Canvas for Your Home Decor

Canvas art has a timeless appeal that printed photographs simply cannot match. The textured surface adds depth and dimension to images, creating an almost painterly quality that elevates ordinary photos into artistic statements. Unlike glossy prints behind glass, canvas pieces have a sophisticated matte finish that works harmoniously with various interior design styles.
Creating your own canvas transfers is incredibly budget-friendly. Professional canvas printing services can charge anywhere from $50 to $200 per piece, while DIY methods cost a fraction of that price. Plus, the handmade quality adds sentimental value that mass-produced items lack.
This type of project fits perfectly into the world of DIY handmade gifts because personalized canvas art makes unforgettable presents. Imagine giving grandparents a canvas transfer of their grandchildren, or surprising a friend with artwork featuring your adventures together. These gifts carry emotional weight that store-bought items simply cannot replicate.
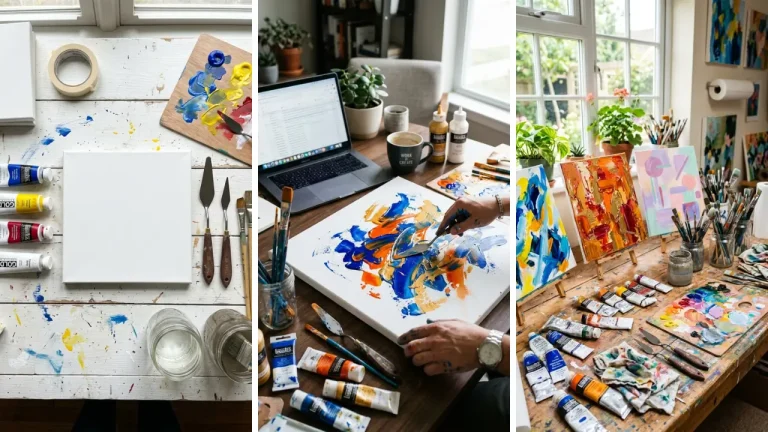
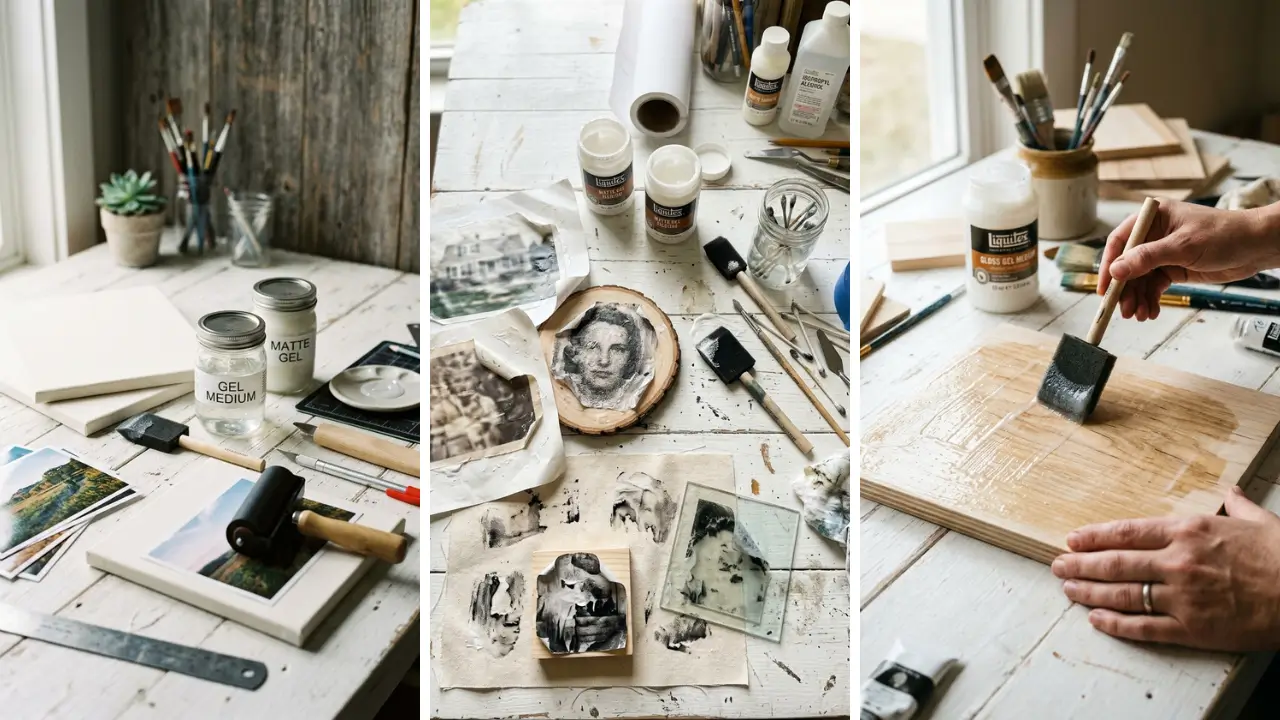
Essential Materials for Photo Canvas Transfer Projects

Before diving into techniques, gather these essential supplies. Having everything ready streamlines the process and prevents frustrating interruptions mid-project. Basic supplies you’ll need:
- Pre-stretched canvas or canvas boards (various sizes available at craft stores)
- Gel medium (matte or gloss finish, depending on your preference)
- Foam brushes or soft bristle brushes
- Spray bottle with water
- Soft cloth or sponge
- Laser-printed photo (mirror-reversed)
- Mod Podge or acrylic sealer for finishing
The type of printed image matters significantly. Laser prints work best because the toner sits on the paper surface rather than absorbing into it. Inkjet prints typically don’t transfer well since the ink penetrates the paper fibers.
Most office supply stores offer laser printing services if you don’t have access to a laser printer at home. Looking for affordable craft supplies? Many of these materials can be found inexpensively, and you might discover great dollar store crafts ideas that help reduce your overall project cost without sacrificing quality.
How to Transfer Photos to Canvas Using Gel Medium Method

The gel medium technique is the most popular approach for canvas photo transfers because it produces consistently excellent results. Here’s a detailed walkthrough of this method.
Step 1: Prepare Your Image
Start by selecting a high-resolution photograph. Blurry or pixelated images will look even worse after transfer, so choose crisp, well-lit shots. Using photo editing software, flip your image horizontally (mirror it) before printing.
This ensures text or recognizable elements appear correctly on the final canvas. Print your image on regular paper using a laser printer. Trim the photo to fit your canvas size, leaving no white borders unless you want a framed effect.
Step 2: Apply Gel Medium

Apply a generous, even layer of gel medium directly onto the printed side of your photo. Work in one direction to minimize brush strokes and air bubbles. The layer should be thick enough to appear opaque but not so thick that it pools.
Immediately place the image face-down onto your canvas, positioning it carefully since repositioning can smear the gel. Use a brayer or credit card to smooth out any air bubbles, working from the center outward.
Step 3: Wait and Remove Paper
This step requires patience. Allow the gel medium to dry completely, typically 8-24 hours depending on humidity and layer thickness. Rushing this stage is the most common mistake beginners make.
Once fully dry, dampen the paper backing with a spray bottle. Let the water soak in for a few minutes, then gently rub the paper away using your fingers or a soft sponge. Work in circular motions, re-wetting as needed.
The image will appear cloudy at first but clears as it dries.
Step 4: Seal Your Artwork
After the canvas dries completely from the paper removal stage, apply a protective sealant layer. Mod Podge or clear acrylic medium works wonderfully. This step protects your transfer from dust, moisture, and UV damage.
This technique is one of many fun crafts to make at home that requires no prior artistic experience. Even complete beginners can achieve professional-looking results with careful attention to each step.
Alternative Methods for Transferring Photos to Canvas

While the gel medium technique is popular, several other methods exist for different situations and preferences.
Iron-On Transfer Paper Method
This approach uses special transfer paper designed for fabrics that also works on canvas. Print your mirror-reversed image onto transfer paper, position it on the canvas, and apply heat using a household iron. The heat activates adhesives that bond the image to the canvas surface.
Advantages: Faster than gel medium, no waiting overnight. Disadvantages: Can appear slightly plastic-like, requires careful heat application to avoid scorching.
Packing Tape Transfer Technique
For a more experimental approach, this method uses clear packing tape to lift images from laser prints. Apply tape strips to your printed image, burnish thoroughly, then soak in water to remove the paper backing. The transparent image remains on the tape, which can then be adhered to canvas.
This technique creates an interesting translucent effect and works well for layered artistic compositions rather than traditional photo reproductions.
Citrasolv Solvent Transfer
Artists sometimes use citrus-based solvents like Citrasolv to transfer magazine images or laser prints. The solvent loosens toner particles, allowing them to transfer under pressure. This method creates beautifully distressed, vintage-looking results but requires working in well-ventilated areas.
Choosing the Best Photos for Canvas Wall Art

Not every photograph translates well to canvas format. Understanding what makes images work helps you select the best candidates for transfer projects. High contrast images with clearly defined lights and darks transfer more successfully than low-contrast, flat photos.
The transfer process can slightly reduce detail, so starting with punchy, well-exposed images compensates for any quality loss. Consider the image composition relative to your canvas dimensions. Portrait-oriented photos work best on vertical canvases, while landscapes suit horizontal formats.
Cropping your image before printing helps optimize the composition. For multi-canvas installations or gallery walls, choose images with cohesive color palettes or thematic connections. A series of black-and-white family photos or sunset landscapes creates visual harmony across pieces.
These photo canvas projects complement other home craft projects quick enough to complete in a weekend. Consider pairing your canvas art with coordinating handmade frames or decorative elements for a cohesive look.
Troubleshooting Common Photo Transfer Problems

Even experienced crafters encounter occasional issues. Here’s how to handle the most common problems. Paper won’t rub off cleanly: The gel medium likely wasn’t fully dry.
Wait additional time, re-wet the surface, and try again. Sometimes paper fibers remain visible; this often resolves after sealing with another medium layer. Image appears too faded: You may have rubbed too aggressively during paper removal.
Apply another coat of gel medium to intensify colors. For future projects, rub more gently and check progress frequently. Air bubbles trapped under image: Prevention is key here.
Work slowly when applying the image and use a brayer tool for even pressure. For small bubbles, you can sometimes pierce them with a pin and smooth flat while still wet. Image transferred in reverse: You forgot to mirror the image before printing.
Always flip horizontally in your editing software, especially important for images containing text or recognizable landmarks.
Creative Ideas for Displaying Your Canvas Photo Art

Once you’ve mastered how to transfer photos to canvas for beautiful wall art, the creative possibilities expand dramatically. Create a gallery wall featuring multiple smaller canvases arranged in a grid or salon-style cluster. Mix photograph transfers with hand-painted canvases for eclectic visual interest.
Use matching frames or embrace the varied-edge look for bohemian appeal. Try splitting single images across multiple canvases for dramatic large-scale installations. Print sections of a panoramic landscape or close-up portrait onto separate panels that display together as one cohesive artwork.
Incorporate canvas transfers into mixed-media projects by adding hand-painted details, collage elements, or dimensional embellishments. The canvas texture accepts paint beautifully, allowing you to enhance photos with artistic touches. Consider creating canvas transfers as handmade gift craft ideas for weddings, anniversaries, or housewarmings.
Custom artwork featuring meaningful photographs makes exceptionally thoughtful presents that recipients treasure for years.
Conclusion: Creating Lasting Memories Through Canvas Art
Learning how to transfer photos to canvas for beautiful wall art opens up a world of creative possibilities that combine photography with hands-on crafting. The techniques outlined here—from gel medium transfers to iron-on methods—offer options for every skill level and artistic vision. Remember that perfect results rarely happen on the first attempt.
Each project teaches valuable lessons that improve your technique over time. Start with less precious images while developing your skills, then progress to more meaningful photographs as confidence grows. The most important thing is simply beginning.
Gather your materials, select a photograph that speaks to you, and start creating. Your walls deserve artwork that tells your unique story, and there’s no more satisfying way to achieve that than crafting it with your own hands. Ready to transform your favorite photos into stunning canvas art?
Start with one small project this weekend and share your results in the comments below. We’d love to see what you create and hear about your experience with these techniques!
FAQ
Q: Can I use inkjet prints to transfer photos to canvas? A: Inkjet prints generally don’t work well for canvas transfers because the ink absorbs into paper fibers rather than sitting on the surface. Laser prints produce much better results since toner particles lift off cleanly during the transfer process.
Q: How long does a photo canvas transfer last? A: When properly sealed with UV-protective varnish, canvas photo transfers can last for decades without significant fading. Keep artwork away from direct sunlight and high humidity areas for maximum longevity.
Q: What size canvas works best for learning how to transfer photos to canvas for beautiful wall art? A: Beginners should start with 8×10 inch or smaller canvases. These sizes are easier to handle during the application process and require less gel medium.
Once comfortable with the technique, progress to larger formats. Q: Can I transfer photos to canvas using regular printer paper? A: Yes, regular copy paper works perfectly fine for gel medium transfers when printed with a laser printer.
Thinner paper actually removes more easily during the rubbing stage compared to thicker cardstock. Q: Is it possible to fix mistakes after transferring photos to canvas? A: Minor imperfections can often be touched up with acrylic paint that matches the image colors.
For major mistakes, you can paint over the entire canvas and start fresh, or embrace imperfections as artistic character that makes handmade pieces unique.