How to Decoupage Furniture for Beginners: Step-by-Step Guide to Stunning DIY Transformations
Have you ever looked at a worn-out dresser or tired side table and wished you could give it a completely new personality? Here’s the exciting truth: you absolutely can, and you don’t need expensive tools or artistic talent to do it. How to decoupage furniture for beginners is simpler than most people imagine, and this step-by-step guide will walk you through everything you need to transform ordinary furniture into extraordinary statement pieces.
Decoupage is the art of decorating surfaces by gluing paper cutouts and sealing them with layers of finish. This centuries-old technique has experienced a massive revival among DIY enthusiasts because it delivers professional-looking results without requiring professional skills. By the end of this guide, you’ll understand every step of the decoupage process, from preparing your furniture to applying that perfect final coat.
Whether you want to upcycle thrift store finds, refresh bedroom furniture, or create personalized pieces for your home, decoupage offers endless creative possibilities. Let’s dive into this rewarding craft that combines creativity with sustainability.
What Is Decoupage and Why Should Beginners Try It?

Decoupage comes from the French word “decouper,” meaning to cut out. This decorative technique involves cutting images from paper, fabric, or other materials and adhering them to surfaces before sealing with multiple protective coats. The result?
A smooth, painted-on appearance that looks far more complex than the actual process. For beginners, decoupage offers several compelling advantages. First, the initial investment is minimal.
Second, mistakes are forgiving and often fixable. Third, the learning curve is gentle compared to other furniture refinishing techniques. The beauty of decoupage lies in its versatility.
You can create vintage Victorian aesthetics, modern geometric patterns, or whimsical designs featuring maps, sheet music, or botanical prints. If you enjoy exploring fun crafts to make at home, decoupage should definitely be on your list.
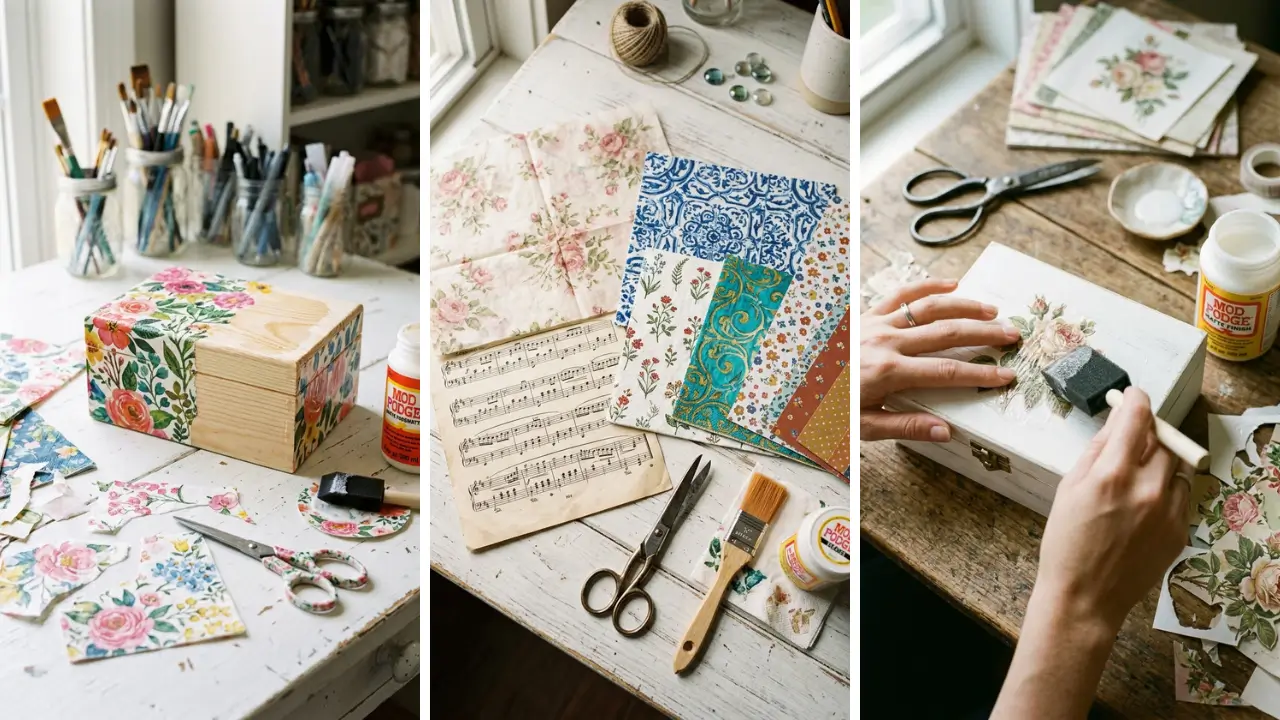
Essential Materials for Your First Decoupage Furniture Project

Before starting your decoupage journey, gathering the right supplies ensures smooth progress. The good news? Most materials are affordable and readily available at craft stores or online.
Basic Supplies You’ll Need
Here’s your essential shopping list:
- Decoupage medium – Mod Podge is the most popular choice, available in matte, gloss, and satin finishes
- Sandpaper – Various grits (120, 220, and 400) for preparation and between coats
- Primer – Essential for sealing wood and creating a smooth base
- Foam brushes or soft bristle brushes – For applying glue and sealant
- Paper materials – Napkins, tissue paper, wrapping paper, scrapbook paper, or printouts
- Sharp scissors or craft knife – For precise cutting
- Brayer or plastic card – For smoothing out bubbles
- Clean cloths – For wiping excess glue
Looking for budget-friendly options? Many crafters discover incredible paper selections and affordable supplies when exploring dollar store crafts ideas that look surprisingly upscale.
Choosing the Right Paper for Decoupage

Paper selection dramatically affects your final results. Thinner papers work better for beginners because they conform easily to surfaces and blend seamlessly. Tissue paper and napkins are excellent starting choices.
They’re forgiving, affordable, and create a nearly invisible edge. Scrapbook paper offers more durability and bolder patterns but requires extra attention to edges. Wrapping paper falls somewhere in between, offering variety without excessive thickness.
Avoid glossy magazine pages for your first project. The coating prevents proper adhesion and often causes bubbling. If you must use printed images, seal them first with clear acrylic spray to prevent ink bleeding.
How to Decoupage Furniture for Beginners: Preparation Steps

Proper preparation separates amateur results from professional-looking finishes. Rushing this stage inevitably leads to peeling, bubbling, or uneven surfaces. Trust the process – thorough prep saves time and frustration later.
Cleaning and Sanding Your Furniture
Start by removing all hardware, drawers, and detachable components. Clean the entire surface with a degreasing solution or mixture of warm water and dish soap. Grease and grime prevent proper adhesion, so this step is non-negotiable.
Once dry, sand the surface with 120-grit sandpaper. You’re not removing all existing finish – just creating texture for primer adhesion. Sand in the direction of the wood grain using consistent, moderate pressure.
Wipe away all dust with a tack cloth or damp rag. Any remaining particles will create bumps beneath your paper.
Priming for Perfect Results
Apply one to two coats of primer, allowing complete drying between coats. Primer serves multiple purposes: it seals the wood, prevents bleed-through from existing stains, and creates a uniform base for your design. For white or light-colored papers, use white primer.
For darker designs, consider tinting your primer or using a base paint color that complements your chosen papers. This technique adds depth and ensures complete coverage even if paper edges lift slightly over time. Lightly sand the primed surface with 220-grit sandpaper once completely dry.
This creates the ideal slightly rough texture for decoupage medium adhesion.
Step-by-Step Guide to Applying Decoupage

Now comes the exciting part – actually applying your designs! This step-by-step guide breaks down the technique into manageable stages that any beginner can master.
Step 1: Planning Your Design Layout
Before applying any glue, arrange your paper pieces on the furniture surface. This dry-fitting stage reveals potential problems and helps you visualize the final result. Take photos of arrangements you like – it’s surprisingly easy to forget exact placement once you start gluing.
Consider pattern flow, especially for larger pieces with drawers. Align patterns across drawer fronts for a cohesive look, or intentionally mismatch for eclectic style.
Step 2: Cutting and Preparing Paper
Cut your papers slightly larger than needed – you can trim excess later. For napkins, separate the layers and use only the printed top layer. The thinner material adheres better and creates smoother results.
If using multiple paper pieces, consider tearing edges instead of cutting. Torn edges blend more naturally and create an almost invisible seam when overlapped.
Step 3: Applying the First Layer
Apply a thin, even coat of decoupage medium to the furniture surface – not the paper. Working in small sections prevents the medium from drying before paper placement. Carefully position your paper on the wet medium.
For thin papers like napkins, this requires patience. Place one edge first, then slowly lower the rest, smoothing as you go. Use a brayer, plastic card, or even your fingers to gently push air bubbles toward the edges.
Work from the center outward using light pressure. Heavy pressure on wet paper causes tearing.
Step 4: Sealing and Protecting
Once your paper application dries completely (typically 15-30 minutes), apply a thin coat of decoupage medium over the entire surface. This seals the paper and begins building protective layers. Allow complete drying, then apply additional coats.
Most furniture requires 3-5 coats for adequate protection. Sand lightly with 400-grit sandpaper between coats for the smoothest finish. For furniture receiving heavy use – like coffee tables or dressers – consider applying a final protective coat of polyurethane or furniture wax.
This extra step dramatically increases durability.
Troubleshooting Common Decoupage Problems

Even experienced crafters encounter challenges. Knowing how to handle common issues prevents frustration and salvages potentially ruined projects.
Dealing with Air Bubbles
Small bubbles often disappear as the medium dries. For persistent bubbles, poke a tiny hole with a pin and press flat. If caught early, you can lift the paper edge slightly, apply more medium, and smooth again.
Fixing Wrinkles and Tears
Wrinkles in thin paper are nearly impossible to fix once dried. Prevention is key: work slowly and keep paper taut during application. Small tears can be patched with matching paper pieces, overlapping edges slightly.
If you enjoy solving creative problems and working with your hands, you’ll find decoupage incredibly satisfying. Many crafters who start with furniture decoupage expand into creating DIY handmade gifts using similar techniques.
Preventing Yellowing
Some decoupage mediums yellow over time, especially on white papers. Prevent this by choosing non-yellowing formulas and applying UV-protective final coats. Store finished pieces away from direct sunlight.
Creative Ideas for Your First Decoupage Furniture Project

Starting with the right project sets you up for success. These beginner-friendly ideas offer excellent practice while creating beautiful, functional pieces.
Small Side Tables
Side tables provide flat surfaces perfect for learning. The limited area feels manageable, and mistakes won’t ruin a large piece. Try covering just the tabletop first, leaving legs painted a complementary solid color.
Drawer Fronts
Transform boring dresser drawers without committing to an entire piece. Remove drawers, decoupage the fronts, and create a stunning focal point. This approach works beautifully for children’s furniture or eclectic bedroom decor.
Decorative Trays
Wooden trays from thrift stores make ideal practice pieces. They’re inexpensive, small, and immediately functional. Decoupage the interior with maps for a travel theme or botanical prints for a garden-inspired look.
Once you master basic techniques, you’ll discover that decoupage fits perfectly into home craft projects quick enough for weekend completion.
Advanced Tips for Stunning Results

Ready to elevate your decoupage skills? These advanced techniques create truly impressive finishes.
Layering for Depth
Create dimensional effects by layering different papers. Apply background papers first, let them dry completely, then add foreground elements. This technique works beautifully for collage-style designs.
Distressing for Vintage Appeal
After final coats dry, lightly sand edges and high points to reveal base colors beneath. This distressing technique creates authentic aged appearance. Apply antiquing glaze in crevices for additional character.
Mixing Media
Don’t limit yourself to paper alone. Combine decoupage with stenciling, hand-painted details, or transfer techniques. Layer fabric under tissue paper for subtle texture.
The possibilities expand dramatically with experience. For more inspiration on personalized gift-giving projects, explore handmade gift craft ideas that incorporate decoupage and other techniques.
Caring for Decoupaged Furniture
Proper care ensures your beautiful creations last for years. Decoupaged furniture requires slightly different maintenance than standard painted pieces. Dust regularly with soft, dry cloths.
Avoid abrasive cleaners or rough sponges that can scratch the sealed surface. For deeper cleaning, use barely damp cloths and dry immediately. Use coasters and trivets on decoupaged surfaces.
While properly sealed pieces resist moisture, prolonged exposure can cause damage. Position furniture away from heating vents and direct sunlight to prevent warping and fading.
Conclusion: Your Decoupage Journey Starts Now
Learning how to decoupage furniture for beginners opens doors to endless creative possibilities. This step-by-step guide has equipped you with everything needed to transform tired furniture into stunning personalized pieces. From selecting materials and preparing surfaces to applying paper and sealing your work, you now understand the complete process.
Remember, perfection isn’t the goal for your first project – learning and enjoying the process matters most. Each piece teaches new lessons and builds confidence. Your fifth project will look dramatically better than your first, and that progress is incredibly rewarding.
The beauty of decoupage lies in its accessibility and forgiving nature. Mistakes become design features, imperfections add character, and every finished piece tells a story. Whether you’re upcycling thrift finds or refreshing inherited furniture, decoupage lets you express creativity while practicing sustainable crafting.
Ready to start your decoupage adventure? Gather your supplies, choose a small practice piece, and dive in! Share your creations, ask questions in the comments below, and don’t hesitate to experiment with different papers and techniques.
Your journey from beginner to confident decoupage artist begins with that very first brushstroke.
Frequently Asked Questions
Q: How long does it take to learn how to decoupage furniture for beginners? A: Most beginners can complete their first simple project in one weekend. Basic techniques are easy to grasp within a few hours of practice.
With each project, your skills improve noticeably, and most crafters feel confident tackling larger furniture pieces after completing two or three smaller projects. Q: Can I decoupage over previously painted or varnished furniture? A: Yes, but proper preparation is essential.
Sand the existing finish lightly to create texture for adhesion, clean thoroughly, and apply primer before decoupaging. Skipping these steps often results in peeling or poor adhesion of your decorative papers. Q: What’s the best type of paper for beginners learning how to decoupage furniture?
A: Tissue paper and the printed layer of decorative napkins work best for beginners. They’re thin, conformable, and create nearly invisible edges. As you gain experience, experiment with thicker scrapbook papers, wrapping paper, or fabric for different effects.
Q: How many coats of decoupage medium do I need for furniture that will be used daily? A: Apply at least 5-8 coats for frequently used furniture like coffee tables or dressers. Sand lightly between coats with 400-grit sandpaper for smoothest results.
For maximum durability, finish with a coat of water-based polyurethane or furniture wax. Q: Can decoupaged furniture be used outdoors? A: Standard decoupage isn’t suitable for outdoor use, as moisture and UV exposure cause rapid deterioration.
However, outdoor-formula decoupage mediums exist for protected porch or patio pieces. For best results, keep decoupaged furniture indoors or in covered outdoor areas with minimal direct sunlight.