Natural Dye Easter Eggs: Handmade Decorations Guide
Have you ever wondered what your ancestors used to create those beautifully colored Easter eggs before synthetic dyes existed? The answer lies right in your kitchen. Learning how to make handmade Easter egg decorations using natural dye isn’t just a nostalgic craft—it’s a sustainable, rewarding activity that produces stunning, one-of-a-kind results every time.
Natural dyeing creates soft, earthy tones that synthetic colors simply cannot replicate. From deep burgundy reds to golden yellows and oceanic blues, everyday ingredients like onion skins, turmeric, and red cabbage can transform ordinary eggs into works of art. Best of all, this technique is completely safe for kids and the environment.
In this comprehensive guide, you’ll discover everything you need to know about creating gorgeous naturally dyed Easter eggs. We’ll cover which ingredients produce which colors, step-by-step dyeing techniques, creative decoration methods, and tips for achieving the most vibrant results. Whether you’re a complete beginner or looking to elevate your Easter crafting game, this guide has you covered.
Why Choose Natural Dyes for Your Easter Egg Decorations

Before diving into techniques, let’s explore why natural dyes are worth considering. First, they’re completely non-toxic. If you’re dyeing eggs with children, there’s no need to worry about harmful chemicals touching little hands or accidentally getting into mouths.
Natural dyes also create unique, organic color variations that synthetic dyes can’t match. Each egg emerges with subtle differences in tone and saturation, giving your Easter display an artisanal, handcrafted appeal. If you enjoy exploring DIY handmade gifts, natural egg dyeing fits perfectly into that creative philosophy.
Additionally, using kitchen scraps and pantry staples means you’re reducing waste while creating something beautiful. Those onion skins you’d normally throw away? They produce the most gorgeous rust-orange hues imaginable.
Essential Supplies for Natural Egg Dyeing

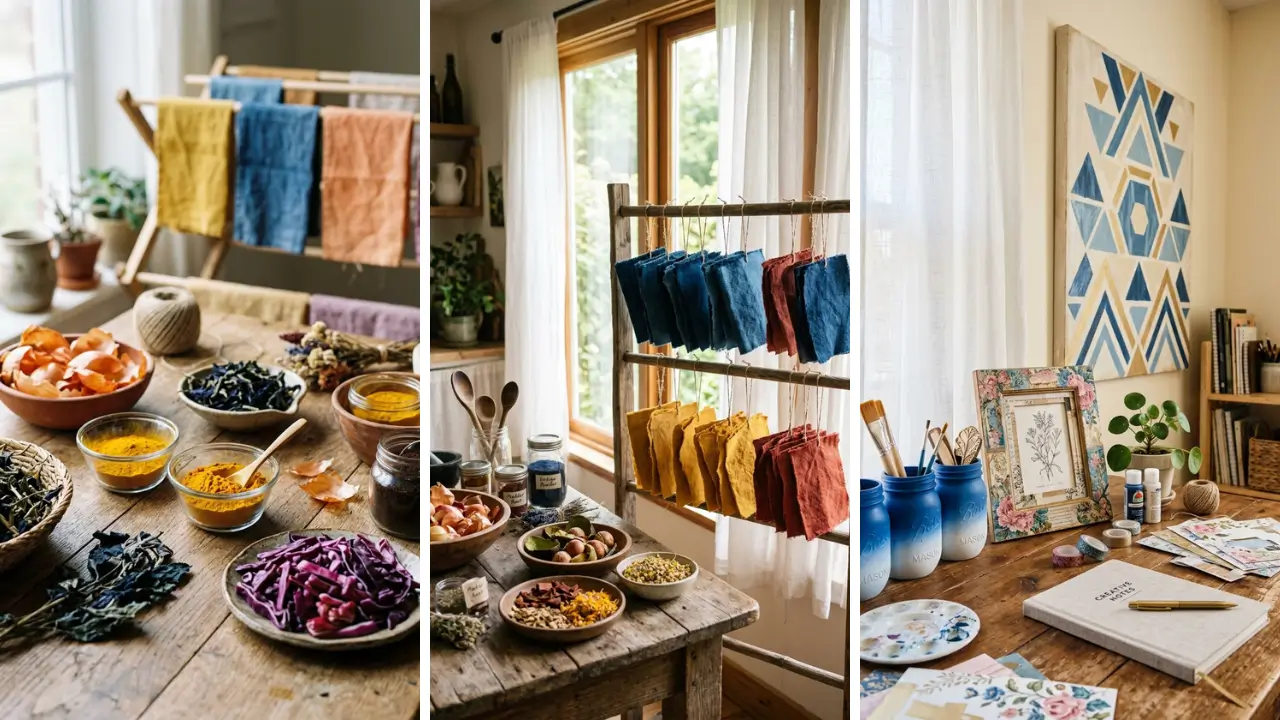
Getting started with natural egg dyeing requires minimal equipment. Most items are probably already in your kitchen. Here’s what you’ll need: Basic supplies:
- Hard-boiled eggs (white eggs show colors best)
- Stainless steel or glass pots (not aluminum)
- White vinegar
- Strainer or cheesecloth
- Spoons for handling eggs
- Glass jars or bowls for soaking
- Paper towels or drying rack
Natural dye materials:
- Yellow onion skins (orange-rust)
- Red onion skins (reddish-purple)
- Turmeric powder (bright yellow)
- Red cabbage (blue-purple)
- Beets (pink-red)
- Spinach or matcha (green)
- Coffee or black tea (brown)
- Blueberries (blue-gray)
This project works wonderfully as one of those fun crafts to make at home because the supplies are so accessible. No specialty store trips required!
How to Make Handmade Easter Egg Decorations Using Natural Dye: Step-by-Step

Now let’s get into the actual process. Understanding how to make handmade Easter egg decorations using natural dye involves three main phases: preparing your dye, preparing your eggs, and the dyeing process itself.
Step 1: Prepare Your Natural Dye Solutions
Creating dye from natural materials requires simmering them in water to extract color. Here’s the basic formula that works for most ingredients: Combine 4 cups of water with approximately 2 cups of your dye material (or 3-4 tablespoons for powders like turmeric). Add 1 tablespoon of white vinegar—this helps the color adhere to the eggshell.
Bring the mixture to a boil, then reduce heat and simmer for 30-60 minutes. The longer you simmer, the more concentrated your dye becomes. For deep, rich colors, simmer closer to an hour.
Strain out the solid materials and let your dye cool to room temperature. You can store prepared dyes in glass jars in the refrigerator for several days if needed.
Step 2: Prepare Your Eggs

For best results, use white-shelled eggs. Brown eggs will still absorb dye, but colors will appear more muted and earthy. Both can be beautiful depending on your aesthetic goals.
Hard-boil your eggs and let them cool completely. For the smoothest color application, gently clean the shells with a bit of vinegar on a soft cloth. This removes any oils that might prevent even dye absorption.
Here’s a pro tip: room temperature eggs absorb dye more evenly than cold eggs straight from the refrigerator.
Step 3: The Dyeing Process
Submerge your prepared eggs in the cooled dye solution. This is where patience becomes your best friend. Natural dyes work slowly compared to synthetic alternatives.
For light, pastel shades, soak eggs for 30 minutes to 2 hours. Medium saturation requires 2-4 hours. For deep, vibrant colors, leave eggs in the dye overnight—8 to 12 hours.
Gently rotate eggs occasionally for even coverage. Once you achieve your desired color, remove eggs with a spoon and place them on paper towels or a drying rack.
Natural Dye Color Guide and Recipes

Different ingredients produce different colors. Here’s a detailed breakdown of what to expect from common kitchen items:
Warm Tones: Yellows, Oranges, and Reds
Turmeric creates the brightest, most consistent yellow. Use 3 tablespoons of powder per 4 cups of water. Results appear quickly, often within 30 minutes.
Yellow onion skins produce beautiful burnt orange to rust tones. Collect skins from about 6-8 onions. This is an excellent way to use kitchen scraps creatively.
Beets yield gorgeous pink hues. Chop 2-3 medium beets and simmer. The resulting color ranges from soft blush to deep magenta depending on soak time.
Cool Tones: Blues, Purples, and Greens
Red cabbage is perhaps the most magical natural dye. It produces stunning blue and purple shades—the exact color depends on your water’s pH. Adding more vinegar shifts colors toward purple; adding baking soda creates more blue tones.
Blueberries create soft blue-gray tones. Use about 2 cups of frozen or fresh berries. The color is subtle but beautiful.
Spinach or matcha powder yields muted green shades. Greens are notoriously tricky with natural dyes, so adjust your expectations for softer sage tones rather than bright Kelly green.
Neutral Tones: Browns and Tans
Coffee produces rich brown tones. Simply use strongly brewed coffee as your dye base. Black tea works similarly but creates lighter, more golden-brown results.
These earth tones pair beautifully with the brighter colors for a cohesive, natural aesthetic. If you’re interested in home craft projects quick enough to complete in an afternoon, coffee and tea dyes work fastest.
Creative Decoration Techniques Beyond Solid Colors

Solid-colored eggs are beautiful, but several techniques can add patterns and visual interest to your naturally dyed creations.
Botanical Prints and Leaf Patterns
This technique creates stunning silhouette patterns on your eggs. Press flat leaves, flowers, or herbs against a damp egg. Wrap the egg tightly in a piece of nylon stocking or cheesecloth to hold the botanical in place.
Submerge the wrapped egg in your dye solution. When you remove the wrapping after dyeing, the area covered by the plant will remain lighter, creating a beautiful negative-space design. Try ferns, parsley, cilantro, small flowers, or even grass blades for different effects.
Rubber Band Resist Patterns
Wrap rubber bands around eggs before dyeing to create striped patterns. The areas covered by rubber bands resist the dye, leaving lines in the original egg color. For more complex patterns, dye the egg once, let it dry, add more rubber bands in different positions, then dye in a second color.
This creates beautiful layered effects.
Wax Resist Technique
Using a crayon or melted beeswax, draw designs directly onto your egg before dyeing. The wax repels the dye, preserving your design in the original shell color. After dyeing and drying, gently warm the egg with a hairdryer and wipe away the melted wax.
This traditional Ukrainian technique called “pysanky” creates incredibly detailed results.
Tips for Achieving the Best Natural Dye Results

After years of natural dyeing experimentation, here are the most impactful tips for success: Start with the freshest eggs possible. Fresh eggs have tighter shells that absorb dye more evenly. Older eggs can develop a chalky texture that affects color absorption.
Don’t rush the process. Natural dyes simply require more time than synthetic alternatives. Plan to let eggs soak for several hours or overnight for the richest colors.
Keep notes on your experiments. Record which ingredients, quantities, and soak times produced your favorite results. Natural dyeing involves variables that can change results batch to batch.
Add a finishing shine. Once eggs are completely dry, rub them gently with a tiny amount of vegetable oil on a soft cloth. This adds a subtle sheen and helps preserve the color.
These naturally dyed eggs make wonderful handmade gift craft ideas for Easter baskets, hostess gifts, or springtime celebrations.
Storing and Displaying Your Natural Easter Eggs

If you’ve used hard-boiled eggs, they should be refrigerated and consumed within one week. For display purposes, eggs can sit at room temperature for about two hours safely. For longer-lasting decorations, consider blown eggs.
Poke small holes in each end of a raw egg, insert a needle to break the yolk, then blow out the contents. These hollow eggs can be dyed using the same techniques and will last indefinitely as decorations. Display your finished eggs in baskets lined with natural moss or grass.
Clear glass bowls also showcase the beautiful colors wonderfully. Arrange eggs of varying colors together for maximum visual impact.
Budget-Friendly Natural Dyeing Ideas
Natural egg dyeing is inherently budget-friendly since most materials come from kitchen scraps or inexpensive pantry staples. For even more savings, consider these approaches: Save onion skins in a bag in your freezer throughout the year. By Easter, you’ll have plenty for dyeing without any additional cost.
Check the reduced produce section for wilting red cabbage or past-prime beets. They work perfectly fine for dyeing purposes. If you enjoy finding creative ways to craft affordably, explore dollar store crafts ideas for additional inspiration on budget-conscious creating.
Conclusion: Embrace the Art of Natural Easter Egg Decorating
Learning how to make handmade Easter egg decorations using natural dye connects you to centuries of tradition while creating something uniquely beautiful. The soft, organic colors achieved through this method have a warmth and authenticity that synthetic dyes simply cannot replicate. Yes, natural dyeing requires more patience than dropping eggs into commercial dye tablets.
But that slower pace is part of the appeal. It transforms Easter egg decorating from a quick activity into a mindful, creative experience you can share with family and friends. Start simple with one or two dye colors, experiment with different soak times, and don’t stress about perfection.
The slight variations and imperfections are what make naturally dyed eggs so charming. Each one tells a story of the ingredients and time that created it. Ready to try natural egg dyeing this Easter?
Gather your supplies, choose a few colors to experiment with, and enjoy the creative process. We’d love to hear about your results! Share your natural dyeing experiences in the comments below, or tag your creations on social media to inspire others.
Frequently Asked Questions
Q: How long do naturally dyed Easter eggs last? A: Hard-boiled naturally dyed eggs should be refrigerated and consumed within one week, just like any hard-boiled egg. For decorative purposes only, blown eggs can be naturally dyed and will last indefinitely since there’s no perishable content inside.
Q: Can I use brown eggs for natural Easter egg decorations using natural dye? A: Yes, you can absolutely use brown eggs! The colors will appear more muted and earthy compared to white eggs.
Brown eggs work especially well with darker dyes like coffee, beet, and red cabbage, creating sophisticated, rustic tones. Q: Why aren’t my natural dyes producing vibrant colors? A: The most common reasons are insufficient soak time or not using enough vinegar.
Try extending your soak time to overnight and ensure you’re adding at least 1 tablespoon of white vinegar per 4 cups of dye solution. Using white eggs also helps colors appear brighter. Q: Is it safe to eat eggs dyed with natural materials?
A: Yes! One of the biggest advantages of learning how to make handmade Easter egg decorations using natural dye is that all materials are food-safe. As long as your hard-boiled eggs have been properly refrigerated, they’re perfectly safe to eat.
Q: What’s the best natural dye for beginners to start with? A: Turmeric and yellow onion skins are the most beginner-friendly options. Turmeric produces consistently bright yellow results quickly, while onion skins create beautiful orange tones and are readily available in most kitchens.
Both are forgiving and produce reliable results even on your first attempt.