How to Build a DIY Raised Garden Bed for Under $50
Want fresh tomatoes, herbs, and vegetables but think gardening requires a huge budget? Here’s the truth: learning how to build a DIY raised garden bed for under $50 is not only possible but surprisingly simple. You don’t need fancy tools, professional carpentry skills, or expensive materials to create a thriving garden space.
Raised garden beds offer incredible benefits—better drainage, fewer weeds, easier maintenance, and the ability to control your soil quality completely. The best part? You can complete this entire project in a single afternoon with basic materials from your local hardware store or even recycled lumber.
In this comprehensive guide, you’ll discover exactly what materials you need, step-by-step building instructions, money-saving tips, and expert advice to create a beautiful raised garden bed that will last for years. Let’s dig in and transform your backyard without breaking the bank.
Why Choose a DIY Raised Garden Bed?

Before grabbing your tools, understanding why raised beds outperform traditional in-ground gardens helps you appreciate this project’s value. Raised beds warm up faster in spring, extending your growing season by several weeks. The elevated design means no more back-breaking bending while planting or weeding.
Your knees and spine will thank you! Plus, you control exactly what goes into your soil—no mystery contaminants or poor drainage issues. Raised beds also create natural barriers against common garden pests.
Slugs, rabbits, and ground-dwelling insects have a harder time reaching your precious vegetables. If you enjoy fun crafts to make at home, building a raised bed combines creativity with practical outdoor living.
Materials You Need to Build a DIY Raised Garden Bed for Under $50

Staying within budget requires smart shopping and material choices. Here’s your complete shopping list with approximate costs: Lumber Options (Choose One):
- Cedar fence pickets (8 pieces, 6 feet each): $20-25
- Untreated pine boards (2×6 or 2×8): $15-20
- Pallet wood (free with some hunting)
Hardware and Supplies:
- Exterior wood screws (2.5-3 inch): $6-8
- Corner brackets (optional but recommended): $4-6
- Landscape fabric: $5-8
Tools Required:
- Drill or screwdriver
- Measuring tape
- Saw (hand saw works fine)
- Level
- Pencil
Most gardeners already own these basic tools. If not, consider borrowing from neighbors or checking if your local library has a tool lending program—yes, these actually exist!
Choosing the Best Location for Your Raised Bed

Location dramatically impacts your garden’s success. Most vegetables need 6-8 hours of direct sunlight daily. Spend a day observing your yard’s sun patterns before committing to a spot.
Avoid placing beds under large trees—root competition and falling debris create ongoing problems. Also consider water access. Dragging hoses across your entire yard gets old quickly.
Level ground makes construction easier, though minor slopes work with some adjustments. Finally, think about convenience. Place beds where you’ll actually visit them regularly.
Out of sight often means out of mind when watering time comes.
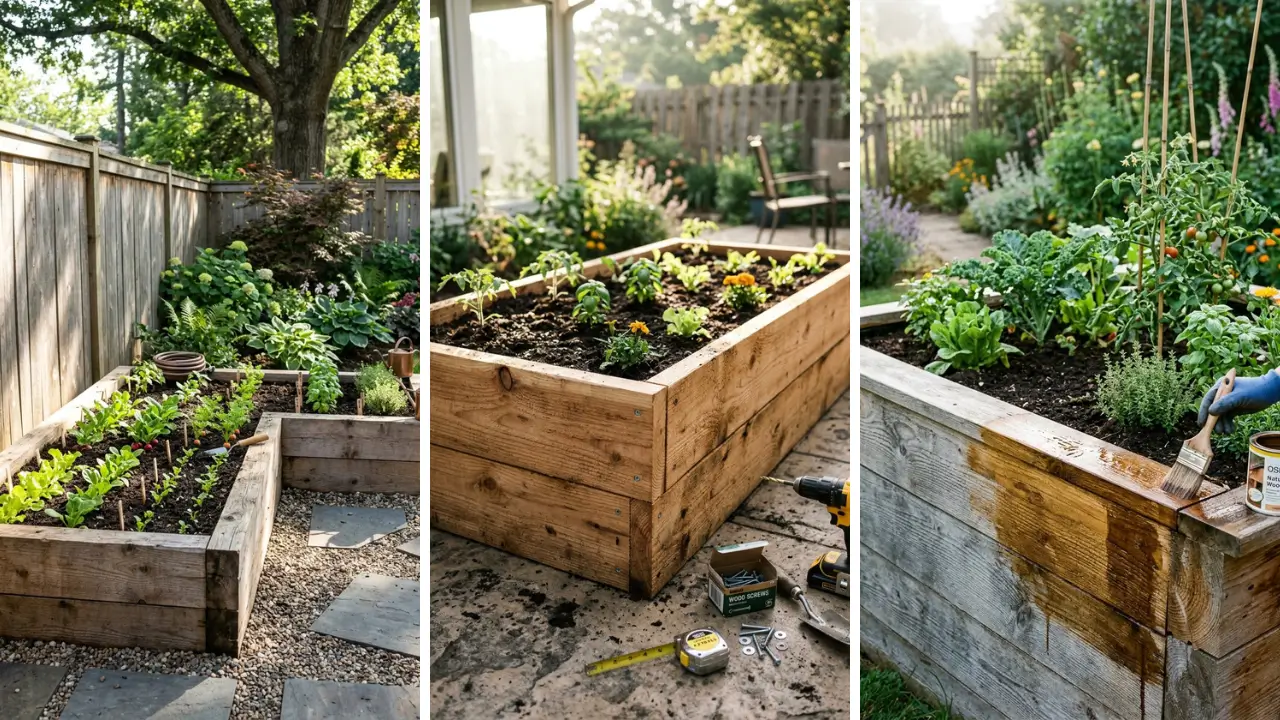
Step-by-Step Instructions: How to Build a DIY Raised Garden Bed for Under $50

Step 1: Cut Your Lumber to Size
A standard beginner-friendly size is 4 feet by 4 feet or 4 feet by 8 feet. The 4-foot width is crucial—you can reach the center from either side without stepping on the soil. For a 4×4 foot bed using fence pickets, cut eight boards at 4 feet and eight boards at 3.5 feet (accounting for overlap at corners).
Measure twice, cut once—this old carpenter’s wisdom saves materials and frustration.
Step 2: Assemble the First Layer
Lay out four boards in a square on flat ground. The shorter pieces go inside the longer pieces at corners. Pre-drill holes to prevent wood splitting, then drive three screws through each corner connection.
Check for square using a measuring tape diagonally across corners. Both diagonal measurements should be equal. Adjust before screws fully tighten if needed.
Step 3: Stack Additional Layers

For adequate soil depth, stack 2-3 layers of boards. Most vegetables thrive with 8-12 inches of soil depth. Offset corners slightly from the layer below for added stability.
Use corner brackets on inside corners for extra reinforcement, especially if using thinner lumber. This prevents walls from bowing outward when filled with heavy soil.
Step 4: Install Landscape Fabric (Optional but Recommended)
Cut landscape fabric slightly larger than your bed’s interior. Staple it to the inside bottom of the frame. This prevents weeds from growing up through your bed while allowing water drainage.
Skip plastic sheeting—it traps water and causes root rot. Landscape fabric breathes while blocking unwanted vegetation. If you’re interested in more home craft projects quick to complete, many use similar simple materials.
Step 5: Position and Level Your Bed
Move the completed frame to your chosen location. Use a level to check all sides. For unlevel ground, dig out high spots rather than adding material under low areas.
A slightly uneven bed won’t ruin your garden, but level beds look more professional and distribute water more evenly across the planting area.
Budget-Friendly Soil Mix for Your Raised Bed

Here’s where many gardeners accidentally blow their budget. Commercial raised bed soil costs a fortune when buying bags. Instead, create this proven mix:
- 40% topsoil (bulk delivery is cheapest)
- 40% compost (make your own or buy bulk)
- 20% perlite or coarse sand for drainage
A 4×4 foot bed that’s 10 inches deep needs approximately 13 cubic feet of soil. Many landscape supply companies sell bulk compost and topsoil by the cubic yard at significantly lower prices than bagged products. Pro tip: Ask neighbors if they’re ordering bulk soil—splitting delivery fees saves everyone money.
Also check local municipal composting programs offering free or cheap compost to residents.
Money-Saving Alternatives and Hacks

Getting under $50 sometimes requires creativity. These alternatives slash costs further: Free Pallet Wood: Many businesses give away pallets. Look for heat-treated (stamped “HT”) pallets rather than chemically treated ones.
Disassemble carefully and sand rough edges. Reclaimed Materials: Old deck boards, fence sections, and construction site scraps work beautifully. Always ask before taking anything that might belong to someone.
Cinder Block Beds: Stack cinder blocks without mortar for an incredibly sturdy, affordable raised bed. Bonus: plant herbs in the block holes! Looking for more budget-friendly project ideas?
Check out these dollar store crafts ideas that look expensive but cost almost nothing. Log Edges: If you have access to fallen trees or know someone clearing land, logs create rustic, beautiful raised bed borders. They decompose slowly, adding nutrients to soil over years.
Common Mistakes to Avoid When Building Raised Garden Beds
Learning from others’ mistakes saves time and money. Here are pitfalls to sidestep: Using Treated Lumber: Modern pressure-treated wood is safer than old formulations, but many gardeners prefer avoiding any chemicals near food crops. Untreated cedar naturally resists rot for 10-15 years.
Making Beds Too Wide: Anything wider than 4 feet requires stepping into the bed, compacting soil and defeating a major raised bed advantage. Stick to reachable widths. Skipping Soil Prep: Even raised beds benefit from loosening the ground underneath.
This allows roots to extend deeper and improves drainage into native soil below. Forgetting Future Access: Leave space to walk around all sides. You’ll need access for harvesting, weeding, and any bed maintenance over time.
Extending Your Raised Bed’s Lifespan

Protect your investment with these maintenance tips that add years to your bed’s life: Apply food-safe linseed oil to exterior wood surfaces annually. This natural treatment repels moisture without introducing chemicals near your plants. Apply in fall after the growing season ends.
Keep soil levels maintained—settling is normal. Add compost each spring to replenish nutrients and maintain proper depth. Rotating crops annually prevents soil depletion and reduces pest buildup.
Check corners and hardware each season. Tighten loose screws and replace any damaged brackets before problems worsen. Small repairs prevent complete rebuilds later.
What to Plant in Your New Raised Bed
Now comes the exciting part—planting! Beginners find success with these forgiving crops:
- Lettuce and salad greens: Fast-growing, cool-weather tolerant
- Tomatoes: Thrive in raised beds’ warm, well-drained soil
- Peppers: Love the extra warmth raised beds provide
- Herbs: Basil, parsley, and cilantro grow easily
- Radishes: Ready to harvest in just 30 days
Use square foot gardening principles to maximize space. This method divides your bed into 1-foot squares, each planted with specific quantities based on plant size. You’ll grow more food in less space.
Creative Ideas: Beyond Basic Beds
Once you’ve mastered basic construction, consider these upgrades for future beds: Add a built-in trellis on the north side for climbing plants like beans, peas, or cucumbers. This vertical growing maximizes space without shading other plants. Install drip irrigation for hands-off watering.
A simple soaker hose connected to a timer costs around $20 and saves countless hours over the growing season. Build a cold frame attachment using old windows or clear plastic. This extends your growing season by weeks on both ends.
If you enjoy creating handmade gift craft ideas, a miniature raised bed planter makes a thoughtful present for gardening friends.
Conclusion: Your Budget Garden Awaits
You now have everything needed to understand how to build a DIY raised garden bed for under $50. This rewarding project combines practical skills with the joy of growing your own food—and the satisfaction of saving hundreds compared to store-bought alternatives. Remember, perfection isn’t the goal.
A slightly imperfect garden bed still grows amazing vegetables. Start simple, learn as you go, and expand your garden as skills and confidence grow. The hardest part is taking that first step.
This weekend, visit your local hardware store, grab some lumber, and build your first raised bed. Future you—enjoying fresh homegrown tomatoes—will be grateful you started today. Ready to start building?
Share your raised bed projects in the comments below! We’d love to see your creations and hear about your budget-saving material finds. If this guide helped you, share it with friends who’ve been dreaming about starting their own gardens.
Frequently Asked Questions
How long does it take to build a DIY raised garden bed for under $50? Most beginners complete a basic 4×4 foot raised bed in 2-3 hours, including cutting lumber and assembly. Having all materials ready beforehand speeds up the process significantly.
Factor in additional time for soil filling and leveling. What wood is best for building a raised garden bed on a budget? Cedar fence pickets offer the best balance of affordability and durability, naturally resisting rot for 10-15 years.
Untreated pine costs less but lasts only 3-5 years. Avoid pressure-treated wood if growing edible crops. Can I really build a DIY raised garden bed for under $50?
Absolutely! Using cedar fence pickets, basic screws, and landscape fabric, a 4×4 foot bed typically costs $35-45. Soil adds to total cost, but bulk purchases and homemade compost keep expenses manageable.
How deep should a raised garden bed be for vegetables? Most vegetables thrive with 8-12 inches of soil depth. Root vegetables like carrots need closer to 12 inches, while lettuce and herbs grow well in 6-8 inches.
Deeper beds cost more to fill but provide better growing conditions. Do I need to line the bottom of my raised garden bed? Landscape fabric on the bottom blocks weeds while allowing drainage—highly recommended.
Never use plastic, which traps water and causes root rot. Skip lining entirely if your native soil drains well and has few weed problems.