How to Make a No-Sew Throw Blanket in Under an Hour
Want a cozy, handmade blanket without touching a sewing machine? You’re in the right place. Learning how to make a no-sew throw blanket is one of the easiest craft projects you can tackle—and the best part?
You can finish it in under 60 minutes. Whether you’re making it for yourself, gifting it to a friend, or creating a comfortable addition to your living room, this project requires minimal supplies and zero sewing skills. No-sew blankets have become incredibly popular for good reason.
They’re budget-friendly, beginner-friendly, and the results look professionally made. Imagine wrapping yourself in a soft fleece blanket that you created with your own hands. That’s exactly what you’ll accomplish today.
Let’s dive into everything you need to know to craft your perfect throw blanket.
Why No-Sew Throw Blankets Are Perfect for Beginners

If you’ve never crafted anything before, a no-sew throw blanket is the ideal starting point. There’s no intimidating equipment, no complicated patterns, and no risk of pricking your fingers with needles. All you need are scissors, fabric, and about 45-60 minutes of your time.
These blankets are also incredibly forgiving. Made a cut slightly uneven? Nobody will notice once the blanket is finished.
This project builds confidence and introduces you to the satisfaction of creating something useful. Once you complete one, you’ll likely want to explore more fun crafts to make at home during your free weekends.
The benefits of no-sew blankets include:
- No sewing machine or needle required
- Completion time under one hour
- Affordable materials (often under $20)
- Customizable sizes, colors, and patterns
- Makes an excellent personalized gift
Materials You Need to Make a No-Sew Throw Blanket

Before starting your no-sew blanket project, gather these essential supplies. Having everything ready ensures a smooth, uninterrupted crafting experience.
Fabric Selection: Choosing the Right Fleece
Fleece is the gold standard for no-sew blankets. It doesn’t fray, it’s soft against the skin, and it cuts easily. You’ll need two pieces of fleece fabric, each measuring approximately 1.5 to 2 yards depending on your desired blanket size.
For a standard throw blanket, aim for pieces around 50 x 60 inches. You can choose two coordinating colors, a pattern paired with a solid, or two identical prints—whatever matches your style. Many craft stores sell fleece specifically bundled for no-sew blanket projects.
Essential Tools and Supplies
Your supply list is refreshingly short:
- Sharp fabric scissors – Dull scissors make this project frustrating
- Ruler or yardstick – For measuring consistent fringe strips
- Cutting mat or flat surface – Protects your table and ensures even cuts
- Fabric clips or weights – Keeps layers aligned while cutting
- Cardboard template – Optional but helpful for uniform fringe
This simplicity is what makes no-sew blankets one of the most accessible home craft projects quick enough to complete in a single afternoon.
Step-by-Step Guide: How to Make a No-Sew Throw Blanket

Now for the exciting part—actually making your blanket. Follow these detailed steps, and you’ll have a finished throw in under an hour.
Step 1: Prepare and Align Your Fabric
Lay your first piece of fleece on a large, flat surface with the “wrong” side facing up (the less vibrant side). Place your second piece directly on top, right side facing up. Smooth out any wrinkles and align all four edges as precisely as possible.
If your fabric pieces aren’t exactly the same size, trim them now so they match perfectly. Use your ruler and scissors to create clean, straight edges. Take your time here—proper alignment makes the rest of the process easier.
Step 2: Cut the Corner Squares
This step is crucial for the tie-knot method. Cut a square from each corner of both fabric layers simultaneously. The square should measure approximately 4 x 4 inches—this matches the length of your fringe strips.
Removing these corners creates clean intersections where your fringe strips meet. Without this step, your corners would look bulky and unfinished. Make sure you’re cutting through both layers at once to keep everything aligned.
Step 3: Cut Your Fringe Strips
Here’s where your blanket starts taking shape. Along all four edges, cut strips that are approximately 1 inch wide and 4 inches long. Cut through both fabric layers simultaneously to ensure your strips match up perfectly.
Pro tip: Create a cardboard template measuring 1 x 4 inches. Use it as a guide for each cut, and your fringe will look uniform and professional. Space your cuts evenly, working your way around the entire blanket perimeter.
Depending on your blanket size, you’ll cut somewhere between 100-150 fringe strips. It sounds like a lot, but with a rhythm, you’ll complete this step in about 20-25 minutes.
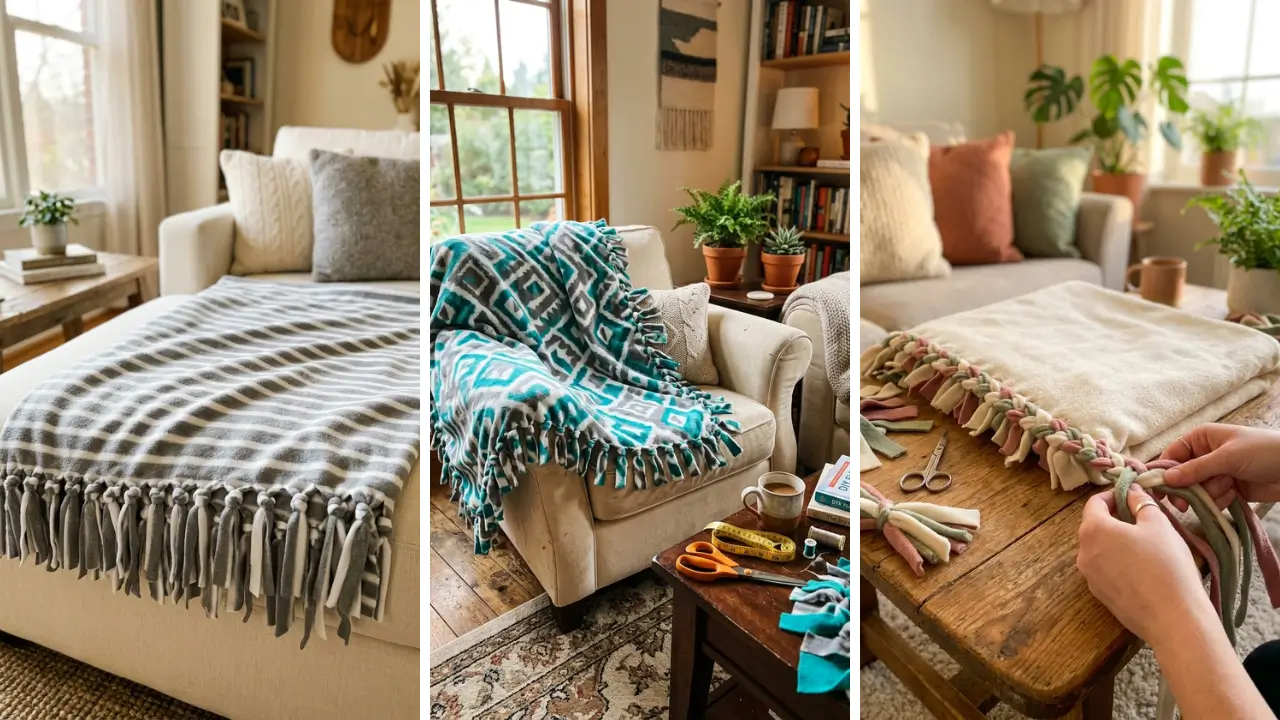
Step 4: Tie the Knots
Pick up one strip from each fabric layer and tie them together using a simple double knot. Pull firmly but gently—you want secure knots without stretching the fleece. Work your way around the entire blanket, tying every pair of strips.
Some crafters prefer a single knot for a cleaner look, while others like the security of double knots. Either works perfectly. The knotting process creates a decorative fringe border while permanently joining your two fabric pieces.
Step 5: Final Touches and Quality Check
Once all knots are tied, flip your blanket over and check both sides. Look for any missed strips or loose knots. Gently tug on random knots to ensure they’re secure.
Trim any uneven fringe ends if needed. Congratulations—you’ve just completed your handmade no-sew throw blanket! Wasn’t that easier than expected?
Creative Variations for Your No-Sew Blanket Project
Once you’ve mastered the basic technique, experiment with these creative variations to make each blanket unique.
Braided Edge Technique

Instead of knotting, try braiding adjacent strips together. Cut longer fringe (about 6 inches) and weave strips through each other in a braided pattern. This creates a more intricate border without any additional difficulty.
Layered Fleece Design

Add a third layer of fleece in a contrasting color. The extra layer creates a thicker, more luxurious blanket perfect for cold winter nights. Simply align all three layers and cut through them simultaneously.
Personalized Additions

Attach iron-on patches, fabric paint designs, or embroidered initials to personalize your blanket. These additions transform a simple throw into a thoughtful, one-of-a-kind gift. Speaking of gifts, no-sew blankets make excellent handmade gift craft ideas for birthdays, holidays, or housewarming celebrations.
Tips for Making Professional-Quality No-Sew Throw Blankets

Even simple projects benefit from insider knowledge. These tips elevate your blanket from good to great. Wash your fleece first.
Pre-washing removes any factory chemicals and pre-shrinks the fabric. Your finished blanket will maintain its shape through future washes. Invest in quality scissors.
Fabric scissors make clean cuts that look professional. Using household scissors often results in jagged, uneven edges that affect your blanket’s appearance. Work on a large surface.
A dining table or clean floor space works perfectly. Cramped workspaces lead to misaligned fabric and crooked cuts. Take breaks.
Cutting 100+ fringe strips can strain your hands. Pause every 15-20 minutes to rest your fingers and maintain cutting accuracy.
No-Sew Blanket Ideas for Every Occasion

No-sew throw blankets suit virtually any purpose or recipient. Here are some popular applications:
- Baby shower gifts – Choose soft pastels or nursery-themed prints
- Sports team blankets – Use team colors for tailgating or game day
- Pet blankets – Make smaller versions for your furry friends
- Movie night throws – Create oversized versions for couch snuggling
- Charity donations – Homeless shelters often accept handmade blankets
No-sew blankets represent just one example of rewarding DIY handmade gifts you can create without expensive equipment or advanced skills. Once you discover how satisfying handmade projects feel, you might explore other creative ventures like thrift store furniture makeover ideas or more complex textile crafts.
Common Mistakes to Avoid When Making No-Sew Blankets

Learn from others’ experiences and sidestep these frequent errors: Cutting uneven strips. Inconsistent fringe widths look sloppy. Use a template and measure frequently.
Skipping corner squares. Forgetting to remove corners results in bunched, awkward intersections that won’t lie flat. Using non-fleece fabric.
Cotton, linen, and other woven fabrics fray without hemming. Stick with fleece or anti-pill fleece for best results. Rushing the knots.
Loose knots unravel with use. Take extra seconds to secure each tie properly.
Conclusion: Your Cozy Creation Awaits
Learning how to make a no-sew throw blanket opens the door to countless creative possibilities. In less than an hour, you’ve transformed two pieces of fleece into a cozy, functional work of art. Whether you keep it for yourself or give it to someone special, this blanket carries the warmth of something handmade.
The best part? You can repeat this project infinitely, experimenting with different colors, patterns, and techniques each time. No-sew blankets make thoughtful gifts, practical home additions, and fun weekend activities.
Now that you have the skills, grab some fleece and start your next creation. Ready to make your first no-sew throw blanket? Gather your supplies this weekend and experience the joy of crafting something beautiful with your own hands.
Tag us in your finished projects—we’d love to see what you create!
Frequently Asked Questions About No-Sew Throw Blankets
How much fabric do I need for a no-sew throw blanket?
For a standard throw blanket, you need two pieces of fleece measuring approximately 1.5 to 2 yards each. This creates a finished blanket around 50 x 60 inches after trimming and adding fringe. Adjust quantities for larger or smaller blankets.
Can I wash a no-sew fleece blanket in the washing machine?
Yes, no-sew fleece blankets are machine washable. Use cold water on a gentle cycle and tumble dry on low heat. Avoid fabric softener, which can reduce fleece’s natural softness over time.
The tied knots remain secure through normal washing.
What’s the best fleece type for no-sew blankets?
Anti-pill fleece works best because it resists those annoying fabric balls that form with regular use. Look for medium-weight fleece with some stretch. Avoid minky or plush fabrics for your first project—they’re harder to cut evenly.
How long does it actually take to make a no-sew blanket?
Most beginners complete a standard throw blanket in 45-60 minutes. Experienced crafters often finish in 30-40 minutes. The cutting takes longest; tying knots goes quickly once you establish a rhythm.
Can kids make no-sew blankets safely?
Absolutely! Children ages 8 and older can make no-sew blankets with supervision. Adult assistance may be needed for cutting, but kids can handle the tying independently.
It’s an excellent family craft activity or classroom project.